GridDB operation control guide
Revision: 2207
Table of Contents
- 1 Introduction
- 2 Service
- 3 Integrated operation control GUI (gs_admin)
- 4 Cluster operation control command interpreter (gs_sh)
- 4.1 Overview
- 4.2 Using gs_sh
- 4.3 Definition of a GridDB cluster
- 4.3.1 Definition of node variable
- 4.3.2 Definition of cluster variable
- 4.3.3 Defining the SQL connection destination of a cluster
- 4.3.4 Definition of a user
- 4.3.5 Definition of arbitrary variables
- 4.3.6 Displaying the variable definition
- 4.3.7 Saving a variable definition in a script file
- 4.3.8 Executing a script file
- 4.4 GridDB cluster operation controls
- 4.4.1 Cluster status
- 4.4.2 Starting a node
- 4.4.3 Stopping a node
- 4.4.4 Batch entry of nodes in a cluster
- 4.4.5 Batch detachment of nodes from a cluster
- 4.4.6 Node entry in a cluster
- 4.4.7 Detaching a node from a cluster
- 4.4.8 Adding a node to a cluster
- 4.4.9 Displaying cluster status data
- 4.4.10 Displaying configuration data
- 4.4.11 Displaying node status
- 4.4.12 Displaying event log
- 4.5 Data operation in a database
- 4.6 Database management
- 4.7 User management
- 4.8 Container management
- 4.9 Other operations
- 4.10 Options and sub-commands specifications
- 5 Operating commands
- 5.1 Command list
- 5.2 Common functions of operating commands
- 5.3 Points to note during use
- 5.4 Starting/stopping a node
- 5.5 User management
- 5.6 Cluster management
- 5.6.1 Joining a cluster configuration
- 5.6.2 Leaving a cluster configuration
- 5.6.3 Stop all clusters
- 5.6.4 Getting cluster configuration data
- 5.6.5 Getting node status
- 5.6.6 Adding a node to a cluster
- 5.6.7 Manual failover of a cluster
- 5.6.8 Getting partition data
- 5.6.9 Increasing the no. of nodes of the cluster
- 5.6.10 Set up autonomous data redistribution of a cluster
- 5.6.11 Controlling the checkpoint
- 5.7 Log data
- 5.8 Backup/restoration
- 5.9 Maintenance
- 6 Export/import
- 6.1 Overview
- 6.2 Configuration of export/import execution environment
- 6.3 Export function
- 6.3.1 Specifying process target
- 6.3.2 Specifying the output format of a row data file
- 6.3.3 Specifying the output configuration of container data file
- 6.3.4 Specifying the output destination
- 6.3.5 Specifying the number parallel executions
- 6.3.6 Test execution function
- 6.3.7 Error continuation specification
- 6.3.8 Other functions
- 6.4 Import function
- 6.5 Command/option specifications
- 6.6 Format of container data file
- 7 Web API
- 8 Long term archive
- 9 Cluster configuration method other than multicast method
- 10 Annexes
1 Introduction
1.1 Aim & composition of this manual
This manual describes the operating functions of GridDB.
It is written for system designers and system administrators responsible for GridDB system's construction and operation management respectively.
The following subjects are covered in this manual.
-
Service
- This section explains the GridDB service performed automatically during OS start-up.
-
Integrated operation control GUI (gs_admin)
- This section explains the web-based integrated operation control GUI (gs_admin) integrating the operating functions of a GridDB cluster.
-
Cluster operation control command interpreter (gs_sh)
- This section explains the GridDB cluster operation control functions and the command interpreter (gs_sh) to provide data operations.
-
Operating commands
- This section explains the various operating commands of GridDB.
-
Export/import
- This section explains the export/import tools.
-
Web API
- This section explains the Web API that can register rows, acquire rows, and execute a SQL SELECT statement for GridDB cluster.
1.2 Explanation of terms
This section explains the main terms used in the GridDB description.
| Term | Meaning |
|---|---|
| Node | Refers to the individual server process to perform data management in GridDB. |
| Cluster | Single or a set of nodes that perform data management together in an integrated manner. |
| Partition | Logical area where data is stored. It exists only within GridDB, and not visible directly to the user. |
| Partition group | A group of several partitions. |
| It is also a data unit in the file system when perpetuated in a disk. | |
| Row | A chunk of data managed in GridDB, which consists of a key and multiple values. |
| Container (table) | Data structure serving as an I/F with the user. Container to manage a set of rows. It is called a container when operating with NoSQL I/F, and a table when operating with NewSQL I/F. 2 data types exist, collection (table) and timeseries container (timeseries table). |
| Collection (table) | One type of container (table) to manage rows having a general key. |
| Timeseries container (timeseries table) | One type of container (table) to manage rows having a timeseries key. Possesses a special function to handle timeseries data. |
| Master node | The node that performs cluster management. |
| Follower node | All other nodes in the cluster other than the master node. |
| Owner node | Within the replicated containers, it records the location of the master container. |
| Number of nodes constituting a cluster | No. of nodes that can join a cluster. |
| Number of nodes already participating in a cluster | No. of nodes joined to a cluster. |
| Stable state | Cluster state in which the number of nodes already participating in a cluster = number of nodes constituting a cluster. |
Number of data characters used in GridDB.
| Item | Details | Remarks |
|---|---|---|
| Connection server | No maximum value specified | Limits such as 2048 bytes exist |
| depending on Web server and other system dependency. | ||
| Port | 0-65535 | |
| User name | Maximum 32 bytes. 1 or more ASCII alphanumeric characters, | Linux system-dependent |
| "_" (underscore) and numbers cannot be specified as the lead character. | ||
| No case sensitivity. | ||
| Password | No maximum length specified. | Linux system-dependent |
| Cluster name | Maximum length 64 characters. 1 or more ASCII alphanumeric characters, | Dependent on GridDB specifications |
| "_" (underscore) and numbers cannot be specified as the lead character. | ||
| No case sensitivity. | ||
| Path | Maximum 1023 bytes | Linux system-dependent |
| File name | Maximum 255 bytes | Linux system-dependent |
1.3 Access to container (table)
GridDB has a NoSQL interface (NoSQL I/F) and a NewSQL interface (NewSQL I/F). And GridDB manages data using a data structure. It is called a container when operating with NoSQL I/F, and a table when operating with NewSQL I/F. The GridDB Standard Edition supports the NoSQL interface while the GridDB Advanced Edition supports both NoSQL and NewSQL interfaces.
- Containers created by NoSQL I/F can be operated as tables by NewSQL I/F.
- Tables created by NewSQL I/F can be operated as tables by NoSQL I/F.
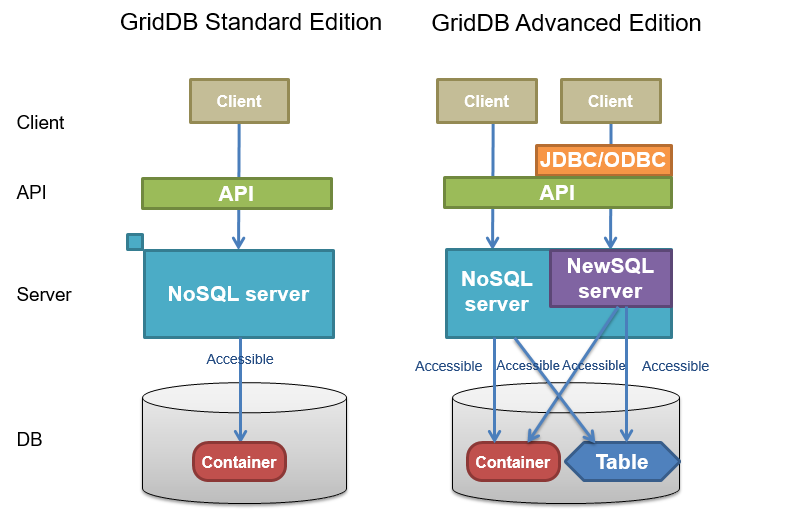
Access range of container and table
1.4 Definition file
The 2 types of definition file used in GridDB are as follows.
- Cluster definition file
- Node definition file
A cluster definition file contains settings that are common in the entire clusters.
A node definition file contains different settings for each node.
These definition file samples are installed at the following locations.
/usr/griddb/                          # installation directory
            conf/                     # sample definition file directory
                 gs_cluster.json.tmpl # cluster definition file sample
                 gs_node.json.tmpl    # node definition file sample
In a new installation, the same files are also placed in the conf directory under the GridDB home directory. During operations, edit these definition files.
/var/lib/gridstore/                    # GridDB home directory
                  conf/                # definition file storage directory
                       gs_cluster.json # (edited) cluster definition file
                       gs_node.json    # (edited) node definition file
Configure the definition file to match the applicable system environment.
[Memo]
- When the GridDB version is upgraded, new parameters may be added to the definition file. Compare the definition file used with the newly-installed sample and reflect the changes where appropriate during use.
2 Service
2.1 Overview
GridDB service is automatically performed during OS start-up to start a GridDB node (hereinafter, node) or GridDB cluster (hereinafter cluster). The node or cluster is stopped when the OS is shut down.
The following can be carried out by the service.
- Start, stop and restart a node (cluster)
- Check the process status of a node (cluster)
2.2 Terms
The terms used are defined below.
| Term | Meaning |
|---|---|
| Service script | Script file is executed automatically during OS startup. It is installed from the GridDB server package in |
/etc/init.d/gridstore and registered in the system as a GridDB service. | |
| PID file | File containing only the process ID (PID) of the gsserver process. This is created in |
$GS_HOME/conf/gridstore.pid when the gsserver process is started. | |
| Start configuration file | File containing the parameters that can be set while in service. Depending on the GridDB server package, |
it is installed in /etc/sysconfig/gridstore/gridstore.conf . |
2.3 Preparing to use the service
The procedure to use and install GridDB service is as follows.
- Install GridDB server package and client package.
- Configure the respective GridDB nodes that constitute a GridDB cluster.
- Configure the start configuration file.
See the “GridDB Quick Start Guide” (GridDB_QuickStartGuide.html) for the procedure to install GridDB and configure a GridDB node.
2.4 Service specifications
2.4.1 Parameters
A list of parameters is available to control the GridDB service operations. By default, nodes and cluster are configured to start and stop when the OS is started and stopped respectively.
A list of the parameters is given below.
| Parameters | Default | Description |
|---|---|---|
| GS_USER | admin | GridDB user name |
| GS_PASSWORD | admin | GS_USER password |
| CLUSTER_NAME | INPUT_YOUR_CLUSTER_NAME_HERE | Cluster name to join |
| MIN_NODE_NUM | 1 | Number of nodes constituting a cluster |
To change the parameters, edit the start configuration file ( /etc/sysconfig/gridstore/gridstore.conf ).
When a server package is updated or uninstalled, the start configuration file will not be overwritten or uninstalled.
[Points to note]
- Do not directly edit a parameter described in service script. The edited file will be lost when the server package is uninstalled or updated. When changing the parameters, edit the start configuration file.
-
When composing a cluster with multiple nodes, use the same parameter file for each node to be attached to the cluster. In particular, if a cluster is expanded by an operation control command, command interpreter, etc. during system operation, the parameter
MIN_NODE_NUMof all the nodes needs to be changed to the number of nodes constituting a cluster after the expansion.
2.4.2 Log
See the boot log( /var/log/boot.log ) and operating command log( $GS_HOME/log ) for details of the service log.
2.5 Functions
GridDB service functions are shown below.
[Points to note]
- Functions other than the status can be executed by a root user only.
2.5.1 start
Action:
-
Start a node and join to a cluster.
# service gridstore start
- This function executes gs_startnode command to start a node and gs_joincluster command to join to a cluster.
- When the gs_startnode command is executed, the system waits for the recovery process to end.
- When the gs_joincluster command is executed, the system doesn't wait for the cluster to start operation.
-
Set the cluster name in
CLUSTER_NAME. -
Set the number of nodes constituting a cluster in
MIN_NODE_NUM.
[Points to note]
- If an error occurs in the middle of a cluster operation, the gsserver process will be stopped.
2.5.2 stop
Action:
-
Leave from a cluster and stop a node.
# service gridstore stop
- End if there are no more processes, and error if the timeout time has passed (termination code 150).
- If there are no processes started by the service, termination code 0 will be returned.
- This function executes gs_leavecluster command to leave a node from a cluster before stopping a node.
- When the gs_leavecluster command is executed, the system waits for the node to leave from the cluster.
- A node stopping process will be performed regardless of the termination code of the gs_leavecluster command.
[Points to note]
- When stopping the cluster, execute the gs_stopcluster command and leave/stop each node by a service stop. If you do not stop the cluster with the gs_stopcluster command, autonomous data arrangement may occur due to node leaving. If data relocation happens frequently, network or disk I/O may become a load. If you leave the node after stopping the cluster, data arrangement will not occur. To prevent unnecessary data arrangement, please use the gs_stopcluster command when stopping the cluster.
- A node started by an operating command or command interpreter (gs_sh) cannot be stopped by a service stop. Use the respective tools to stop the node.
2.5.3 status
Action:
-
Display whether the node process is under execution or not.
# service gridstore status
2.5.4 restart
Action:
- Stop and start continuously.
2.5.5 condrestart
Action:
- Restart if there is a lock file.
2.6 Automatic recovery function
2.6.1 Overview
If the GridDB node abnormally terminates or the node process is forcibly terminated, it will automatically restart the node and join to the cluster. Operation manager does not need to be aware of restoring the cluster status to normal operation.
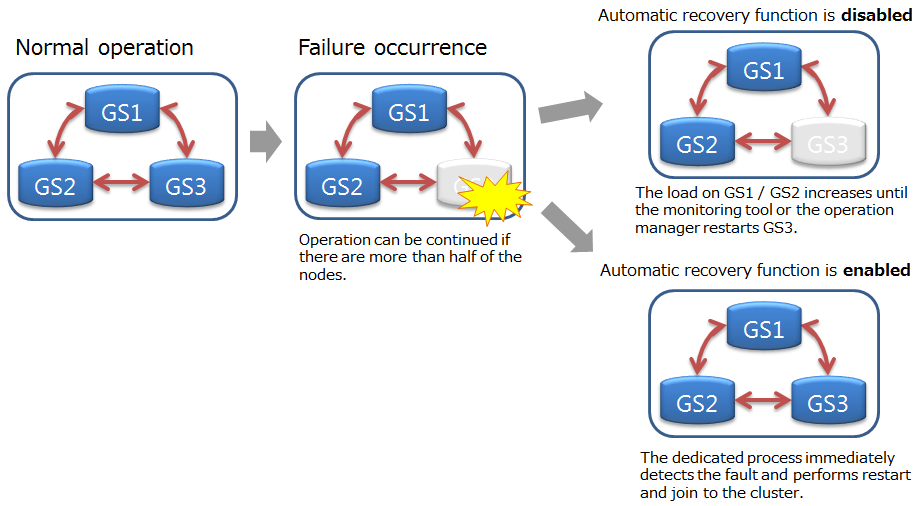
Automatic recovery function
[Points to note]
Automatic restart is not performed in the following cases:
- In case of the user explicitly turns it off.
- In case of an unrecoverable failure (Node status: ABNORMAL).
- In case of trying automatic restart more than 5 times.
- In case of the node is not joined to the cluster before the failure.
2.6.2 Parameters
The parameters of automatic recovery function is as follows.
| Parameter | Default | Value |
|---|---|---|
| SVC_ENABLE_AUTO_RESTART | true | true(Enabled)/false(Disabled) |
| GS_USER | admin | Set as appropriate |
| GS_PASSWORD | admin | Set as appropriate |
To change the parameters, edit the start configuration file ( /etc/sysconfig/gridstore/gridstore.conf ).
SVC_ENABLE_AUTO_RESTART
- Set whether to enable or disable this function.
- This parameter can be changed by restarting the node.
- If you want to control GridDB's fault recovery with another monitoring system, set false.
GS_USER/GS_PASSWORD
- Set the GridDB administrator user name and password.
-
These parameters are used in the following cases:
- a. In case of starting, stopping, restarting by service
- b. In case of the -u option is not specified with the gs_startnode
[Points to note]
- If the specified GS_USER / GS_PASSWORD is invalid, or if these are not specified, the GridDB node will fail to start up.
2.7 Error message list
Service error messages are as shown below.
| Code | Message | Meaning |
|---|---|---|
| F00003 | Json load error | Reading of definition file failed. |
| F01001 | Stop service timed out | Stop node process timed out. |
| F01002 | Startnode error | An error occurred in the node startup process. |
| F01003 | Startnode timed out | Start node process timed out. |
| F01004 | Joincluster error | An error occurred in the join cluster process. |
| F01005 | Joincluster timed out | Join cluster process timed out. |
| F01006 | Leavecluster error | An error occurred in the leave cluster process. |
| F02001 | Command execution error | An error occurred in the command execution. |
| F02002 | Command execution timed out | Command execution timed out. |
[Memo]
- If an error occurs with each command execution, the operating command error will be displayed and recorded at the same time. Refer to the item on operating commands (gs_startnode, gs_joincluster, and gs_leavecluster) as well when troubleshooting errors.
3 Integrated operation control GUI (gs_admin)
3.1 Overview
The integrated operation control GUI (hereinafter described as gs_admin) is a Web application that integrates GridDB cluster operation functions.
The following operations can be carried out using gs_admin.
-
Management and operation of cluster configuration
- Consolidate cluster data and node data in node repository
- Edit node repository
- Operation of cluster configuration
-
Compare cluster and node data
- Display a dashboard to show the performance data and log analysis data
- Cluster status and configuration data
- Node version and data (checkpoint) written to a data disk
- Container data arranged in a node
- Viewing event log of a node, dynamic changes in the event log output level for error analysis purposes
- Execute SQL command on a cluster and display results
-
See node performance data
- Display node performance data in a graph
- The performance data of the node at a specific point is stored and compared with the current performance data
-
Database-related function in a cluster.
- Database list display
- Tree display of database and container
- Create a database in a cluster, delete database from a cluster
- Assign, revoke database access rights for a general user
- Execution of SQL commands on a database, result display (GridDB Advanced Edition only)
-
General user-related functions in a cluster.
- Creating a general user in a cluster, deleting a general user from a cluster
- Changing the password of a general user
-
Container-related functions in a database.
- Create a container in a database, delete a container from a database
- Save the container search and search tree structural
- Container data display and index, trigger settings in a container
- Execute a TQL command on a container (inquiry language) and display results
3.1.1 gs_admin configuration
gs_admin needs to be installed on a machine in which nodes constituting a cluster have been started, or in a machine on the network with the same subnet and multicast distribution.
3.2 Setting up gs_admin
gs_admin is a Web application that runs on Tomcat.
To use gs_admin, Tomcat and Java have to be installed beforehand. The compatible versions are as follows.
- Apache Tomcat 7.0/8.0
- Oracle Java 7/8
In addition, the GridDB versions compatible with gs_admin Ver.4.1 are as follows.
- GridDB Standard Edition Ver.4.1
- GridDB Advanced Edition Ver.4.1
The procedure to use gs_admin is as follows.
- Configure the respective GridDB nodes that constitute a GridDB cluster.
- Install and configure gs_admin.
- Access the gs_admin application URI with a browser, and log in as a gs_admin user.
See the “GridDB Quick Start Guide” (GridDB_QuickStartGuide.html) for the procedure to configure a GridDB node.
The procedure to install and configure gs_admin is as follows.
- Installation of GridDB client package
- Deploy gs_admin.war in Tomcat
- gs_admin user settings
- gs_admin.properties file settings
- Node repository settings
- adminHome rights settings
3.2.1 Installation of client package
Install the GridDB client package (griddb-xx-client-X.X.X-linux.x86_64.rpm).
Log into a machine installed with the Web application as a root user, and install the package using the command below.
# rpm -Uvh griddb-xx-client-X.X.X-linux.x86_64.rpm
(*) xx indicates the GridDB edition. (se, ae, ve)
(*) X.X.X indicates the GridDB version.
When a client package is installed, a directory named admin is created in the GridDB home directory ( /var/lib/gridstore/admin ). This directory ( /var/lib/gridstore/admin ) is known as adminHome hereinafter.
gs_admin configuration data and data used by gs_admin are installed in adminHome. As there are functions in gs_admin to operate adminHome files, the appropriate rights need to be set. Rights settings will be described later.
The configuration under adminHome is as follows.
capture/                                                # snapshot storage directory (*)
        [Node address]_[port no.]/YYYYMMDDHHMMSS.json   # snapshot file (*)
conf/                                                   # configuration file directory
     gs_admin.properties                                # static parameter file to be configured initially
     gs_admin.settings                                  # dynamic parameter file to configure display-related settings
     password                                           # gs_admin user definition file
     repository.json                                    # node repository file
log/                                                    # log file directory of gs_admin (*)
    gs_admin-YYYYMMDD.log                               # log file (*)
tree/                                                   # structural file directory of container tree (*)
     foldertree-[cluster name]-[user name].json         # folder tree file (*)
Files and directories marked with a (*) are created automatically by gs_admin.
[Points to note]
- Files and directories under adminHome will not be deleted even if the client package is uninstalled. Manually delete the files if they are not required.
3.2.2 Deployment in Tomcat
gs_admin is a Web application that runs on Tomcat. To use gs_admin, there is a need to deploy the gs_admin war file in Tomcat. Tomcat settings are omitted in this section.
The deployment procedure is as follows.
Deploy the war file included in the GridDB client package (griddb-xx-client-X.X.X-linux.x86_64.rpm) in Tomcat.
When a client package is installed, war file is installed under the following directory.
- /usr/griddb/web/gs_admin.war
Copy gs_admin.war to the webapps directory under the Tomcat installation directory.
$ cp /usr/griddb/web/gs_admin.war [Tomcat installation directory]/webapps
3.2.3 gs_admin user settings
When using gs_admin, perform authentication as a gs_admin user.
Administrator users of GridDB clusters under management need to be set up as gs_admin users.
The gs_admin user definition file is found in /var/lib/gridstore/admin/conf/password .
This file will not be created when a client package is installed.
To use this easily, copy the user definition file of the node in the cluster you want to manage ( /var/lib/gridstore/conf/password ) to the gs_admin user definition file ( /var/lib/gridstore/admin/conf/password ). In this case, all administrator users listed in the copied user definition file will become gs_admin users.
[Memo]
- See User management for details about user management in GridDB.
- See Managing multiple clusters if you want to manage multiple clusters in gs_admin.
3.2.4 gs_admin.properties file settings
The configuration file is found in /var/lib/gridstore/admin/conf/gs_admin.properties . Set together with the GridDB cluster configuration as a gsadm user.
Reload the Web application if the property file has been overwritten.
gs_admin.properties contains the following settings.
| Parameters | Default | Description |
|---|---|---|
| adminUser | admin | Set the gs_admin administrator user. |
| Multiple user names can be set by separating the names with commas. A gs_admin administrator user may use the following functions. | ||
| - Cluster operation function | ||
| - Repository management function | ||
| ospassword | - | Set the password of the node gsadm user (OS user). |
| The following functions can be used when the password is set. | ||
| - Node start operation (Start) in the cluster operation functions | ||
| - OS data display screen |
[Memo]
-
When installing GridDB, gsadm is registered as an OS user to use GridDB. As no password has been set up in a gsadm user, a password needs to be set up in advance if you want to set up
ospasswordin gs_admin.
3.2.5 Node repository settings
Node repository files are files to centrally manage cluster configuration data and node data ( /var/lib/gridstore/admin/conf/repository.json ). They are used to specify cluster under management and cluster operation functions. Set together with the GridDB cluster configuration as a gsadm user.
The default file contents are as follows.
{
    "header" : {
        "lastModified" : "",
        "version" : "2.7.0"
    },
    "clusters" : [
        {
            "name" : "INPUT_YOUR_CLUSTER_NAME_HERE",
            "address" : "239.0.0.1",
            "port" : 31999,
            "jdbcAddress" : "239.0.0.1",
            "jdbcPort" : 41999
        }
    ],
    "nodes" : [
        {
            "address" : "192.168.1.10",
            "port" : 10040,
            "sshPort" : 22,
            "clusterName" : "INPUT_YOUR_CLUSTER_NAME_HERE"
        }
    ]
}
To configure a node repository, either edit the file directly or use the repository management screen. When configuring using the repository management screen, see the functions on the repository management screen and Starting management of a cluster in operation with gs_admin (recommended).
Use of the operation control command or command interpreter (gs_sh) is recommended when performing cluster configuration for the first time.
3.2.6 adminHome rights setting
Files and directories are created automatically by gs_admin under adminHome. As a result, a Tomcat execution user requires read and write rights to adminHome. Therefore, owners of files and directories under adminHome are changed to Tomcat execution users (tomcat by default) beforehand.
Change the owner as a root user.
# chown -R tomcat:tomcat /var/lib/gridstore/admin
[Memo]
-
The default directory of adminHome is
/var/lib/gridstore/adminbut this can be changed by changing the Web application settings. Change the value ofadminHomein/webapps/gs_admin/WEB-INF/classes/conf/gs_adminPath.propertiesunder the Tomcat home (/usr/local/tomcatby default).
[Points to note]
- When upgrading the gs_admin version, gs_adminPath.properties is recreated when the war file is reinstalled. The value of gs_adminPath.properties needs to be reset if it is going to be changed in the operations.
3.3 Login and login destination screen
3.3.1 Login screen
Access the application URI below to access gs_admin.
http://[Tomcat operating machine address]:8080/gs_admin
he login screen appears when you access the gs_admin application URI.
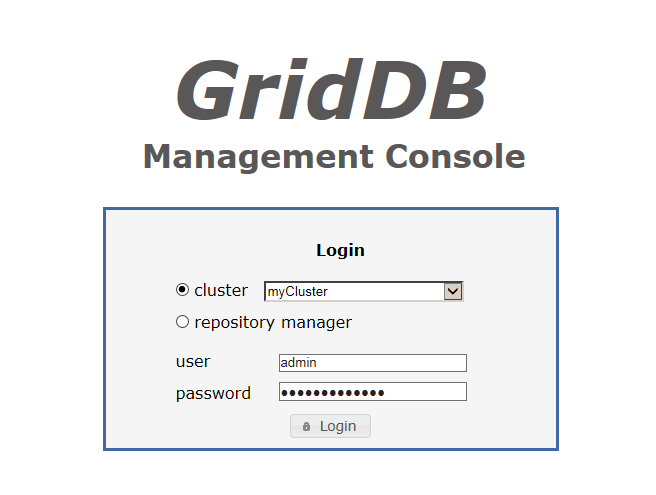
Login screen
In the log-in screen, you can choose from 2 different environment; cluster or repository manager. In the former option, you need to select the cluster that you would like to manage from the drop-down list. Once logged in, you will be taken to the Integrated operation control screen
On the other hand, for the latter option, you will be taken to the Repository management screen.
When logging in, enter the user name and password of the gs_admin user in the user and password box respectively, and click the Login button.
[Memo]
- The port no. of the Tomcat operating machine differs depending on the environment. Default port is 8080.
- It is possible to log into the integrated operation control screen even if the node has not been started.
3.3.2 Integrated operation control screen
The integrated operation control screen is shown below.
Integrated operation control screen
The integrated operation control screen is made up of the following elements.
| Element | Abbreviation | Location | Function |
|---|---|---|---|
| Tree view | Tree | Left | Display, select a list of operating targets |
| Data display and input section | View | Right | Data display and data input subject to operation |
| Menu area | - | Top | Log out |
| Message area | - | Bottom | - |
Tree function
In Tree, a cluster or container can be selected as the main operation target by switching tabs at the top.
| Tab | Tree name | Main functions |
|---|---|---|
| ClusterTree | Cluster tree | Display a list of the clusters and nodes, select the operating targets |
| ContainerTree | Container tree | Display a list of the databases, search for containers, select operating targets |
View function
In View, the tab displayed at the top of View differs for each operating target selected in Tree. The function can be switched by selecting the tab at the top.
See the items of each tree and screen for details.
3.3.3 Repository management screen
This function can be used by a gs_admin administrator user only.
Select repository manager in the login screen and login as a gs_admin administrator user to arrive at the repository management screen.
The repository management screen is shown below.
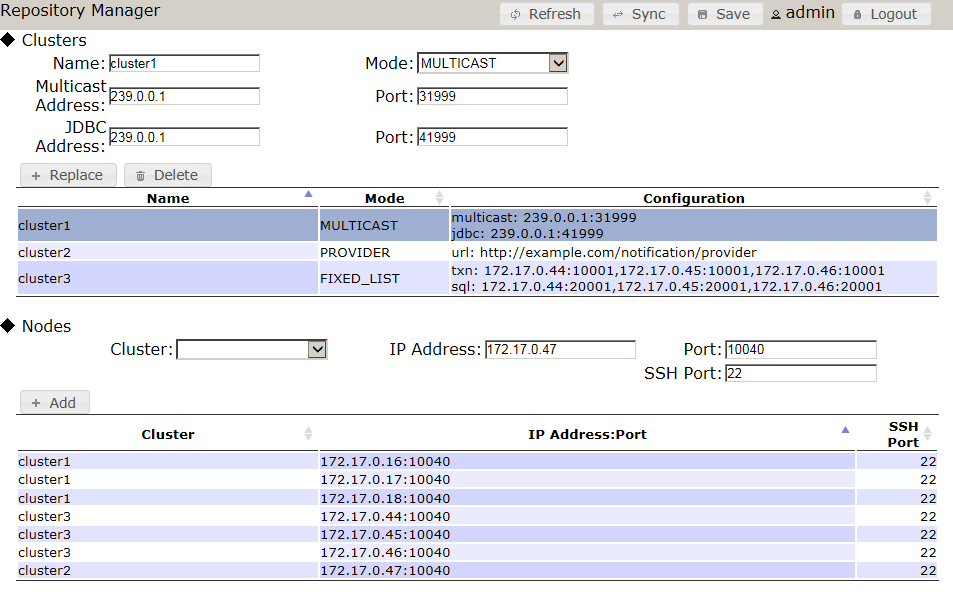
Repository management screen
The following functions are available in the repository management screen.
-
Displaying repository data
-
Display of the node repository file (
/var/lib/gridstore/admin/conf/repository.json) is divided into 2 sections. The top half of the screen shows the cluster data, whereas the bottom half displays the node data.
-
Display of the node repository file (
-
Editing repository data
- Any changes/edit in the repository data will not be applied unless it is saved.
-
To add clusters and nodes to the repository, enter the cluster and node data in the boxes provided, and click the Add button.
- A cluster cannot be added or replaced when the cluster name is duplicated.
- A node cannot be added or replaced when the combination of the IP address and port is duplicated.
-
Replace and Delete can be performed by selecting a row in the table.
- Upon selecting a row, the contents of the row will be copied to the input column.
- Multiple rows cannot be selected.
-
Besides the cluster name, one of the following data is required to add or replace a cluster depending on the cluster connection method.
- If the cluster connection method is "MULTICAST": multicast address, multicast port
- If the cluster connection method is "FIXED_LIST": connection destination list of the fixed list method
- If the cluster connection method is "PROVIDER": provider URL of the provider method
- IP address and port are required to add or replace a node.
- When deleting a cluster, if there are registered nodes in the deleted cluster after deletion, a dialog to confirm deletion of the cluster from these nodes will appear. Select Yes to delete.
-
Cluster synchronization
- Data of a cluster in operation can be acquired and registered in a repository.
-
Click the Sync button to display the dialog for inputting the IP address and port. Enter the IP address and port of any node constituting the cluster here, select Sync, and click Yes in the confirmation dialog to overwrite and update the display in the repository management screen.
- The specified node need not be a master node.
-
Specify
/system/serviceAddressof the node definition file (gs_node.json) as the IP address. -
Specify
/system/servicePortof the node definition file (gs_node.json) as the port. - SSH port is registered as 22 by default.
-
Updating repository data
- Click the Refresh button to import the node repository file again.
- Unsaved contents will be discarded.
-
Saving repository data
- Click the Save button to save the contents displayed on the screen.
- As long as the data is not saved yet, no changes will be made to the node repository file.
The specifications of the input column are as follows.
Cluster
-
Cluster name (Name)
-
Specify
/cluster/clusterNameof the cluster definition file (gs_cluster.json).
-
Specify
-
Cluster connection method (Notification Mode)
-
Select one of the following from the drop-down box
- Multicast method: MULTICAST
- Fixed list method: FIXED_LIST
- Provider method: PROVIDER
-
Select one of the following from the drop-down box
-
Multicast address (Multicast Address)
-
Specify
/transaction/notificationAddressof the cluster definition file (gs_cluster.json). - Must be specified when using the multicast method.
-
Specify
-
Multicast port (Multicast Port)
-
Specify
/transaction/notificationPortof the cluster definition file (gs_cluster.json). - Must be specified when using the multicast method.
-
Specify
-
JDBC address (JDBC Address)
-
Specify
/sql/notificationAddressof the cluster definition file (gs_cluster.json). - Specify when using the multicast method. (optional)
- This is necessary when using the SQL screen in the GridDB Advanced Edition.
-
Specify
-
JDBC port (JDBC Port)
-
Specify
/sql/notificationPortof the cluster definition file (gs_cluster.json). - Specify when using the multicast method. (optional)
- This is necessary when using the SQL screen in the GridDB Advanced Edition.
-
Specify
-
Connection destination list of fixed list method (Transaction Member)
-
Combine the
/cluster/notificationMember/transaction/addressand/cluster/notificationMember/transaction/portin the cluster definition file (gs_cluster.json) with a “:” and specify the value of each node by separating them with a comma. - Example: 192.168.10.1:10001,192.168.10.2:10001,192.168.10.3:10001
-
Combine the
-
Connection destination list of fixed list method (SQL Member)
-
Combine the
/cluster/notificationMember/sql/addressand/cluster/notificationMember/sql/portin the cluster definition file (gs_cluster.json) with a “:” and specify the value of each node by separating them with a comma. - Example: 192.168.10.1:20001,192.168.10.2:20001,192.168.10.3:20001
-
Combine the
-
Provider URL of provider method (Provider URL)
-
Specify
/cluster/notificationProvider/urlof the cluster definition file (gs_cluster.json). - This is necessary when using the provider method.
-
Specify
Node
-
Cluster
- Select a registered cluster in the selection box.
-
IP Address
-
Specify
/system/serviceAddressof the node definition file (gs_node.json).
-
Specify
-
Port
-
Specify
/system/servicePortof the node definition file (gs_node.json).
-
Specify
-
SSH Port
- Specify the SSH port of the machine with operating nodes. Default port is 22.
3.4 Cluster tree-related functions
3.4.1 Cluster tree
Summary
In a cluster tree, the nodes constituting a cluster under management, i.e the repository nodes (clusterName is the cluster under management) are displayed in a tree format.
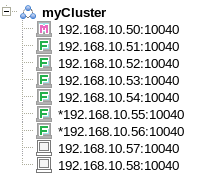
Cluster tree
An * will appear at the beginning of a node which has not been registered in the repository.
A description of the icons shown in a cluster tree is given below.
| Icon | Description |
|---|---|
 | Cluster |
 | Master node |
 | Follower node |
 | Started node |
 | Stopped node |
 | Status unconfirmed node |
 | Message |
Context menu
When an element of the tree is right clicked, a context menu appears according to which element is clicked, cluster or node. Data update and element operation can then be performed by selecting an item from the menu.
The menus and functions for the respective selected elements are as follows.
| Selected element | Menu | Function |
|---|---|---|
| Cluster | refresh | Get list of nodes in a tree again |
| Node | refresh | Display the latest node information in View |
Operating target and view tab
When an element in the tree is left clicked, the functions appear in the View according to which element is clicked, cluster or node. The function can be changed by tapping the top section of the View.
| Selected element | Tab | Screen name | Function |
|---|---|---|---|
| Cluster | Dashboard | Dashboard screen | Display a variety of data in the entire cluster. |
| Status | Cluster status screen | Display configuration data and information of cluster under management. | |
| Monitor | OS data display screen | Display OS data of a machine with operating nodes. | |
| Configuration | Cluster operation screen | Cluster operations such as startup and termination of node can be carried out. | |
| Node | System | System data screen | Display system data of the node. |
| Container | Container list screen | Display a list of containers stored in the node. | |
| Performance | Performance data screen | Display performance data of the node as a graph. | |
| Snapshot | Snapshot screen | Display the measured performance values in a table. The values can be compared with the values measured earlier. | |
| Log | Log screen | Display the event log of a node and the output level of an event log can be set. |
[Memo]
- If the master node of a cluster is changed, re-acquisition of the node list may fail. Log out once first before logging in again.
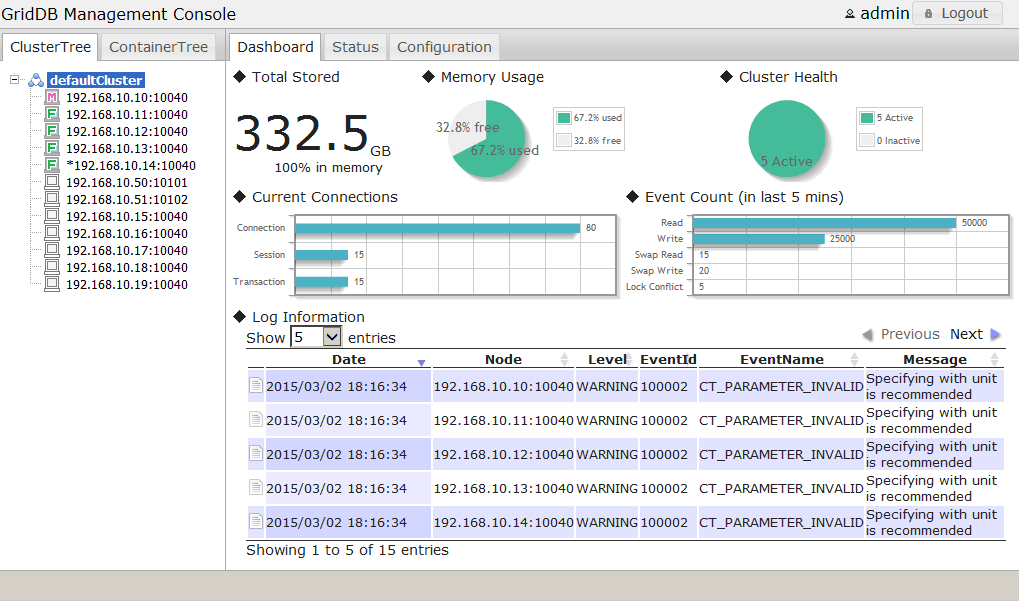
3.4.2 Dashboard screen
Summary
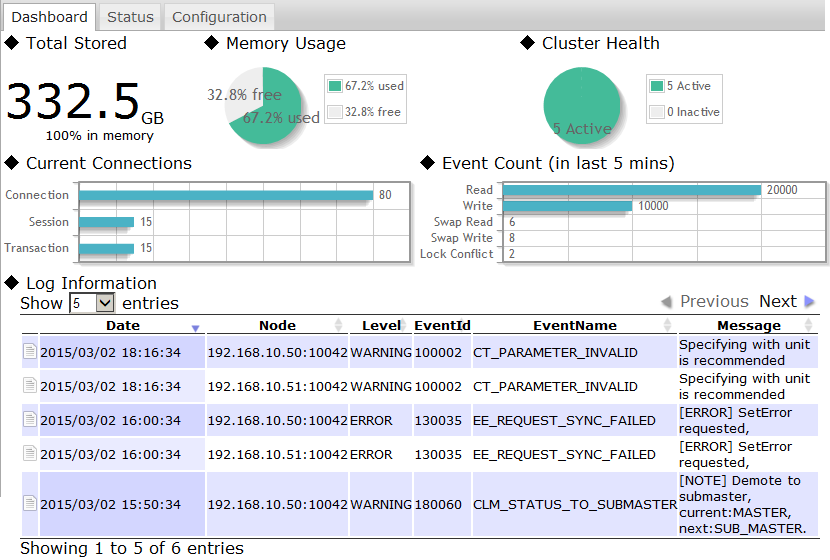
The dashboard screen contains a variety of information related to the entire cluster such as memory usage, cluster health, log information, etc.
Method of use
| Type of tree | Operating target | Tab |
|---|---|---|
| Cluster tree | Cluster | Dashboard |
Screen
Dashboard screen
Functions
The following functions are available in the dashboard screen.
-
Total volume of data in the cluster (◆Total Stored)
- Display the total volume of data in the cluster along with its unit. (KB - TB)
- The % of the total volume of data saved in the memory is also displayed.
-
Total amount of memory used (◆Memory Usage)
- The utilization rate of memory is displayed on a pie chart.
-
Cluster health (◆Cluster Health)
- Display the proportion of operating nodes and non-operating nodes on a pie chart.
-
Network connection in a cluster (◆Current Connections)
- Display the current connection, session and number of transactions of the cluster on a bar chart.
-
Number of cluster events (in the past 5 minutes) (◆Event Count)
- Display the read command, write command, swap read, swap write and event count of the lock bids which occurred in the past 5 minutes in a cluster.
- *Past 5 minutes refers to the past 5 minutes starting from the time the latest performance data is output to the log.
-
Log analysis data (◆Log Information)
- Display the WARNING and ERROR logs of each node constituting a cluster.
- Move and hover the cursor to the icon on the far left to display detailed data of the target log.
3.4.3 Cluster status screen
Summary
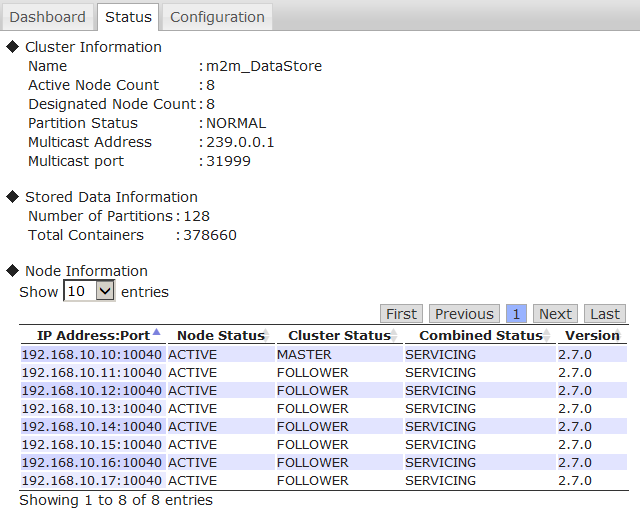
The cluster status screen displays the current cluster's and node's configuration data and information such as the cluster's name, active node count, number of partitions, and the node's IP address, etc., as shown below.
Method of use
| Type of tree | Operating target | Tab |
|---|---|---|
| Cluster tree | Cluster | Status |
Screen
Cluster status screen
Functions
The cluster status screen is comprised of the following components.
-
Cluster data display (◆Cluster Information)
-
Display the following data acquired from a master node.
- Cluster name, operation node number, number of nodes constituting a cluster, partition status, multicast address and port
-
Display the following data acquired from a master node.
-
Data-related information display (◆Stored Data Information)
-
Display the following data acquired from a cluster.
- No. of partitions, total no. of containers
-
Display the following data acquired from a cluster.
-
Display data on nodes constituting a cluster (◆Node Information)
-
Display the following data of each node.
- IP address and port, node status, cluster status, composite status, node version
- Composite status is the status of a node displayed on the cluster operation screen.
-
Display the following data of each node.
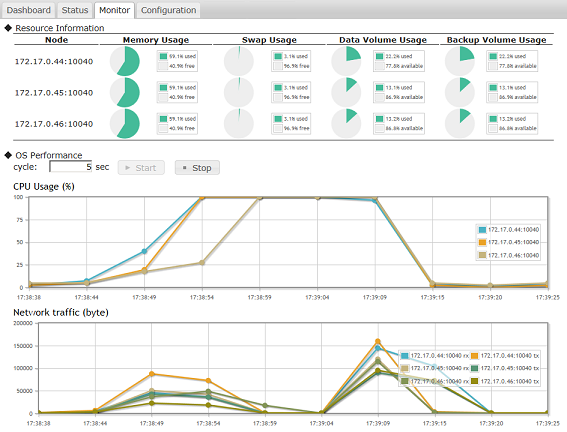
3.4.4 OS data display screen
Summary
The OS data display screen is comprised of two components, Resource Information and OS Performance of the current cluster. The GridDB performance analysis, and the CPU and Network load status are displayed by pie charts and line graphs respectively.
Method of use
| Type of tree | Operating target | Tab |
|---|---|---|
| Cluster tree | Cluster | Monitor |
Screen
OS data display screen
Functions
The OS data display screen is comprised of the following components.
-
Display resource Information of a node (◆Resource Information)
-
Display the following data acquired from a node.
- CPU utilization rate
- Memory, swap memory capacity, utilization rate
- Capacity of data directory and backup directory, disk utilization rate
-
Display the following data acquired from a node.
-
OS performance data display (◆OS Performance)
-
Click the Start button to get the performance data from the node at the specified cycle interval and draw 2 graphs.
- CPU utilization rate
- Network transfer volume
-
Click the Start button to get the performance data from the node at the specified cycle interval and draw 2 graphs.
[Memo]
-
This function cannot be used if the
ospasswordhas not been set up in gs_admin.properties. - This setting is necessary in order to connect to the node execution environment from the gs_admin execution environment as an OS user “gsadm”. See the manual of each OS for details on the SSH connection procedure.
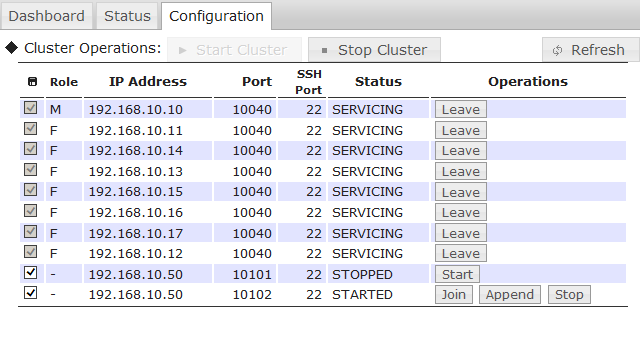
3.4.5 Cluster operation screen
This function can be used by the gs_admin administrator only.
Summary
The cluster operations screen consists of a list of table of the running nodes, as well as the start and end node features.
Method of use
| Type of tree | Operating target | Tab |
|---|---|---|
| Cluster tree | Cluster | Configuration |
Screen
Cluster operation screen
Functions
The following functions are available in the cluster operation screen.
-
Displaying list of nodes
-
The cluster operation screen can display three of the following types of nodes, which have been registered to the repository:
- Nodes that constitute the actual cluster (displayed at the top of the table)
- Nodes that have been allocated to the current (being managed) cluster but do not constitute (not yet configured to) the actual cluster
- Nodes that have NOT been allocated to any cluster
-
The cluster operation screen can display three of the following types of nodes, which have been registered to the repository:
-
Displaying node data
-
The following data is available for each of the nodes.
- Cluster registration status (check box)
- Role in the cluster (Role)
- IP address and port, and SSH port
- Node status
- The cluster registration status indicates whether the nodes are registered in the current cluster.
- There are 3 types of role - master node (M), follower node (F), and unassigned role (-).
- Node status appears only for the nodes that constitute the actual cluster, and the nodes that have been allocated to the current (being managed) cluster but do not constitute (not yet configured to) the actual cluster
-
The following data is available for each of the nodes.
-
Registration and removal of nodes
- *Contents of a node repository are edited by this function.
- Click the check box next to the cluster registration status to register or delete a node to/from a cluster.
- In this screen, only nodes that have been registered into a cluster can be operated.
- When a cluster is in operation, the check box is disabled.
-
Cluster operations components
-
Start cluster
- Compose a cluster with all the nodes registered in the cluster.
- This command can be executed only when the node status of all the nodes is STARTED.
-
Stop cluster
- Stop a cluster in operation.
- This command can be executed only when the cluster is in operation.
-
Start cluster
-
Node operations components
-
Executable operating buttons will appear in the operations column of each node.
- Display buttons differ depending on the node status.
-
Starting a node (Start)
- Start a node which has been stopped (status STOPPED)
-
Joining a cluster (Join)
- Add or re-add a node to a cluster.
-
Leave a cluster (Leave)
- Remove a node from the active cluster.
-
Increase the number of nodes in a cluster (Append)
- Increase the no. of nodes of the active cluster.
-
Stopping a node (Stop)
- Stop the node in operation.
- Cannot be executed while a cluster is operating. Stop the node after removing it from the cluster.
-
Executable operating buttons will appear in the operations column of each node.
[Memo]
- To start a node, this setting is necessary in order to connect to the node execution environment from the gs_admin execution environment as an OS user “gsadm”. See the manual of each OS for details on the SSH connection procedure.
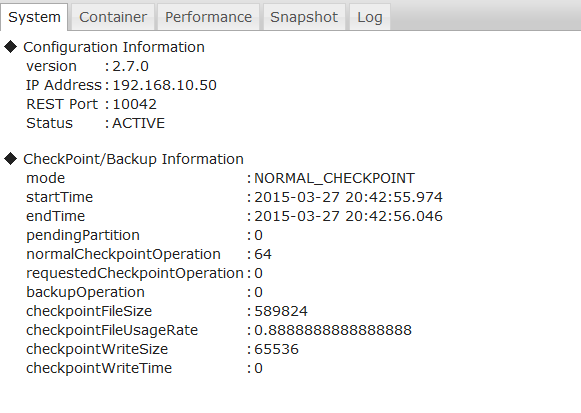
3.4.6 System data screen
Summary
The system data screen is comprised of configuration and checkpoint/backup information.
Method of use
| Type of tree | Operating target | Tab |
|---|---|---|
| Cluster tree | Node | System |
Screen
System data screen
Functions
The following functions are available in the system data screen.
-
Displaying node data (◆Configuration Information)
-
Display the following data acquired from a node.
- Node version, IP address and port, node status
-
Display the following data acquired from a node.
-
Displaying checkpoint, backup data (◆ CheckPoint/Backup Information)
- Display the number of checkpoint executions, number of backups performed, etc., as shown in the screenshot above.
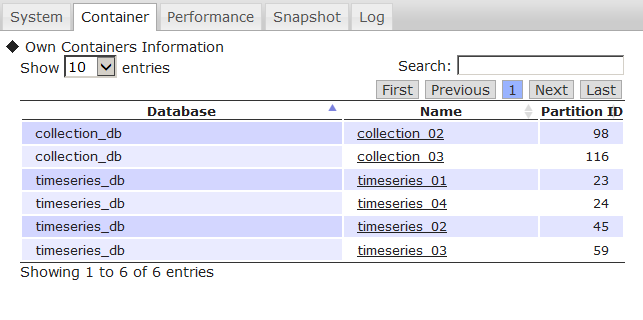
3.4.7 Container list screen
Summary
The container list screen contains containers information such as the name of the containers and to which database it belongs to.
Method of use
| Type of tree | Operating target | Tab |
|---|---|---|
| Cluster tree | Node | Container |
Screen
Container list screen
Functions
The following functions are available in the container list screen.
-
Displaying the container list (◆Own Containers Information)
-
Display a list of the containers stored in a node.
- Display the database name, container name and partition ID.
-
Display a list of the containers stored in a node.
-
Hyperlink to the container details screen
- Click on the container name to move to the container details screen and get detailed information of the container.
[Memo]
- The container tree needs to be initialized before moving to the container details screen. If the container details cannot be displayed, click the ContainerTree tab on the Tree once to initialize the container tree.
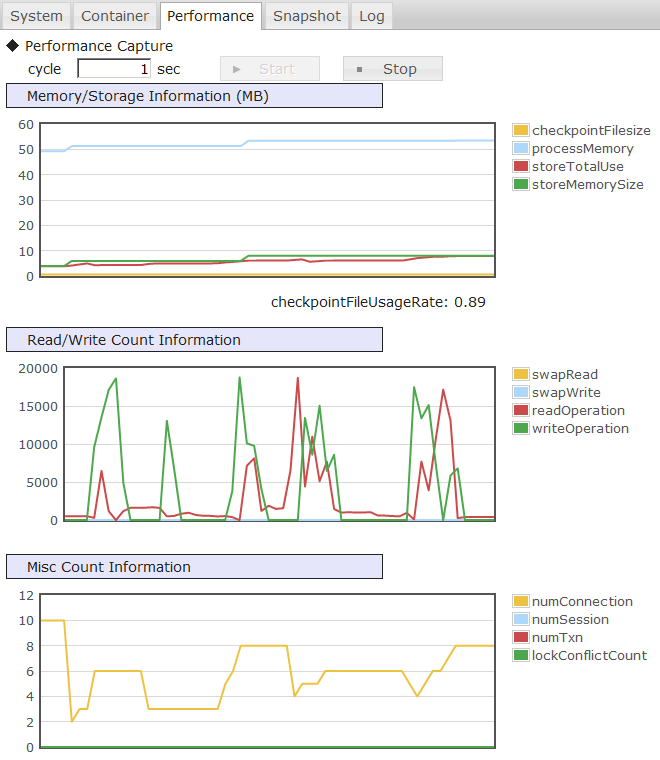
3.4.8 Performance data screen
Summary
The performance data screen shows graphical representation of the node's performance such as memory/storage, read/write count, and misc. count information.
Method of use
| Type of tree | Operating target | Tab |
|---|---|---|
| Cluster tree | Node | Performance |
Screen
Performance data screen
Functions
The following functions are available in the performance data screen.
-
Plot a graph (◆Performance Capture)
- Clicking the Start button will bring up 3 graphs showing the performance of the node at a specified interval.
- The operation can be stopped with the Stop button.
-
Memory/Storage Information
- Display the volume of data saved in the memory and stored in a disk.
- Unit is in MB.
-
Read/Write Count Information
- Display the number of times the memory or disk is read from or written to over time.
-
Misc Count Information
- Display the current connection, session, transaction, and number of lock bids generated.
3.4.9 Snapshot screen
Summary
The snapshot screen shows the node's performance at a point in time. The values can be compared with the values measured earlier.
Method of use
| Type of tree | Operating target | Tab |
|---|---|---|
| Cluster tree | Node | Snapshot |
Screen
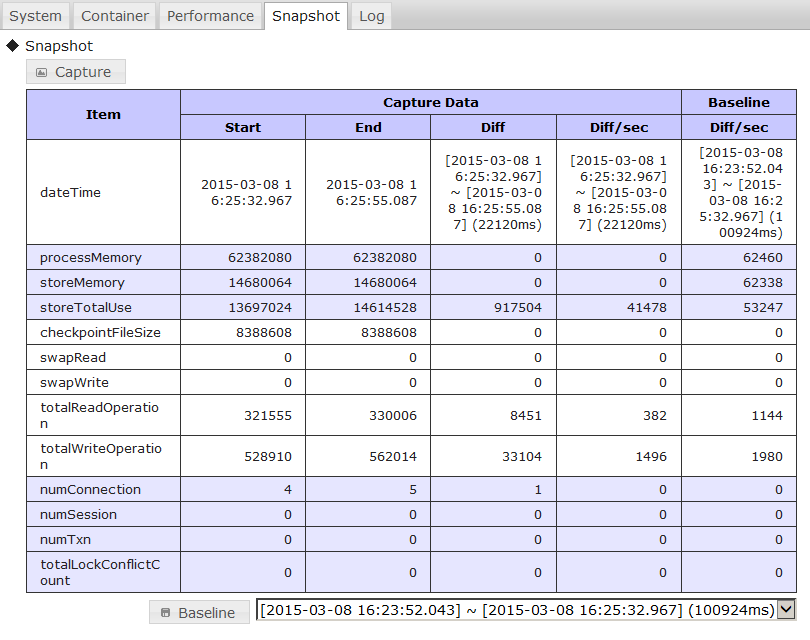
Snapshot screen
Functions
The following functions are available in the snapshot screen.
-
Gathering of performance data
- Click the Capture button to get the current performance data of the node.
-
Differential display
- Click the Capture button several times to save and display the baseline and the difference (Diff) between the previous performance data (Start) and current performance data (End).
-
Display and save baseline
- Click the Baseline button to save the displayed differential value per second as the Baseline.
- Saved data can be selected from the selection box. Only the latest 10 cases will be displayed in the selection box.
- The baseline is saved in the capture directory of adminHome with the time indicated in Start as its name.
3.4.10 Log screen
Summary
The log screen contains the event log information of a node and the corresponding setting of its output level.
Method of use
| Type of tree | Operating target | Tab |
|---|---|---|
| Cluster tree | Node | Log |
Screen
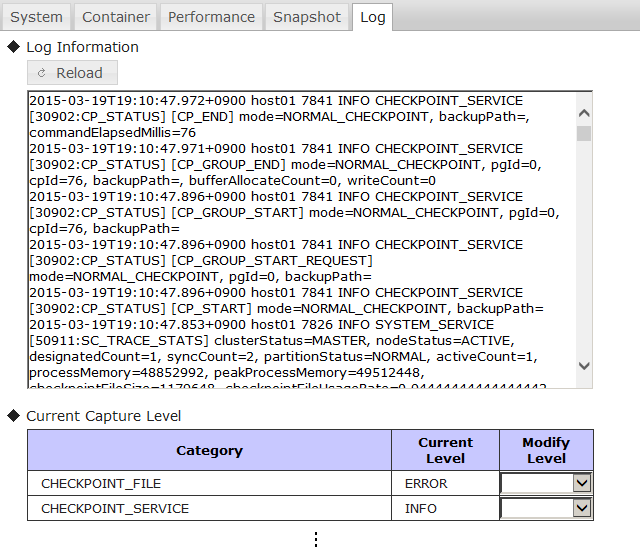
Log screen
Functions
The following functions are available in the log screen.
-
Displaying event log (◆Log Information)
- Display the last 30 event logs of the node.
- Event logs can be acquired again with the reload button.
-
Event log output level display setting (◆Current Capture Level)
- The current event log output level can be checked for each category.
- The log output levels are ERROR, WARNING, INFO and DEBUG.
-
The changed log level is initialized by restarting the node.
- Edit the node definition file (gs_node.json) of the target node to be perpetuated.
[Points to note]
- Be sure to follow the instructions of the support desk when changing the log output level.
3.5 Container tree-related functions
3.5.1 Container tree
Summary
In a container tree, the databases and containers which exist in a cluster under management are displayed in a tree format.
The cluster under management is displayed at the top of the tree (the figure within the parentheses () refer to the total number of databases in the cluster).
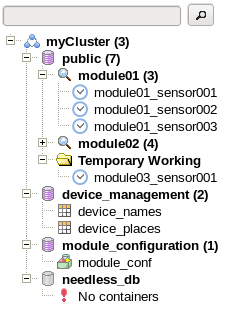
Container tree
A description of the icons shown in a container tree is given below.
| Icon | Description |
|---|---|
| Cluster |
 | Database |
 | Database (does not exist) |
 | Container (collection) |
 | Container (timeseries container) |
 | Partitioned table (container) |
 | Search folder |
 | Temporary work folder |
| Message |
Functions
The following functions are available in a container tree.
-
Displaying cluster operation functions
- Upon selecting a cluster, a list of functions such as database creation etc. will appear in View.
-
Auto detection of database
- Automatically detects all databases existing in a cluster and displays them under the cluster.
- If the displayed database no longer exists in the cluster, it can be deleted from the Tree.
-
Selecting database subject to operation
- Upon selecting a database, a list of functions such as container creation etc. will appear in View.
-
Searching for container
- Containers in each database can be searched using key words. Search conditions can be added by separating them with a single-byte space.
- A search is conducted by selecting a database or search folder, entering the key words in the search bar at the top, and then clicking the search button or pressing the Enter key.
- A search folder is created during a search. Figure within parentheses () indicates the number of containers found.
- Search results can be filtered by stratifying the search folder.
- Search folders can be deleted with the context menu or Delete key. Even if it is deleted, containers in clusters that are displayed in the folder will not be deleted.
-
Deleting container
- A container can be deleted from a cluster with the context menu or Delete key. Display a confirmation dialog prior to deletion.
-
Selecting container subject to operation
- Icon changes depending on the type of container selected.
- Upon selecting a container, detailed information etc. of the container will appear in View.
-
Temporary work folder
- This folder is created under the database when a container is created in the container creation screen, or when the container name is clicked from the container data screen.
- Can be deleted with the context menu or Delete key. Even if it is deleted, containers in clusters that are displayed in the folder will not be deleted.
-
Saving tree structure
- Tree structure after the search is saved and imported during the next login. (File differs for each cluster and user)
- Objects saved include clusters, databases and search folders. Search results, containers and temporary work folders will not be saved.
-
These are saved in
/var/lib/gridstore/admin/tree/foldertree-[cluster name]-[user name].jsonin the Tomcat operating machine.
After login, the ClusterTree tab and node list are displayed automatically. Upon switching to the ContainerTree tab, the tree structure of the container tree will be added automatically if it has been saved. However, search folders will not be searched again automatically.
The following operations cannot be carried out in a container tree.
-
Search for containers across the database
- Containers in a cluster cannot be searched across a database.
-
Creation/deletion of database
- Perform the operation from the database management screen.
-
Creation of container
- Perform the operation from the container creation screen.
-
Deletion of partitioned table (container)
- Perform the operation from the SQL screen with a SQL command.
Context menu
When an element of the tree is right clicked, a context menu appears according to which element is clicked, cluster or node. Data update and element operation can then be performed by selecting an item from the menu.
The menus and functions for the respective selected elements are as follows.
| Selection element | Menu | Function |
|---|---|---|
| Cluster | refresh | Read the tree structure of the tree again and automatically detect the database |
| Database | refresh | Check the database existence and search for containers again |
| Container | refresh | Display the latest container information in View |
| drop | Deletion of container (with confirmation dialog) | |
| Search folder | refresh | Search for container again |
| remove | Deletion of folder | |
| Temporary work folder | remove | Deletion of folder |
[Memo]
- Each function of a container tree can be used only when a cluster is in operation.
Operating target and view tab
When an element in the tree is left clicked, the functions appear in the View according to which element is clicked, cluster or node. The function can be changed by tapping the top section of the View.
| Selection element | Tab | Screen name | Function overview |
|---|---|---|---|
| Cluster | Database | Database management screen | A database can be created or deleted, and access rights can be assigned or revoked. |
| User | User management screen | A general user can be created or deleted and the password can be changed. | |
| SQL | SQL screen | The results of a SQL command executed on the database can be displayed. | |
| Database | Create | Container creation screen | A container can be created in a database. |
| SQL | SQL screen | The results of a SQL command executed on the database can be displayed. | |
| Container | Details | Container details screen | Column and index configuration data of a container will be displayed. |
| Index | Index setting screen | An index can be created or deleted for each column of a container. | |
| Trigger | Trigger setting screen | A container trigger can be created, edited or deleted. | |
| TQL | TQL screen | Execute a TQL (query language) on a container and display the results. | |
| Partitioned table | Details | Container details screen | Column, index and table partitioning data of a container will be displayed. |
| (container) |
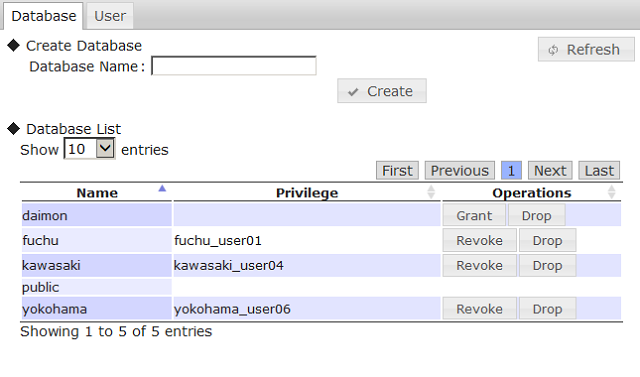
3.5.2 Database management screen
Summary
The database management screen contains two components, database creation and deletion function, and configuration of access rights (grant, revoke, drop, etc.) for database users.
Method of use
| Type of tree | Operating target | Tab |
|---|---|---|
| Container tree | Cluster | Database |
Screen
Database management screen
Functions
The following functions are available in the database management screen.
-
Creating database (◆Create Database)
- Input the database name and click the Create button to create a database in a cluster.
-
Displaying database list (◆Database List)
-
Display a list of the databases existing in a cluster.
- Display the database name, access rights (Privilege), and operations in the database.
- Display general users who have access rights to the database in the access rights (Privilege) column.
- Public database cannot be operated.
-
Display a list of the databases existing in a cluster.
-
Deleting database (Drop)
- Delete a database from a cluster.
- An error will occur if a container exists in the database.
-
Assignment of access rights (Grant)
- Assign database access rights to a general user.
- Click Grant to display the user selection dialog. A general user existing in a cluster can be selected from the selection box.
- Only one general user has access rights to the database.
- A single user can have access rights to multiple databases.
-
Revoking access rights (Revoke)
- Revoke database access rights from a general user.
- In the user management screen tab, when a general user is deleted from the user list, all access rights of that user will be automatically deleted.
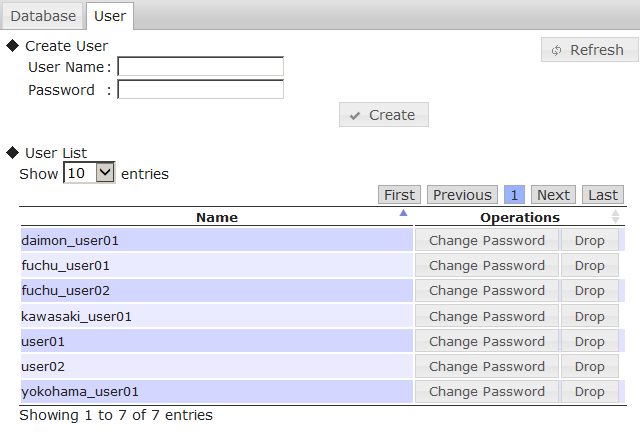
3.5.3 User management screen
Summary
In the user management window, addition and deletion of general user, as well as modification of the password can be performed.
Method of use
| Type of tree | Operating target | Tab |
|---|---|---|
| Container tree | Cluster | User |
Screen
User management screen
Functions
-
Creating a user (◆Create User)
- Input the desired user name and password, and click the Create button to register a general user into the cluster.
-
Displaying a list of the users (◆User List)
-
Display a list of the general users existing in the cluster.
- Display the user name and operation on the user.
-
Display a list of the general users existing in the cluster.
-
Deleting user (Drop)
- Delete a general user from the cluster.
- If the user has access rights to the database, all access rights will be automatically revoked.
-
Changing password (Change Password)
- The password of a user can be changed. The original password is not needed.
- Click Change Password to display the input dialog for a new password. Enter the new password and click Change to change the password.
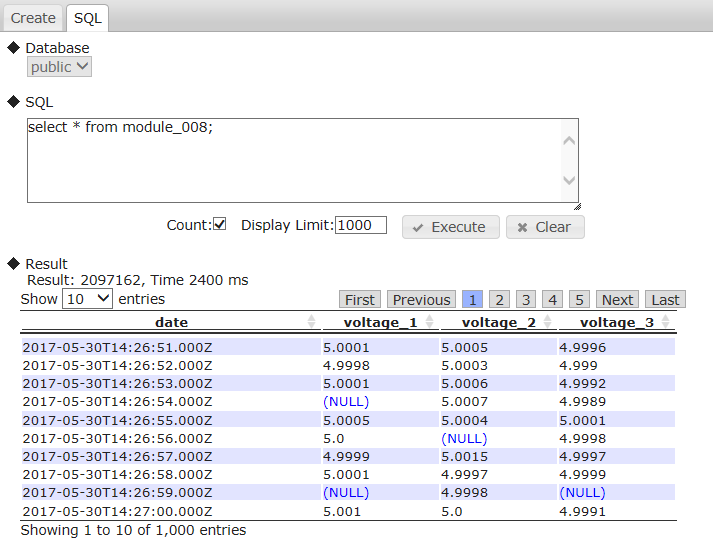
3.5.4 SQL screen
This function can be used in the GridDB Advanced Edition only.
Summary
The results of a SQL command executed on the database are displayed.
Method of use
| Type of tree | Operating target | Tab |
|---|---|---|
| Container tree | Cluster | SQL |
| Container tree | Database | SQL |
Screen
SQL screen
Functions
The following functions are available in the SQL screen.
-
Selecting a database subject to execution (◆Database)
- A database existing in a cluster can be selected with the selection box.
- If a database is selected in a container tree, it will be fixed in the selected database.
-
SQL execution (◆SQL)
-
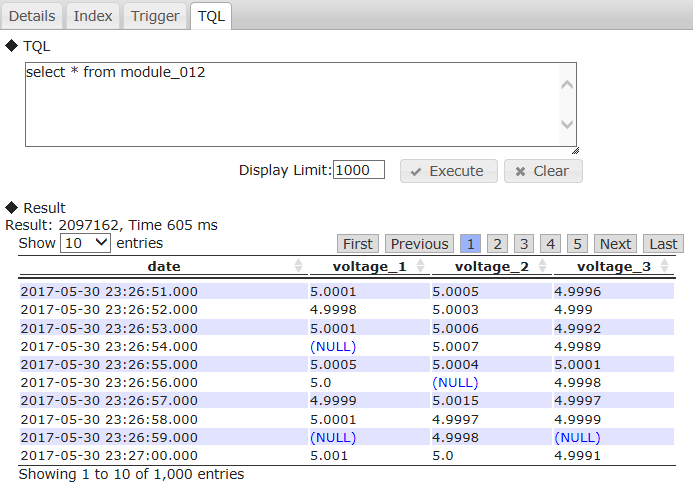
Enter the SQL command and click the Execute button to execute the command. The results are displayed in ◆Result.
- Although a new line can be returned for input to be carried out, there is only 1 SQL command that can be executed.
- Inputs can be deleted with the Clear button.
- By setting Count, the number of hits is displayed. Otherwise, the number is not displayed. (In the latter case, by not getting the number, the response is faster).
- The number of rows to display is indicated in Display Limit.
- See “GridDB Advanced Edition SQL Reference” (GridDB_AE_SQL_Reference.html) for details of the SQL syntax that can be used.
-
Enter the SQL command and click the Execute button to execute the command. The results are displayed in ◆Result.
-
Displaying result (◆Result)
-
If the SELECT command is executed, the number of hits, the number of rows located, and elapsed time (ms) will be displayed (in a table format).
- The execution time of the SQL statement is displayed as elapsed time in ms.
- A NULL value and a value of array type are displayed as (NULL). A value of BLOB is displayed as (BLOB).
-
A value of TIMESTAMP is displayed as following format:
- Date and time format: ISO8601 format
- Timezone: UTC
- Example: 2018-11-07T12:30:00.417Z
- If the INSERT/DELETE/UPDATE command is executed, the no. of rows will be displayed. If other DCL commands or DDL commands are executed, SUCCESS will be displayed in the results.
-
If the SELECT command is executed, the number of hits, the number of rows located, and elapsed time (ms) will be displayed (in a table format).
[Memo]
-
When using this screen, the JDBC address and port need to be added to the cluster data of the node repository.
- Settings in the node repository can be executed from the repository management screen.
- When the number of displaying columns is over 1024, the number of displaying rows at once is decreased and some displaying formats are changed.
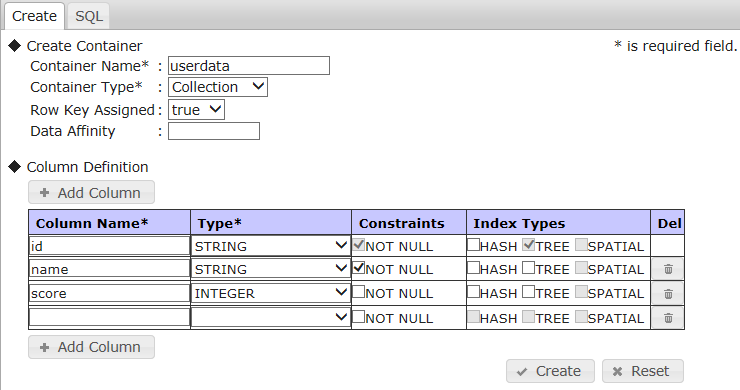
3.5.5 Container creation screen
Summary
The container creation window allows for creation of container and modification of the column.
Method of use
| Type of tree | Operating target | Tab |
|---|---|---|
| Container tree | Database | Create |
Screen
Container creation screen (collection)
Container creation screen (timeseries container)
Functions
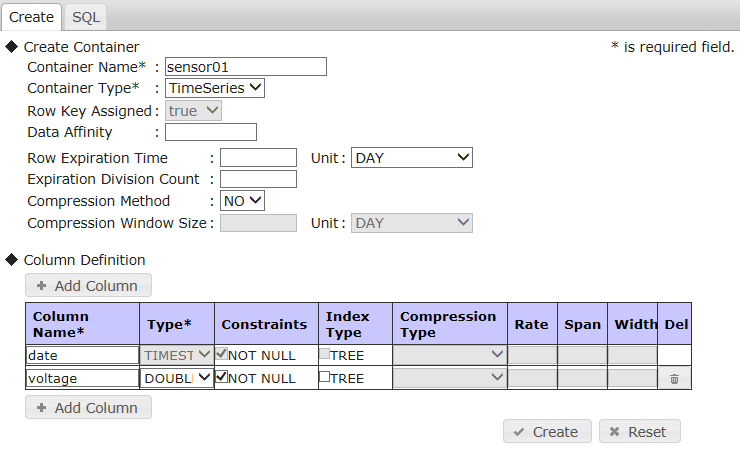
The following functions are available in the container creation screen.
-
Creating a container
- Specify the container name and container type, followed by the parameters according to the container type, and then click the Create button to create a container in a database.
-
Selection of container type
- The container type can be either a collection (Collection) or timeseries container (TimeSeries).
- The parameters and column contents that can be set differ depending on the container type.
-
Column settings
- Column settings can be configured when creating a container. The upper limit of the number of columns is 100.
- A column can be added with the Add Column button and deleted with the Del button on the right side of the column.
- All settings except the container type can be returned to their initial status with the Reset button.
-
If Row Key Assigned is set to true when a collection is selected for the container type, the first column will be set up as the row key.
- When a row key is set up, the data type of the first column will be limited to those that can be used. And a NOT NULL constraint will be fixed as true.
- If a timeseries container is selected for the container type, the data type of the first column will be fixed as TIMESTAMP and index settings will be disabled. And a NOT NULL constraint will be fixed as true.
-
Add to container tree
- If a container is created successfully, a temporary work folder will be created under the database of the container tree and the created container will be added automatically under the folder.
[Memo]
- See “GridDB API reference” (GridDB_API_Reference.html) for the detailed settings.
3.5.6 Container details screen
Summary
The container details screen contains column and index configuration data of a container.
Method of use
| Type of tree | Operating target | Tab |
|---|---|---|
| Container tree | Container | Details |
Screen
Container details screen
Functions
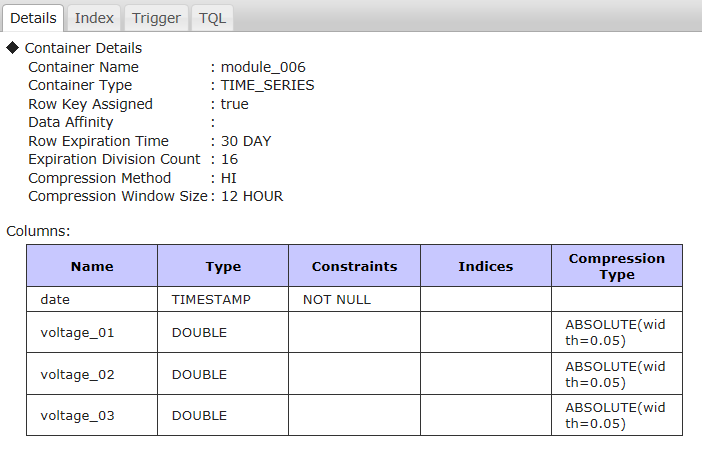
The following functions are available in the container details screen.
-
Display container parameters
- Displaying the container parameters, including the container name, container type etc.
-
Displaying column data of a container
-
Display the following data as column data of a container.
- Column name, data type, column constraints, index, compression data (timeseries container only), table partitioning data (partitioned table only)
-
Display the following data as column data of a container.
3.5.7 Index setting screen
Summary
Index setting window allows an index to be created or deleted for each column of a container.
Method of use
| Type of tree | Operating target | Tab |
|---|---|---|
| Container tree | Container | Index |
Screen
Index setting screen
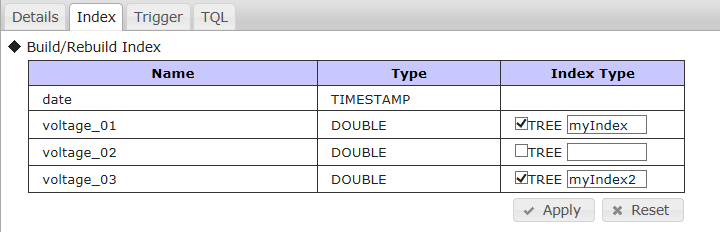
Functions
The following functions are available in the index setting screen.
-
Index setting of a column (◆Build/Rebuild Index)
- Select/deselect a check box and click the Apply button to create/delete the target index.
- An index name can be specified in textbox.
- Click the Reset button to dismiss any changes made to the index.
[Memo]
- If the index name is changed and apply, the index is recreated.
- The upper limit of the number of operative columns in this screen is 100.
3.5.8 Trigger setting screen
Summary
The trigger setting screen allows for configuration of the container's trigger such creation, edit and deletion.
Method of use
| Type of tree | Operating target | Tab |
|---|---|---|
| Container tree | Container | Trigger |
Screen
Trigger setting screen
Functions
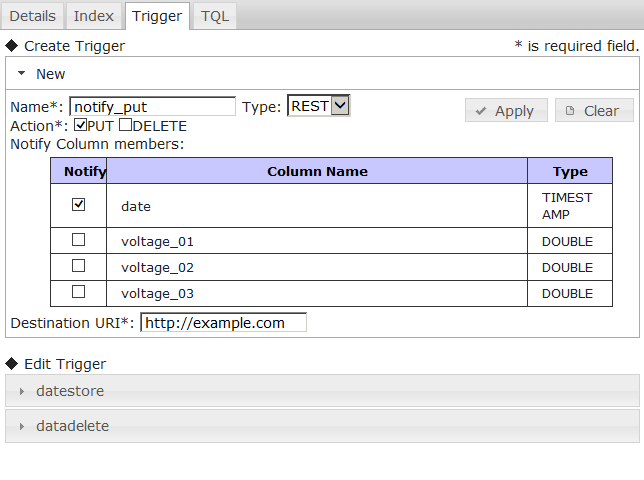
The following functions are available in the trigger setting screen.
-
Creating a trigger (◆Create Trigger)
- To create a trigger in the container, first click New to bring up the configuration boxes. Then, once the setting has been set, click the Apply button to complete the process.
- Click the Clear button to dismiss the changes and return to the default values.
- The trigger name (Name), operation under management (Action), and notification destination URI (Destination URI) are essential items. If the notification method (Type) is set to JMS, the notification name (Destination Name) in the JMS settings becomes necessary to fill in.
- Notification methods (Type) include REST and JMS. Settings vary depending on the notification method.
- The operation under monitoring (Action) is set up by ticking the PUT and DELETE check boxes.
- The column under monitoring (Notify Column members) is set up by ticking the check box.
-
Editing a trigger (◆Edit Trigger)
- When the list of triggers appear, click on the trigger's name to bring up its configuration.
- Only destination URI (Destination URI) and JMS settings can be edited.
- Click the Apply button to save the edited contents.
- Click the Delete button to delete the trigger.
- Click the Clear button to clear the settings.
[Memo]
- See “GridDB API reference” (GridDB_API_Reference.html) for the details.
3.5.9 TQL screen
Summary
In the TQL screen, the TQL (query language) on a container can be executed and the corresponding results can be displayed.
Method of use
| Type of tree | Operating target | Tab |
|---|---|---|
| Container tree | Container | TQL |
Screen
TQL screen
Functions
The following functions are available in the TQL screen.
-
TQL execution (◆TQL)
- Input the TQL command and click the Execute button to execute the command. The results will be displayed in ◆Result.
- Although a new line can be used as an input, 1 TQL command can be executed at a time.
- The FROM phrase can be omitted since this command will be executed on containers subject to the operation.
- The input box can be cleared with the Clear button.
- The number of rows to display is indicated in Display Limit.
-
Displaying result (◆Result)
-
Display the number of hits, the number of rows located (in a table format), and elapsed time (ms). The number of hits is not displayed for a partitioned table.
- The execution time of the TQL statement is displayed as elapsed time in ms.
- A NULL value is displayed as (NULL). A value of BLOB is displayed as (BLOB).
-
A value of TIMESTAMP is displayed as following format:
- Date and time format: ISO8601 format
- Timezone: UTC
- Example: 2018-11-07T12:30:00.417Z
-
Display the number of hits, the number of rows located (in a table format), and elapsed time (ms). The number of hits is not displayed for a partitioned table.
[Memo]
- See “GridDB API Reference” (GridDB_API_Reference.html) for the TQL details.
- When the number of displaying columns is over 1024, the number of displaying rows at once is decreased and some displaying formats are changed.
3.6 How to use gs_admin
This section provides a guide on how to use various functions accessible by gs_admin.
3.6.1 Commencing management of a cluster in operation
To manage the current active cluster in gs_admin, use the repository management function and follow the procedure below.
- Select the repository manager in the login screen and login as a gs_admin administrator user.
-
Click the Sync button, enter the following data of any cluster in operation, and then click Sync to synchronize the data.
-
Specify
/system/serviceAddressof the node definition file (gs_node.json) as the IP address. -
Specify
/system/servicePortof the node definition file (gs_node.json) as the port.
-
Specify
- Data of a cluster in operation will be reflected in the cluster list and node list.
- Click the Save button to save repository data.
- Click the Logout button to return to the login screen.
- Select the name of the cluster in operation from the list of clusters on the login screen.
- Log in as a gs_admin administrator user or a normal user to commence the operating functions.
3.6.2 Managing multiple clusters
When managing multiple clusters as a single gs_admin user, take note of the gs_admin user settings.
gs_admin user is managed in a single file, therefore if an administrator managing multiple clusters use different passwords for each of the cluster, the admin cannot be specified as a gs_admin user.
Therefore, the appropriate settings need to be configured according to number of admin in charge of the entire clusters.
-
When multiple clusters are managed by different users
- Choose unique names for each of the gs_admin users.
-
When multiple clusters are managed by a single user
- Register gs_admin users with the same password in all the clusters to-be-managed.
The procedure to register a new gs_admin user is shown below.
-
Use the gs_adduser command to add an administrator user to a single node among the clusters that you want to manage as a new user.
Example: If the new user name/password is gs#newuser/newuser
$ su - gsadm
$ gs_adduser gs#newuser -p newuser
$ cat /var/lib/gridstore/conf/password
admin,8c6976e5b5410415bde908bd4dee15dfb167a9c873fc4bb8a81f6f2ab448a918
gs#newuser,9c9064c59f1ffa2e174ee754d2979be80dd30db552ec03e7e327e9b1a4bd594e
system,6ee4a469cd4e91053847f5d3fcb61dbcc91e8f0ef10be7748da4c4a1ba382d17
- Distribute the above-mentioned user definition file to all the other nodes of the cluster that you want to manage as a new user.
- All nodes will be restarted to reconstitute the cluster.
-
Add the user name and password added above to the gs_admin user definition file as a Tomcat execution user.
Example: If the new user name/password is gs#newuser/newuser
$ echo gs#newuser,9c9064c59f1ffa2e174ee754d2979be80dd30db552ec03e7e327e9b1a4bd594e >> /var/lib/gridstore/admin/conf/password
3.7 Gathering of error data
(1) Log output
gs_admin error data and other logs are output to the adminHome log directory.
The log output level can be set in the /webapps/gs_admin/WEB-INF/classes/logback.xml under the Tomcat home directory ( /usr/local/tomcat by default).
The output level is INFO by default.
This command is used in collecting data when a gs_admin problem occurs, or when there is a request from the support desk, etc.
<?xml version="1.0" encoding="UTF-8" ?>
<configuration>
        <property resource="conf/gs_adminPath.properties" />

        <appender name="FILE" class="ch.qos.logback.core.rolling.RollingFileAppender">
                <rollingPolicy class="ch.qos.logback.core.rolling.TimeBasedRollingPolicy">
                        <fileNamePattern>${adminHome}/log/gs_admin-%d{yyyyMMdd}.log</fileNamePattern>
                        <maxHistory>10</maxHistory>
                </rollingPolicy>

                <encoder>
                        <pattern>%d{yyyy-MM-dd HH:mm:ss.SSS} %level [%thread] %logger [%file::%line] %msg%n</pattern>
                </encoder>
        </appender>

        <root level="info">
                <appender-ref ref="FILE" />
        </root>
</configuration>
(2) Performance data collection
During gs_admin troubleshooting, the parameter to collect performance data is found in gs_admin.properties.
By setting this parameter (logging.performance) to true, performance data will be added to the data output under adminHome/log. The default value is false.
3.8 Error list
| Error type | Error no. | Message | Treatment method |
|---|---|---|---|
| Internal Server Error | E00104 | Cluster is not servicing. | Cluster under management is not operating. Use the configuration tab and other operation tools to operate the cluster, refresh the clusters from the cluster tree, or login again. |
| Internal Server Error | E00105 | D10135: Failed to check a node status. | Nodes from Ver.1.5 or lower may have been registered in the nodes registered in the repository. Check the version of each node. |
| Internal Server Error | Failed to create <File path>. | File creation failed. Check if there is any directory which does not exist in the displayed path, or any directory for which access rights of Tomcat user have not been assigned. | |
| Internal Server Error | E0030C | [Code:******] <Error message> | Error message of GridDB node. |
| See “GridDB Errorcode List” and check the countermeasure with the corresponding code. | |||
| Bad Request | E00300 | Container "Container name" already exists. | Container name is duplicated. Specify another container name to create a container. |
| Bad Request | E00303 | Container "Container name" not found. | Specified container does not exist. Right click the ContainerTree cluster, select refresh and search for the container again. |
| Bad Request | [Code:******] <Error message> | Error message of GridDB node. | |
| See “GridDB Errorcode List” and check the countermeasure with the corresponding code. | |||
| Input Error | <Field name> is required. | The input field has been left blank. Enter a value in the <Field name> input file. | |
| Input Error | <Field name> is invalid. | An invalid value has been entered in the <Field name> input field. Follow the operation control guide for the possible types of value. |
4 Cluster operation control command interpreter (gs_sh)
4.1 Overview
The cluster operation control command interpreter (hereinafter referred to gs_sh) is a command line interface tool to manage GridDB cluster operations and data operations.
The following can be carried out by gs_sh.
-
Operation control of GridDB cluster
- Definition of GridDB cluster
- Starting and stopping a GridDB node and cluster
- Displaying status and logs
-
GridDB cluster data operation
- Database and user management
- Displaying collection and trigger
- Index setting, deletion
- Search using a TQL/SQL
[Memo]
- All functions provided in the GridDB operating commands are planned to be provided as gs_sh sub-commands. Where possible, use of gs_sh is recommended as there is a possibility that the operating commands may be deleted in future releases. See the chapter on “Operating Commands” for details of the operating commands.
4.2 Using gs_sh
4.2.1 Preliminary preparations
Carry out the following preparations before using gs_sh.
-
GridDB setup
- Installation of GridDB node and client library
- User creation
- Network setting (GridDB cluster definition file, node definition file)
See the chapter on “System Design & Construction” in the “GridDB Quick Start Guide” (GridDB_QuickStartGuide.html) for details on the procedure.
-
Remote connection setting using SSH
- This setting is necessary in order to connect to each GridDB node execution environment from the gs_sh execution environment as an OS user “gsadm”.
*See the manual of each OS for details on the SSH connection procedure.
4.2.2 gs_sh start-up
There are two types of start modes in gs_sh.
-
Startup in interactive mode
- The interactive mode is started when gs_sh is executed without any arguments. The gs_sh prompt will appear, allowing sub-commands to be entered.
-
Example:
$ gs_sh
// execution of sub-command “version”
gs> version
gs_sh version 2.0.0
[Memo]
-
When a sub-command is started in the interactive mode,
- a .gssh_history file is created in the home directory of the execution user and saved in the history.
- Click the arrow key to display/execute up to 20 sub-commands started earlier.
- Enter some of the sub-commands and click the Tab key to display a list of the sub-command input candidates.
-
When a sub-command is started in the interactive mode,
-
Startup in batch mode
- When the script file for user creation is specified in gs_sh, the system will be started in the batch mode. Batch processing of a series of sub-commands described in the script file will be carried out. gs_sh will terminate at the end of the batch processing.
-
Example:
// specify the script file (test.gsh) and execute
$ gs_sh test.gsh
[Memo]
- Execute gs_sh commands as the OS user “gsadm”.
- During gs_sh startup, .gsshrc script files under the gsadm user home directory are imported automatically. The .gsshrc contents will also be imported to the destination from other script files.
- Extension of script file is gsh.
- A script file is described using the character code UTF-8.
4.3 Definition of a GridDB cluster
The definition below is required in advance when executing a GridDB cluster operation control or data operation.
- Define each node data in the node variable
- Use the node variable to define the GridDB cluster configuration in the cluster variable
- Define the user data of the GridDB cluster
An explanation of node variables, cluster variables, and how to define user data is given below. An explanation of the definition of an arbitrary variable, display of variable definition details, and how to save and import variable definition details in a script file is also given below.
4.3.1 Definition of node variable
Define the IP address and port no. of a GridDB node in the node variable.
-
Sub-command
setnode <Node variable> <IP address> <Port no.> [<SSH port no.>] -
Description of each argument
Argument Description Node variable Specify the node variable name. If the same variable name already exists, its definition will be overwritten. IP address Specify the IP address of the GridDB node (for connecting operation control tools). Port no. Specify the port no. of the GridDB node (for connecting operation control tools). SSH port no. Specify the SSH port number. Number 22 is used by default. -
Example:
//Define 4 GridDB nodes
gs> setnode node0 192.168.0.1 10000
gs> setnode node1 192.168.0.2 10000
gs> setnode node2 192.168.0.3 10000
gs> setnode node3 192.168.0.4 10000
[Memo]
- Only single-byte alphanumeric characters and the symbol "_" can be used in the node variable name.
-
Check the GridDB node “IP address” and “port no. ” for connecting the operation control tools in the node definition file of each tool.
- “IP address”: /system/serviceAddress
- “Port no.” : /system/servicePort
4.3.2 Definition of cluster variable
Define the GridDB cluster configuration in the cluster variable.
-
Sub-command
setcluster <Cluster variable> <Cluster name> <Multicast address> <Port no.> [<Node variable> ...] setcluster <Cluster variable> <Cluster name> FIXED_LIST <Address list of fixed list method> [<Node variable> ...] setcluster setcluster <Cluster variable> <Cluster name> PROVIDER <URL of provider method> [<Node variable> ...] -
Description of each argument
Argument Description Cluster variable Specify the cluster variable name. If the same variable name already exists, its definition will be overwritten. Cluster name Specify the cluster name. Multicast address [For the multicast method] Specify the GridDB cluster multicast address (for client connection). Port no. [For the multicast method] Specify the GridDB cluster multicast port no. (for client connection). Node variable Specify the nodes constituting a GridDB cluster with a node variable. When using a cluster variable in a data operation sub-command, the node variable may be omitted. Address list of fixed list method [For fixed list method] Specify the list of transaction addresses and ports for /cluster/notificationMember in gs_cluster.json. Example: 192.168.15.10:10001,192.168.15.11:10001 URL of provider method [For provider method] Specify the value of /cluster/notificationProvider in gs_cluster.json. -
Example:
// define the GridDB cluster configuration
gs> setcluster cluster0 name 200.0.0.1 1000 $node0 $node1 $node2
[Memo]
- Only single-byte alphanumeric characters and the symbol "_" can be used in the cluster variable name.
- Prepend a "$" to the node variable name.
-
Check the “cluster name”, “multicast address” and “port no.” defined in a cluster variable in the cluster definition file of each GridDB node.
- “Cluster name”: /cluster/clusterName
- “Multicast address”: /transaction/notificationAddress
- “Port no.”: /transaction/notificationPort
*All settings in the cluster definition file of a node constituting a GridDB cluster have to be configured the same way. If the settings are configured differently, the cluster cannot be composed.
In addition, node variables can be added or deleted for a defined cluster variable.
-
Sub-command
modcluster <Cluster variable> add | remove <Node variable> ... -
Description of each argument
Argument Description Cluster variable Specify the name of a cluster variable to add or delete a node. add | remove Specify "add" when adding node variables, and "remove" when deleting node variables. Node variable Specify node variables to add or delete a cluster variable. -
Example:
//Add a node to a defined GridDB cluster configuration
gs> modcluster cluster0 add $node3
//Delete a node from a defined GridDB cluster configuration
gs> modcluster cluster0 remove $node3
[Memo]
- Prepend a "$" to the node variable name.
4.3.3 Defining the SQL connection destination of a cluster
Define the SQL connection destination in the GridDB cluster configuration. This is set up only when using the GridDB NewSQL interface.
-
Sub-command
setclustersql <Cluster variable> <Cluster name> <SQL address> <SQL port no.> setclustersql <Cluster variable> <Cluster name> FIXED_LIST < SQL address list of fixed list method> setclustersql <Cluster variable> <Cluster name> PROVIDER <URL of provider method> -
Description of each argument
Argument Description Cluster variable Specify the cluster variable name. If the same variable name already exists, the SQL connection data will be overwritten. Cluster name Specify the cluster name. SQL address [For multicast method] Specify the reception address for the SQL client connection. SQL port no. [For multicast method] Specify the port no. for the SQL client connection. SQL address list of fixed list method [For fixed list method] Specify the list of sql addresses and ports for cluster.notificationMember in gs_cluster.json. Example: 192.168.15.10:20001,192.168.15.11:20001 URL of provider method [For provider method] Specify the value of cluster.notificationProvider in gs_cluster.json. -
Example:
//Definition method when using both NoSQL interface and NewSQL interface to connect to a NewSQL server
gs> setcluster    cluster0 name 239.0.0.1 31999 $node0 $node1 $node2
gs> setclustersql cluster0 name 239.0.0.1 41999
[Memo]
- Only single-byte alphanumeric characters and the symbol "_" can be used in the cluster variable name.
- This is set up only when using the GridDB NewSQL interface.
- When an existing cluster variable name is specified, only the section containing SQL connection data will be overwritten. When overwriting, the same method as the existing connection method needs to be specified.
- Execute only this command when using SQL only.
-
Check the “SQL address” and “SQL port no.” defined in a cluster variable in the cluster definition file of each GridDB node.
- “SQL address”: /sql/notificationAddress
- “SQL port no.”: /sql/notificationPort
4.3.4 Definition of a user
Define the user and password to access the GridDB cluster.
-
Sub-command
setuser <User name> <Password> [<gsadm password>] -
Description of each argument
Argument Description User name Specify the name of the user accessing the GridDB cluster. Password Specify the corresponding password. gsadm password Specify the password of the OS user 'gsadm'. This may be omitted if start node (startnode sub-command) is not going to be executed. -
Example:
//Define the user, password and gsadm password to access a GridDB cluster
gs> setuser admin admin gsadmpass
[Memo]
-
The user definition is divided and stored in the variables below.
Variable Name Value user User name password Password ospassword gsadm password - Multiple users cannot be defined. The user and password defined earlier will be overwritten. When operating multiple GridDB clusters in gs_sh, reset the user and password with the setuser sub-command every time the connection destination cluster is changed.
4.3.5 Definition of arbitrary variables
Define an arbitrary variable.
-
Sub-command
set <Variable name> [<Value>] -
Description of each argument
Argument Description Variable name Specify the variable name. Value Specify the setting value. The setting value of the variable concerned can be cleared by omitting the specification. -
Example:
// Define variable
gs> set GS_PORT 10040
// Clear variable settings
gs> set GS_PORT
[Memo]
- Node variable and cluster variable settings can also be cleared with the set sub-command.
- Only single-byte alphanumeric characters and the symbol "_" can be used in the variable name.
4.3.6 Displaying the variable definition
Display the detailed definition of the specified variable.
-
Sub-command
show [<Variable name>] -
Description of each argument
Argument Description Variable name Specify the name of the variable to display the definition details. If the name is not specified, details of all defined variables will be displayed. -
Example:
// Display all defined variables
gs> show
Node variable:
  node0=Node[192.168.0.1:10040,ssh=22]
  node1=Node[192.168.0.2:10040,ssh=22]
  node2=Node[192.168.0.3:10040,ssh=22]
  node3=Node[192.168.0.4:10040,ssh=22]
Cluster variable:
  cluster0=Cluster[name=cluster0,239.0.0.1:31999,nodes = (node0,node1,node2,node3)]
Other variables:
  user=admin
  password=*****
  ospassword=*****
[Memo]
- Password character string will not appear. Display replaced by "*****".
4.3.7 Saving a variable definition in a script file
Save the variable definition details in the script file.
-
Sub-command
save [<Script file name>] -
Description of each argument
Argument Description Script file name Specify the name of the script file serving as the storage destination. Extension of script file is gsh. If the name is not specified, the data will be saved in the .gsshrc file in the gsadm user home directory. -
Example:
// Save the defined variable in a file
gs> save test.gsh
[Memo]
- If the storage destination script file does not exist, a new file will be created. If the storage destination script file exists, the contents will be overwritten.
- A script file is described using the character code UTF-8.
- Contents related to the user definition (user, password, gsadm password) will not be output to the script file.
- Contents in the .gsshrc script file will be automatically imported during gs_sh start-up.
4.3.8 Executing a script file
Execute a read script file.
-
Sub-command
load [<Script file name>] -
Description of each argument
Argument Description Script file name Specify the script file to execute. If the script file is not specified, the .gsshrc file in the gsadm user home directory will be imported again. -
Example:
// Execute script file
gs> load test.gsh
[Memo]
- Extension of script file is gsh.
- A script file is described using the character code UTF-8.
4.4 GridDB cluster operation controls
The following operations can be executed by the administrator user only as functions to manage GridDB cluster operations.
- GridDB node start, stop, join cluster, leave cluster (startnode/stopnode/joincluster/leavecluster)
- GridDB cluster operation start, operation stop (startcluster/stopcluster)
- Increase the number of new nodes in a GridDB cluster (appendcluster)
- Get various data
4.4.1 Cluster status
This section explains the status of a GridDB node and GridDB cluster.
A cluster is composed of 1 or more nodes.
A node status represents the status of the node itself e.g. start or stop etc.
A cluster status represents the acceptance status of data operations from a client. A cluster status is determined according to the status of the node group constituting the cluster.
An example of the change in the node status and cluster status due to a gs_sh sub-command operation is shown below.
A cluster is composed of 4 nodes. When the nodes constituting the cluster are started (startnode), the node status changes to “Start”. When the cluster is started after starting the nodes (startcluster), each node status changes to “Join”, and the cluster status also changes to “In Operation”.
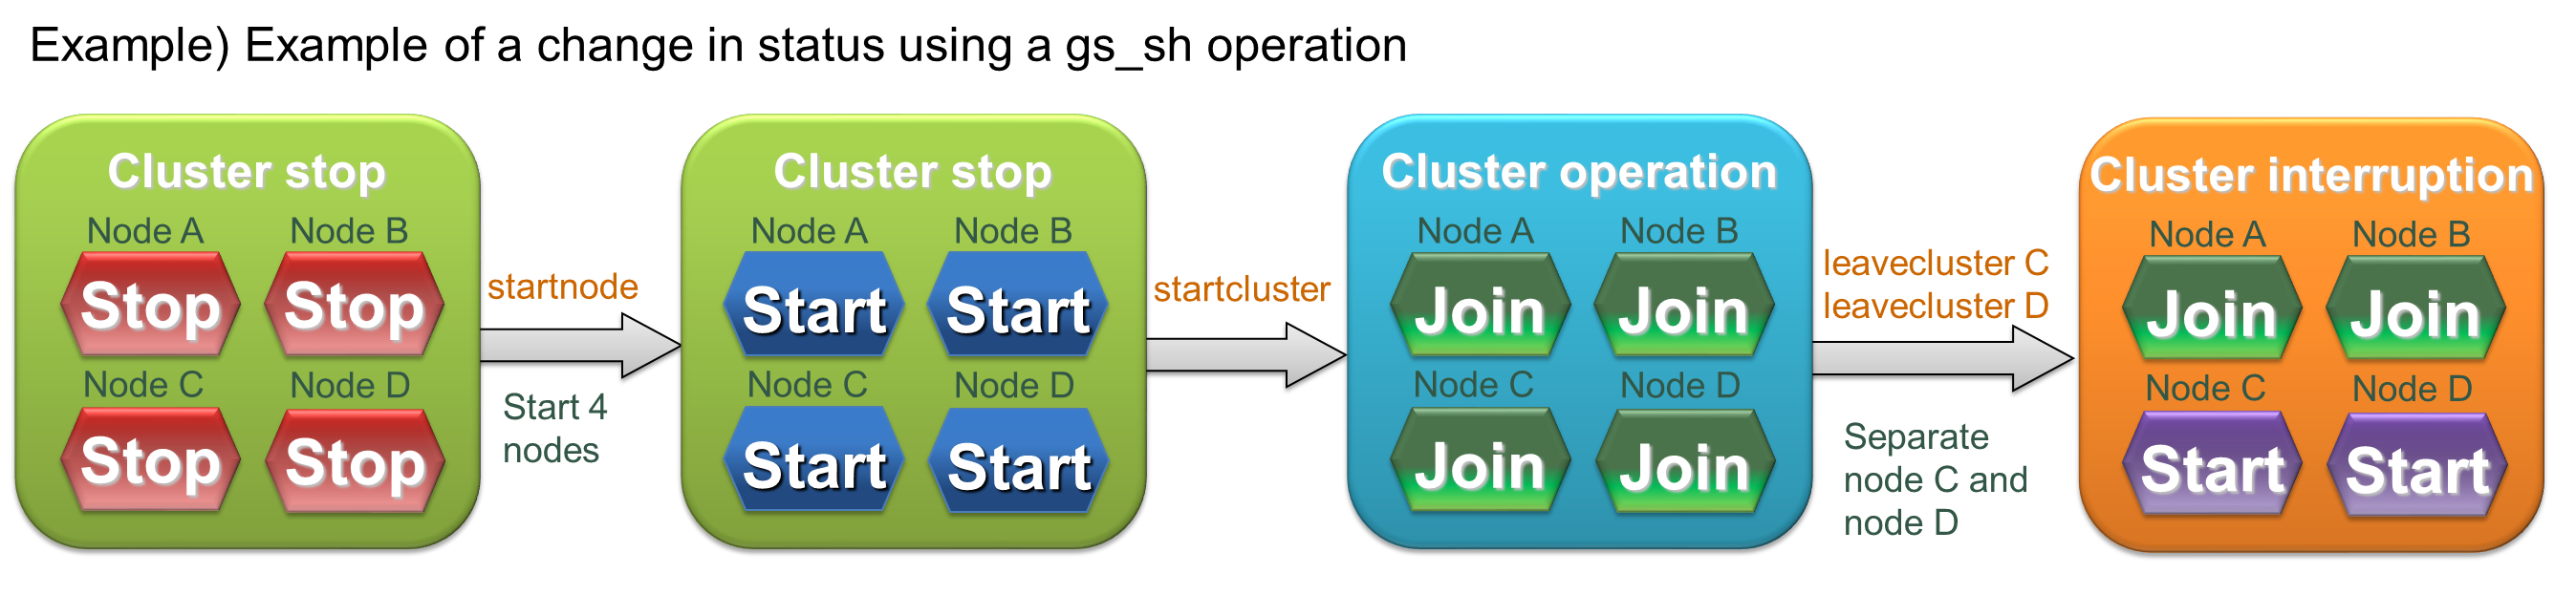
Status example
A detailed explanation of the node status and cluster status is given below.
- Node status
Node status changes to “Stop”, “Start” or “Join” depending on whether a node is being started, stopped, joined or detached. If a node has joined a cluster, there are 2 types of node status depending on the status of the joined cluster.
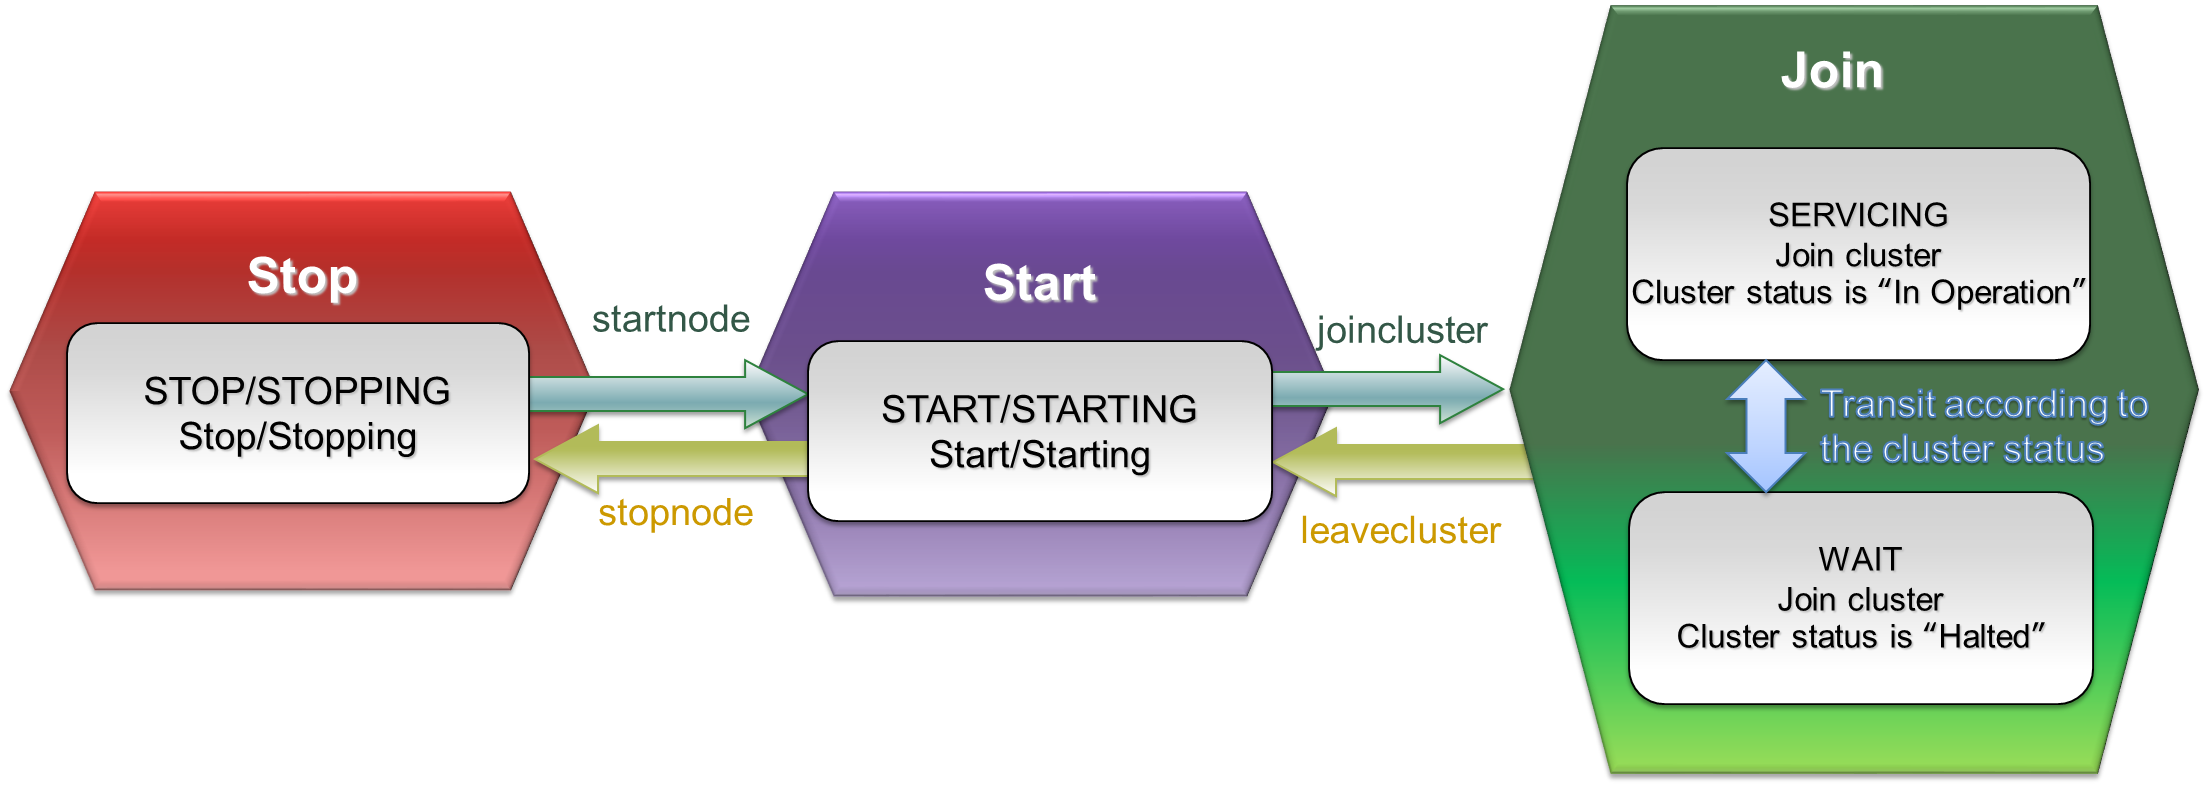
Node status
| Status | Status name | Description |
|---|---|---|
| Join | SERVICING | Node is joined to the cluster, and the status of the joined cluster is “In Operation” |
| WAIT | Node is joined to the cluster, and the status of the joined cluster is “Halted” | |
| Start | STARTED | Node is started but has not joined a cluster |
| STARTING | Starting node | |
| Stop | STOP | Stopped node |
| STOPPING | Stopping node |
-
Cluster status
GridDB cluster status changes to “Stop”, “Halted” or “In Operation” depending on the operation start/stop status of the GridDB cluster or the join/leave operation of the GridDB node. Data operations from the client can be accepted only when the GridDB cluster status is “In Operation”.
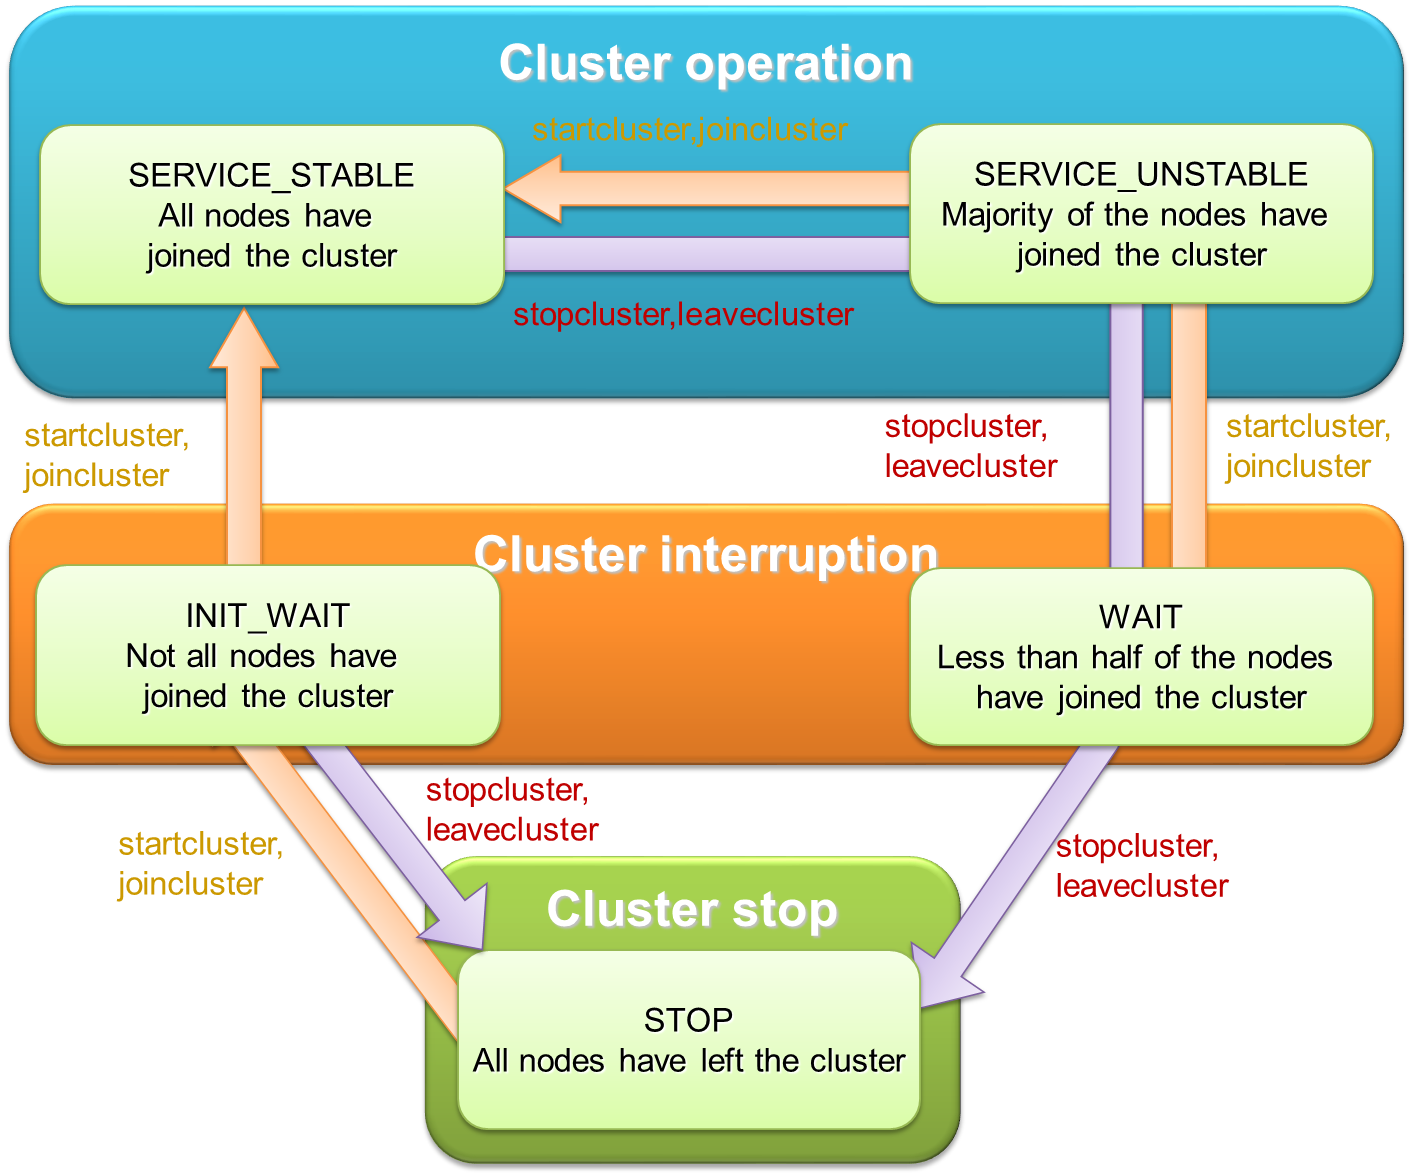
Cluster status
Status Status name Description In Operation SERVICE_STABLE All nodes defined in the cluster configuration have joined the cluster SERVICE_UNSTABLE More than half the nodes defined in the cluster configuration have joined the cluster Halted WAIT Half and more of the nodes defined in the cluster configuration have left the cluster INIT_WAIT 1 or more of the nodes defined in the cluster configuration have left the cluster (when the cluster is operated for the first time, the status will not change to “In Operation” unless all nodes have joined the cluster) Stop STOP All nodes defined in the cluster configuration have left the cluster The GridDB cluster status will change from “Stop” to “In Operation” when all nodes constituting the GridDB cluster are allowed to join the cluster. In addition, the GridDB cluster status will change to “Halted” when half and more of the nodes have left the cluster, and “Stop” when all the nodes have left the cluster.
Join and leave operations (which affect the cluster status) can be applied in batch to all the nodes in the cluster, or to individual node.
Operation When the operating targets are all nodes When the operating target is a single node Join startcluster : Batch entry of a group of nodes that are already operating but have not joined the cluster yet. joincluster : Entry by a node that is in operation but has not joined the cluster yet. Leave stopcluster : Batch detachment of a group of nodes joined to a cluster. leavecluster : Detachment of a node joined to a cluster.
[Memo]
- Join and leave cluster operations can be carried out on nodes that are in operation only.
- A node which has failed will be detached automatically from the GridDB cluster.
- The GridDB cluster status can be checked with the cluster status data display sub-command (configcluster).
Details of the various operating methods are explained below.
4.4.2 Starting a node
Start the specified node.
-
Sub-command
startnode <Node variable> | <Cluster variable> [<Timeout time in sec>] -
Description of each argument
Argument Description Node variable | cluster variable Specify the node to start by its node variable or cluster variable. If the cluster variable is specified, all nodes defined in the cluster variable will be started. Timeout time in sec. Set the number of seconds the command or a script is allowed to run. Returns an error message (D20203: Timeout occurred) if this number is reached. Timeout time = -1, return to the console immediately without waiting for the command to finish. Timeout time = 0 or not set, no timeout time, wait for the command to finish indefinitely. Timeout time > 0, return an error if timeout time is reached. -
Example:
// start node
gs> startnode $node1
The GridDB node node1 is starting up.
All GridDB node has been started.
[Memo]
- Command can be executed by an administrator user only.
- Append "$" in front of the variable name when using a variable.
- The cluster start process (startcluster sub-command) can be executed in batches by waiting for the start process to complete.
4.4.3 Stopping a node
Stop the specified node.
-
Sub-command
stopnode <Node variable> | <Cluster variable> [<Timeout time in sec>] -
Description of each argument
Argument Description Node variable | Cluster variable Specify the node to stop by its node variable or cluster variable. If the cluster variable is specified, all nodes defined in the cluster variable will be stopped. Timeout time in sec. Set the number of seconds the command or a script is allowed to run. Returns an error message (D20203: Timeout occurred) if this number is reached. Timeout time = -1, return to the console immediately without waiting for the command to finish. Timeout time = 0 or not set, no timeout time, wait for the command to finish indefinitely. Timeout time > 0, return an error if timeout time is reached. -
Example:
// stop node
gs> stopnode $node1
The GridDB node node1 is stopping down.
All GridDB node has been stopped.
In addition, the specified node can be forced to stop as well.
-
Sub-command
stopnodeforce <Node variable> | <Cluster variable> [<Timeout time in sec>] -
Description of each argument
Argument Description Node variable | Cluster variable Specify the node to stop by force by its node variable or cluster variable. If the cluster variable is specified, all nodes defined in the cluster variable will be stopped by force. Timeout time in sec. Set the number of seconds the command or a script is allowed to run. Returns an error message (D20203: Timeout occurred) if this number is reached. Timeout time = -1, return to the console immediately without waiting for the command to finish. Timeout time = 0 or not set, no timeout time, wait for the command to finish indefinitely. Timeout time > 0, return an error if timeout time is reached. -
Example:
// stop node by force
gs> stopnodeforce $node1
The GridDB node node1 is stopping down.
All GridDB node has been stopped.
[Memo]
- Command can be executed by an administrator user only.
- Append "$" in front of the variable name when using a variable.
- In a stopnode sub-command, nodes which have joined the GridDB cluster cannot be stopped. In a stopnodeforce command, nodes which have joined the GridDB cluster can also be stopped but data may be lost.
4.4.4 Batch entry of nodes in a cluster
Explanation on how to add batch nodes into a cluster is shown below. In this case when a group of unattached but operating nodes are added to the cluster, the cluster status will change to “In Operation”.
-
Sub-command
startcluster <Cluster variable> [<Timeout time in sec.>] -
Description of each argument
Argument Description Cluster variable Specify a GridDB cluster by its cluster variable. Timeout time in sec. Set the number of seconds the command or a script is allowed to run. Returns an error message (D20203: Timeout occurred) if this number is reached. Timeout time = -1, return to the console immediately without waiting for the command to finish. Timeout time = 0 or not set, no timeout time, wait for the command to finish indefinitely. Timeout time > 0, return an error if timeout time is reached. -
Example:
// start GridDB cluster
gs> startcluster $cluster0
Waiting for the GridDB cluster to start.
The GridDB cluster has been started.
[Memo]
- Command can be executed by an administrator user only.
- Append "$" in front of the variable name when using a variable.
- To change the status of a GridDB cluster from “Stop” to “In Operation”, all nodes must be allowed to join the cluster. Check beforehand that all nodes constituting the GridDB cluster are in operation.
4.4.5 Batch detachment of nodes from a cluster
To stop a GridDB cluster, simply make the attached nodes leave the cluster using the stopcluster command.
-
Sub-command
stopcluster <Cluster variable> [<Timeout time in sec.>] -
Description of each argument
Argument Description Cluster variable Specify a GridDB cluster by its cluster variable. Timeout time in sec. Set the number of seconds the command or a script is allowed to run. Returns an error message (D20203: Timeout occurred) if this number is reached. Timeout time = -1, return to the console immediately without waiting for the command to finish. Timeout time = 0 or not set, no timeout time, wait for the command to finish indefinitely. Timeout time > 0, return an error if timeout time is reached. -
Example:
// stop GridDB cluster
gs> stopcluster $cluster0
Waiting for the GridDB cluster to stop.
The GridDB cluster has been stopped.
[Memo]
- Command can be executed by an administrator user only.
- Append "$" in front of the variable name when using a variable.
4.4.6 Node entry in a cluster
Join a node that is temporarily left from the cluster by leavecluster sub-command or failure into the cluster.
-
Sub-command
joincluster <Cluster variable> <Node variable> [<Timeout time in sec.>] -
Description of each argument
Argument Description Cluster variable Specify a GridDB cluster by its cluster variable. Node variable Specify the node to join by its node variable. Timeout time in sec. Set the number of seconds the command or a script is allowed to run. Returns an error message (D20203: Timeout occurred) if this number is reached. Timeout time = -1, return to the console immediately without waiting for the command to finish. Timeout time = 0 or not set, no timeout time, wait for the command to finish indefinitely. Timeout time > 0, return an error if timeout time is reached. -
Example:
gs> startnode $node0
// start node
The GridDB node node0 is starting up.
All GridDB node has been started.
// join node
gs> joincluster $cluster0 $node0
Waiting for the GridDB node to join the GridDB cluster.
The GridDB node has joined to the GridDB cluster.
[Memo]
- Command can be executed by an administrator user only.
- Append "$" in front of the variable name when using a variable.
- Only nodes that are in operation can join a GridDB cluster. Check that the nodes joining a cluster are in operation.
- Use the appendcluster sub-command when adding a node that is not yet defined in the cluster's configuration to the cluster (the node is not part of the cluster).
4.4.7 Detaching a node from a cluster
Detach the specified node from the cluster.
-
Sub-command
leavecluster <Node variable> [<Timeout time in sec.>] leaveclusterforce <Node variable> [<Timeout time in sec.>] -
Description of each argument
Argument Description Node variable Specify the node to detach by its node variable. Timeout time in sec. Set the number of seconds the command or a script is allowed to run. Returns an error message (D20203: Timeout occurred) if this number is reached. Timeout time = -1, return to the console immediately without waiting for the command to finish. Timeout time = 0 or not set, no timeout time, wait for the command to finish indefinitely. Timeout time > 0, return an error if timeout time is reached. -
Example:
// leave node
gs> leavecluster $node0
Waiting for the GridDB node to leave the GridDB cluster.
The GridDB node has leaved the GridDB cluster.
[Memo]
- Command can be executed by an administrator user only.
- Append "$" in front of the variable name when using a variable.
- A node can safely leave a GridDB cluster only when the data has been duplicated in other nodes. However, a leavecluster sub-command forces a node to leave regardless of whether the data has been duplicated or not and so there is always a risk of data loss. Use the gs_leavecluster command to detach a node. See the section on “System Design & Construction - Designing Tuning Parameters” in the “GridDB Quick Start Guide” (GridDB_QuickStartGuide.html) for details regarding data duplication.
- A leaveclusterforce command forces a node to leave a cluster even if there is a risk that data may be lost due to the detachment.
4.4.8 Adding a node to a cluster
Add an undefined node to a pre-defined cluster.
-
Sub-command
appendcluster <Cluster variable> <Node variable> [<Timeout time in sec.>] -
Description of each argument
Argument Description Cluster variable Specify a GridDB cluster by its cluster variable. Node variable Specify the node to join by its node variable. Timeout time in sec. Set the number of seconds the command or a script is allowed to run. Returns an error message (D20203: Timeout occurred) if this number is reached. Timeout time = -1, return to the console immediately without waiting for the command to finish. Timeout time = 0 or not set, no timeout time, wait for the command to finish indefinitely. Timeout time > 0, return an error if timeout time is reached. -
Example:
// define node
gs> setnode node5 192.168.0.5 10044
// start node
gs> startnode $node5
// increase no. of nodes
gs> appendcluster $cluster1 $node5
Waiting for a node to be added to a cluster.
A node has been added to the cluster.
Add node variables $node5 to cluster variable $cluster1. (Execute a save command when saving changes to a variable. )

Cluster[name=name1,239.0.5.111:33333,nodes=($node1,$node2,$node3,$node4,$node5)]
[Memo]
- Command can be executed by an administrator user only.
- Append "$" in front of the variable name when using a variable.
- To increase the number of new nodes, all nodes that constitute a GridDB cluster needs to join the cluster. If there is any node detached from the GridDB cluster, re-attach the nodes first. In addition, check that the new node to be added is in operation.
- When executing an appendcluster sub-command, the node variable to be added is added to the cluster variable automatically. There is no need to manually change the cluster variable definition.
- If a variable is changed, execute a save command to save the data. Unsaved contents will be discarded.
- See the chapter on “System Design & Construction” in the “GridDB Quick Start Guide” (GridDB_QuickStartGuide.html) for details on how to set up a new node.
4.4.9 Displaying cluster status data
Display the cluster status data.
-
Sub-command
configcluster <Cluster variable> -
Description of each argument
Argument Description Cluster variable Specify a GridDB cluster by its cluster variable. -
Example:
// display cluster data
gs> configcluster $cluster1
Name                  : cluster1
ClusterName           : defaultCluster
Designated Node Count : 4
Active Node Count     : 4
ClusterStatus         : SERVICE_STABLE

Nodes:
  Name    Role Host:Port              Status
-------------------------------------------------
  node1     F  10.45.237.151:10040    SERVICING
  node2     F  10.45.237.152:10040    SERVICING
  node3     M  10.45.237.153:10040    SERVICING
  node4     F  10.45.237.154:10040    SERVICING
[Memo]
- Command can be executed by an administrator user only.
-
ClusterStatus will be one of the following.
- INIT_WAIT : Waiting for cluster to be composed
- SERVICE_STABLE : In operation
- SERVICE_UNSTABLE : Unstable (specified number of nodes constituting a cluster has not been reached)
-
Role will be one of the following.
- M: MASTER
- F: FOLLOWER
- S: SUB_CLUSTER (temporary status in a potential master candidate)
- -: Not in operation
4.4.10 Displaying configuration data
Display the cluster configuration data.
-
Sub-command
config <Node variable> -
Description of each argument
Argument Description Node variable Specify the node belonging to a GridDB cluster to be displayed with a node variable. -
Example:
// display cluster configuration data
gs> config $node1
{
  "follower" : [ {
    "address" : "10.45.237.151",
    "port" : 10040
  }, {
    "address" : "10.45.237.152",
    "port" : 10040
  }, {
    "address" : "10.45.237.153",
    "port" : 10040
  }, {
    "address" : "10.45.237.154",
    "port" : 10040
  } ],
  "master" : {
    "address" : "10.45.237.155",
    "port" : 10040
  },
  "multicast" : {
    "address" : "239.0.5.111",
    "port" : 33333
  },
  "self" : {
    "address" : "10.45.237.150",
    "port" : 10040,
    "status" : "ACTIVE"
  }
}
[Memo]
- Command can be executed by an administrator user only.
- Append "$" in front of the variable name when using a variable.
- The output contents differ depending on the version of the GridDB node. Check with the support desk for details.
4.4.11 Displaying node status
Display the node configuration data.
-
Sub-command
stat <Node variable> -
Description of each argument
Argument Description Node variable Specify the node to display by its node variable. -
Example:
// display node status, statistical data
gs> stat $node1
{
  "checkpoint" : {
    "archiveLog" : 0,
    "backupOperation" : 0,
    "duplicateLog" : 0,
    "endTime" : 1413852025843,
    "mode" : "NORMAL_CHECKPOINT",
             :
             :
}
[Memo]
- Command can be executed by an administrator user only.
- Append "$" in front of the variable name when using a variable.
- The output contents differ depending on the version of the GridDB node.
4.4.12 Displaying event log
Displays the log of the specified node.
-
Sub-command
logs <Node variable> -
Description of each argument
Argument Description Node variable Specify the node to display by its node variable. -
Example:
// display log of node
gs> logs $node0
2013-02-26T13:45:58.613+0900 c63x64n1 4051 INFO SYSTEM_SERVICE ../server/system_service.cpp void SystemService::joinCluster(const char8_t*, uint32_t) line=179 : joinCluster requested (clusterName="defaultCluster", minNodeNum=1)
2013-02-26T13:45:58.616+0900 c63x64n1 4050 INFO SYSTEM_SERVICE ../server/system_service.cpp virtual void SystemService::JoinClusterHandler::callback(EventEngine&, util::StackAllocator&, Event*, NodeDescriptor) line=813 : ShutdownClusterHandler called g
2013-02-26T13:45:58.617+0900 c63x64n1 4050 INFO SYSTEM_SERVICE ../server/system_service.cpp void SystemService::completeClusterJoin() line=639 : completeClusterJoin requested
2013-02-26T13:45:58.617+0900 c63x64n1 4050 INFO SYSTEM_SERVICE ../server/system_service.cpp virtual void SystemService::CompleteClusterJoinHandler::callback(EventEngine&, util::StackAllocator&, Event*, NodeDescriptor) line=929 : CompleteClusterJoinHandler called
In addition, the log output level can be displayed and changed.
-
Sub-command
logconf <Node variable> [<Category name> [<Log level>]] -
Description of each argument
Argument Description Node variable Specify the node to operate by its node variable. Category name Specify the log category name subject to the operation. Output level of all log categories will be displayed by default. Log level Specify the log level to change the log level of the specified category. Log level of the specified category will be displayed by default. -
Example:
// display log level of node
gs> logconf $node0
{
  "CHECKPOINT_SERVICE" : "INFO",
  "CHUNK_MANAGER" : "ERROR",
  "CLUSTER_OPERATION" : "INFO",
  "CLUSTER_SERVICE" : "ERROR",
  "COLLECTION" : "ERROR",
  "DATA_STORE" : "ERROR",
  "EVENT_ENGINE" : "WARNING",
  "HASH_MAP" : "ERROR",
  "IO_MONITOR" : "WARNING",
  "LOG_MANAGER" : "WARNING",
  "MAIN" : "ERROR",
  "OBJECT_MANAGER" : "INFO",
  "RECOVERY_MANAGER" : "INFO",
  "REPLICATION" : "WARNING",
  "REPLICATION_TIMEOUT" : "WARNING",
  "SESSION_TIMEOUT" : "WARNING",
  "SYNC_SERVICE" : "ERROR",
  "SYSTEM_SERVICE" : "INFO",
  "TIME_SERIES" : "ERROR",
  "TRANSACTION_MANAGER" : "ERROR",
  "TRANSACTION_SERVICE" : "ERROR",
  "TRANSACTION_TIMEOUT" : "WARNING",
  "TRIGGER_SERVICE" : "ERROR"
}
[Memo]
- Command can be executed by an administrator user only.
- Log levels are ERROR, WARNING, INFO, and DEBUG. Be sure to follow the instructions of the support desk when changing the log level.
- Log level is initialized by restarting the node. Changes to the log level are not saved.
- Batch changes cannot be made to the log level of multiple categories.
- The output contents differ depending on the version of the GridDB node. Check with the support desk for details.
4.5 Data operation in a database
To execute a data operation, there is a need to connect to the cluster subject to the operation.
Data in the database configured during the connection (“public” when the database name is omitted) will be subject to the operation.
4.5.1 Connecting to a cluster
Establish connection to a GridDB cluster to execute a data operation.
-
Sub-command
connect <Cluster variable> [<Database name>] -
Description of each argument
Argument Description Cluster variable Specify a GridDB cluster serving as the connection destination by its cluster variable. Database name Specify the database name. -
Example:
// connect to GridDB cluster
// for NoSQL
gs> connect $cluster1
The connection attempt was successful(NoSQL).
gs[public]>

gs> connect $cluster1 userDB
The connection attempt was successful(NoSQL).
gs[userDB]>

// for NewSQL (configure both NoSQL/NewSQL interfaces)
gs> connect $cluster1
The connection attempt was successful(NoSQL).
The connection attempt was successful(NewSQL).
gs[public]>
[Memo]
- Connect to the database when the database name is specified. Connect to the “public” database if the database name is omitted.
- If the connection is successful, the connection destination database name appears in the prompt.
- Append "$" in front of the variable name when using a variable.
- When executing a data operation sub-command, it is necessary to connect to a GridDB cluster.
- If the SQL connection destination is specified (execution of setclustersql sub-command), SQL connection is also carried out.
4.5.2 Search (TQL)
Execute a search and retain the search results.
-
Sub-command
tql <Container name> <Query;> -
Description of each argument
Argument Description Container name Specify the container subject to the search. Query; Specify the TQL command to execute. A semicolon (;) is required at the end of a TQL command. -
Example:
// execute search
gs[public]> tql c001 select *;
5 results. (25 ms)
[Memo]
- When executing a data operation sub-command, it is necessary to connect to a GridDB cluster.
- A return can be inserted in the middle of a TQL command.
- Display the elapsed time of query as milliseconds.
- Retain the latest search result. Search results are discarded when a tql or sql sub-command is executed.
- See the chapter on “TQL Syntax & Operating Functions” in the “GridDB API Reference” (GridDB_API_Reference.html) for the TQL details.
4.5.3 SQL command execution
Execute an SQL command and retains the search result. This function can be executed in the GridDB Advanced Edition edition only.
-
Sub-command
sql <SQL command;> -
Description of each argument
Argument Description SQL command; Specify the SQL command to execute. A semicolon (;) is required at the end of the SQL command. -
Example:
gs[public]> sql select * from con1;          -> search for SQL
10,000 results. (52 ms)
gs[public]> get 1                            -> display SQL results
id,name
----------------------
0,tanaka
The 1 results had been acquired.
Sub-command name 'sql' can be omitted when the first word of SQL statement is one of the follows.
- select update insert replace delete create drop alter grant revoke pragma
[Memo]
- Before executing a sql command, there is a need to specify the SQL connection destination and perform a connection first.
- Retain the latest search result. Search results are discarded when a sql or tql sub-command is executed.
- Sub-command name 'sql' can not be omitted when specifying the 'set password' command or the command includes comments in header.
- Count the number of hits when querying.
- Display the elapsed time of query as milliseconds. It does not include the time of counting.
-
The following results will appear depending on the type of SQL command.
Operation Execution results when terminated normally Search SELECT Display the no. of search results found. Search results are displayed in sub-command get/getcsv/getnoprint. Update INSERT/UPDATE/DELETE Display the no. of rows updated. DDL statement Nothing is displayed. - See “GridDB Advanced Edition SQL Reference” (GridDB_AE_SQL_Reference.html) for the SQL details.
4.5.4 Getting search results
The following command gets the inquiry results and presents them in different formats. There are 3 ways to output the results as listed below.
(A) Display the results obtained in a standard output.
-
Sub-command
get [No. of acquires] -
Description of each argument
Argument Description No. of acquires Specify the number of search results to be acquired. All search results will be obtained and displayed by default.
(B) Save the results obtained in a file in the CSV format.
-
Sub-command
getcsv <CSV file name> [<No. of acquires>] -
Description of each argument
Argument Description File name Specify the name of the file where the search results are saved. No. of acquires Specify the number of search results to be acquired. All search results will be obtained and saved in the file by default.
(C) Results obtained will not be output.
-
Sub-command
getnoprint [<No. of acquires>] -
Description of each argument
Argument Description No. of acquires Specify the number of search results to be acquired. All search results will be obtained by default. -
Example:
// execute search
gs[public]> tql c001 select *;
5 results. (5 ms)

//Get first result and display
gs[public]> get 1
name,status,count
mie,true,2
The 1 results had been acquired.

//Get second and third results and save them in a file
gs[public]> getcsv /var/lib/gridstore/test2.csv 2
The 2 results had been acquired.

//Get fourth result
gs[public]> getnoprint 1
The 1 results had been acquired.

//Get fifth result and display
gs[public]> get 1
name,status,count
akita,true,45
The 1 results had been acquired.
[Memo]
- When executing a data operation sub-command, it is necessary to connect to a GridDB cluster.
- Output the column name to the first row of the search results
- An error will occur if the search results are obtained when a search has not been conducted, or after all search results have been obtained or discarded.
-
A NULL value is output by each command as follows.
- get: (NULL)
- getcsv: an unquoted empty string
-
A value of TIMESTAMP is output as following format:
- Date and time format: ISO8601 format
- Timezone: UTC
- Example: 2018-11-07T12:30:00.417Z
4.5.5 Getting the execution plan
The following command displays the execution plan of the specified TQL command. Search is not executed.
-
Sub-command
tqlexplain <Container name> <Query;> -
Description of each argument
Argument Description Container name Specify the target container. Query; Specify the TQL command to get the execution plan. A semicolon (;) is required at the end of a TQL command. -
Example:
//Get execution plan
gs[public]> tqlexplain c001 select * ;
0       0       SELECTION       CONDITION       NULL
1       1       INDEX   BTREE   ROWMAP
2       0       QUERY_EXECUTE_RESULT_ROWS       INTEGER 0
In addition, the actual measurement values such as the number of processing rows etc. can also be displayed together with the executive plan by actually executing the specified TQL command.
-
Sub-command
tqlanalyze <Container name> <Query;> -
Description of each argument
Argument Description Container name Specify the target container. Query; Specify the TQL command to get the execution plan. A semicolon (;) is required at the end of a TQL command. -
Example:
// Execute search to get execution plan
gs[public]> tqlanalyze c001 select *;
0       0       SELECTION       CONDITION       NULL
1       1       INDEX   BTREE   ROWMAP
2       0       QUERY_EXECUTE_RESULT_ROWS       INTEGER 5
3       0       QUERY_RESULT_TYPE       STRING  RESULT_ROW_ID_SET
4       0       QUERY_RESULT_ROWS       INTEGER 5
[Memo]
- When executing a data operation sub-command, it is necessary to connect to a GridDB cluster.
- See the chapter on “TQL Syntax & Operating Functions” in the “GridDB API Reference” (GridDB_API_Reference.html) for the detailed execution plan.
- Since search results are not retained, search results cannot be acquired and thus there is also no need to execute a tqlclose sub-command. When the search results are required, execute a query with the tql sub-command.
- A partitioned table (container) is not supported. If executed, an error will occur.
4.5.6 Discarding search results
Close the tql and discard the search results saved.
-
Sub-command
tqlclose
Close query. Discard the search results retained.
-
Sub-command
queryclose -
Example:
//Discard search results
gs[public]> tqlclose

gs[public]> queryclose
[Memo]
-
Search results are discarded at the following timing.
- When a tqlclose or query close sub-command is executed
- When executing a new search using a tql or sql sub-command
- When disconnecting from a GridDB cluster using a disconnect sub-command
- An error will occur if search results are acquired (get sub-command, etc.) after they have been discarded.
4.5.7 Disconnecting from a cluster
Disconnect from a GridDB cluster.
-
Sub-command
disconnect -
Example:
//Disconnect from a GridDB cluster
gs[public]> disconnect
gs>
[Memo]
- Retained search results are discarded.
- When disconnected, the connection database name will disappear from the prompt.
4.5.8 Hit count setting
Set whether to execute count query when SQL querying.
-
Sub-command
sqlcount <Boolean> -
Description of each argument
Argument Description Boolean If FALSE is specified, gs_sh does not count the number of the result when querying by sql sub-command. And hit count does not be displayed. Default is TRUE. -
Example:
gs[public]> sql select * from mycontainer;
25550 results. (33 ms)

gs[public]> sqlcount FALSE

gs[public]> sql select * from mycontainer;
The query had been executed. (33 ms)
[Memo]
- If FALSE is specified, the response will be faster instead of displaying no hit count.
4.6 Database management
This section explains the available sub-commands that can be used for database management. Connect to the cluster first prior to performing database management with connect sub-command.
4.6.1 Creating a database
Create a database with the specified name.
-
Sub-command
createdatabase <Database name> -
Description of each argument
Argument Description Database name Specify the name of the database to be created. -
Example:
// Create a database with the name “db1”
gs[public]> createdatabase db1
[Memo]
- Command can be executed by an administrator user only.
- Only the administrator user can access a database immediately after it has been created. Assign access rights to general users where necessary.
4.6.2 Deleting a database
Delete the specified database.
-
Sub-command
dropdatabase <Database name> -
Description of each argument
Argument Description Database name Specify the name of the database to be deleted. -
Example:
//Delete databases shown below
//db1: No container exists in the database
//db2: Database does not exist
//db3: Container exists in the database

gs[public]> dropdatabase db1                  // No error occurs
gs[public]> dropdatabase db2                  // An error occurs
D20340: This database "db2" does not exists.
gs[public]> dropdatabase db3                  // An error occurs
D20336: An unexpected error occurred while dropping the database. : msg=[[145045:JC_DATABASE_NOT_EMPTY] Non-empty database cannot be dropped]
[Memo]
- Command can be executed by an administrator user only.
- A public database which is a default connection destination cannot be deleted.
4.6.3 Displaying current database
Display the current database name.
-
Sub-command
getcurrentdatabase -
Example:
gs[db1]> getcurrentdatabase
db1
4.6.4 Database list
List the databases with access right information.
-
Sub-command
showdatabase [<Database name>] -
Description of each argument
Argument Description Database name Specify the name of the database to be displayed. -
Example:
gs[public]> showdatabase
database     ACL
----------------------------
public       ALL_USER
db1          user1
db2          user1
db3          user3

gs[public]> showdatabase db1
database     ACL
----------------------------
public       ALL_USER
db1          user1
[Memo]
- For general users, only databases for which access rights have been assigned will be displayed. For administrator users, a list of all the databases will be displayed.
4.6.5 Granting access rights
Grant the database access rights to user.
-
Sub-command
grantacl <Database name> <User name> -
Description of each argument
Argument Description Database name Specify the name of the database for which access rights are going to be granted User name Specify the name of the user to assign access rights to. -
Example:
gs[public]> grantacl db1 user001
[Memo]
- Command can be executed by an administrator user only.
- An error will occur if access rights have already been assigned (only 1 user can be assigned access rights to each database). Execute this command after revoking the access rights ("revokeacl" command).
4.6.6 Revoking access rights
Revoke access rights to the database.
-
Sub-command
revokeacl <Database name> <User name> -
Description of each argument
Argument Description Database name Specify the name of the database for which access rights are going to be revoked. User name Specify the name of the user whose access rights are going to be revoked. -
Example:
gs[public]> revokeacl db1 user001
[Memo]
- Command can be executed by an administrator user only.
4.7 User management
This section explains the available sub-commands that can be used to perform user management. Connect to the cluster first prior to performing user management (sub-command connect).
4.7.1 Creating a general user
Create a general user (username and password).
-
Sub-command
createuser <User name> <Password> -
Description of each argument
Argument Description User name Specify the name of the user to be created. Password Specify the password of the user to be created. -
Example:
gs[public]> createuser user01 pass001
[Memo]
- Command can be executed by an administrator user only.
- A name starting with "gs#" cannot be specified as the name of a general user as it is reserved for use by the administrator user.
- When creating an administrator user, use the gs_adduser command in all the nodes constituting the cluster.
4.7.2 Deleting a general user
Delete the specified general user
-
Sub-command
dropuser <User name> -
Description of each argument
Argument Description User name Specify the name of the user to be deleted. -
Example:
gs[public]> dropuser user01
[Memo]
- Command can be executed by an administrator user only.
4.7.3 Update password
Update the user password.
-
Sub-command
setpassword <Password> (general user only) setpassword <User name> <Password> (administrator user only) -
Description of each argument
Argument Description Password Specify the password to change. User name Specify the name of the user whose password is going to be changed. -
Example:
gs[public]> setpassword newPass009
[Memo]
- The general user can change its own password only.
- An administrator user can change the passwords of other general users only.
4.7.4 Listing general users
List the general user data.
-
Sub-command
showuser [<User name>] -
Description of each argument
Argument Description User name Specify the name of the user to be displayed. -
Example:
gs[public]> showuser
UserName
------------------------------------
user002
user001
user003

gs[public]> showuser user001
Name     : user001
GrantedDB: public, userDB
[Memo]
- Command can be executed by an administrator user only.
4.8 Container management
This section explains the available sub-commands that can be used when performing container operations. Connect to the cluster first before performing container management. Containers in the database at the (sub-command connect) connection destination will be subject to the operation.
4.8.1 Creating a container
Create a container.
-
Sub-command
-
Simplified version
Container (collection) createcollection <Container name> <Column name> <Column type> [<Column name> <Column type> ...] Container (timeseries container) createtimeseries <Container name> <Compression method> <Column name> <Column type> [<Column name> <Column type> ...] -
Detailed version
createcontainer <Container data file> [<Container name>]
-
Simplified version
-
Description of each argument
Argument Description Container name Specify the name of the container to be created. If the name is omitted in the createcontainer command, a container with the name given in the container data file will be created. Column name Specify the column name. Column type Specify the column type. Compression method For time series data, specify the data compression method. Container data file Specify the file storing the container data in JSON format. Simplified version
Specify the container name and column data (column name and type) to create the container. The compression type can also be specified for timeseries containers only.
- Specify "NO", "SS" for the compression method. Use the detailed version if "HI" is specified.
- The collection will be created with a specified row key. The first column will become the row key.
- In case of specifying column constraints and index names, use the detailed version.
Detailed version
Specify the container definition data in the json file to create a container.
-
The container definition data has the same definition as the metadata file output by the export tool. See the container data file format and Metadata files for the column type and data compression method, container definition format, etc. However, the following data will be invalid in this command even though it is defined in the metadata file of the export command.
- version : Export tool version
- database : Database name
- containerFileType : Export data file type
- containerFile : Export file name
- partitionNo : Partition no.
- Describe a single container definition in a single container definition file.
- If the container name is omitted in the argument, create the container with the name described in the container definition file.
- If the container name is specified in the argument, ignore the container name in the container definition file and create the container with the name described in the argument.
- An error will not occur even if the database name is described in the container definition file but the name will be ignored and the container will be created in the database currently being connected.
- Partitioned tables are not applicable. An error will occur when table partitioning data is described in the container definition file.
-
When using the container definition file, the metadata file will be output when the --out option is specified in the export function. The output metadata file can be edited and used as a container definition file.
Example: When using the output metadata file as a container definition file
{
    "version":"2.1.00",                              # unused
    "container":"container_354",
    "database":"db2",                                # unused
    "containerType":"TIME_SERIES",
    "containerFileType":"binary",                    # unused
    "containerFile":"20141219_114232_098_div1.mc",   # unused
    "rowKeyAssigned":true,
    "partitionNo":0,                                 # unused
    "columnSet":[
        {
            "columnName":"timestamp",
            "type":"timestamp",
            "notNull":true
        },
        {
            "columnName":"active",
            "type":"boolean",
            "notNull":true
        },
        {
            "columnName":"voltage",
            "type":"double",
            "notNull":true
        }
    ],
    "timeSeriesProperties":{
        "compressionMethod":"NO",
        "compressionWindowSize":-1,
        "compressionWindowSizeUnit":"null",
        "expirationDivisionCount":8,
        "rowExpirationElapsedTime":-1,
        "rowExpirationTimeUnit":"null"
    },
    "compressionInfoSet":[
    ]
}
4.8.2 Deleting container
Delete a container
-
Sub-command
dropcontainer <Container name> -
Description of each argument
Argument Description Container name Specify the name of the container to be deleted. -
Example:
gs[public]> dropcontainer Con001
[Memo]
-
A partitioned table (container) is not supported. If executed, an error will occur.
- To drop partitioned table (container), use SQL.
4.8.3 Displaying a container data
Display a container data.
-
Sub-command
showcontainer <Container name> -
Description of each argument
Argument Description Container name Specify the container name to be displayed. Display a list of all containers if omitted. -
Example:
// display container list
gs[userDB]> showcontainer
Database : userDB
Name                  Type         PartitionId
------------------------------------------------
cont001               COLLECTION            10
col00a                COLLECTION             3
time02                TIME_SERIES            5
cont003               COLLECTION            15
cont005               TIME_SERIES           17

// display data of specified container
gs[public]> showcontainer cont003
Database    : userDB
Name        : cont003
Type        : COLLECTION
Partition ID: 15
DataAffinity: -

Columns:
No  Name                  Type            CSTR  Index
------------------------------------------------------------------------------
 0  string                STRING          NN    TREE(myIndex)   [RowKey]
 1  value                 DOUBLE          NN    HASH() TREE(myIndex2)
[Memo]
- Container data of the current DB will be displayed.
- The data displayed in a container list are the “Container name”, “Container type” and “Partition ID”.
- The data displayed in the specified container are the “Container name”, “Container type”, “Partition ID”, “Defined column name”, “Column data type”, “Column constraints” as CSTR, “Column index setting”, and "Table partitioning data".
- In “Column constraints” column, “NOT NULL constraint” as NN is displayed.
- In the case of connecting through JDBC, the details of "Table partitioning data" are displayed. The displayed items are "Partitioning Type", "Partitioning Column", "Partition Interval Value", "Partition Interval Unit" of interval partitioning, and "Partition Division Count" of hash partitioning. For interval-hash partitioning, the items of interval partitioning and hash partitioning are both displayed.
-
Example:
// Display the specified container data (in the case of connecting through JDBC)
gs[public]> showcontainer cont003
Database    : userDB
Name        : time018
Type        : TIME_SERIES
Partition ID: 15
DataAffinity: -
Partitioned             : true
Partition Type          : INTERVAL
Partition Column        : date
Partition Interval Value: 730
Partition Interval Unit : DAY
Partition Division Count: -
Sub Partition Type          : HASH
Sub Partition Column        : id
Sub Partition Interval Value: -
Sub Partition Interval Unit : -
Sub Partition Division Count: 15

Columns:
No  Name                  Type            CSTR  Index
------------------------------------------------------------------------------
 0  date                  TIMESTAMP       -     TREE(myIndex)   [RowKey]
 1  id                    DOUBLE          NN


// Display the specified container data (not in the case of connecting through JDBC)
gs[public]> showcontainer cont003
Database    : userDB
Name        : time018
Type        : TIME_SERIES
Partition ID: 15
DataAffinity: -
Partitioned : true(need SQL connection for details)

Columns:
No  Name                  Type            CSTR  Index
------------------------------------------------------------------------------
 0  date                  TIMESTAMP       -     TREE(myIndex)   [RowKey]
 1  value                 DOUBLE          NN
4.8.4 Displaying a table data
Display a table data. It is compatible command of showcontainer.
-
Sub-command
showtable <Table name> -
Description of each argument
Argument Description Table name Specify the table name to be displayed. Display a list of all tables if omitted.
4.8.5 Creating an index
Create an index in the column of a specified container.
-
Sub-command
createindex <Container name> <Column name> <Index type> ... -
Description of each argument
Argument Description Container name Specify the name of container that the column subject to the index operation belongs to. Column name Specify the name of the column subject to the index operation. Index type ... Specify the index type. Specify TREE, HASH or SPATIAL (or multiple) for the index type. -
Example:
// create index
gs[public]> createindex cont003 col2 tree hash

gs[public]> showcontainer cont003
Database    : public
Name        : cont003
Type        : COLLECTION
Partition ID: 15
DataAffinity: -

Columns:
No  Name                  Type            Index
------------------------------------------------------------
 0  col1                  INTEGER         [TREE] (RowKey)
 1  col2                  STRING          [TREE, HASH]
 2  col3                  TIMESTAMP       []
[Memo]
- An error will not occur even if an index that has already been created is specified.
- An index name is not supported. In case of specifying an index name, use the detailed version or SQL.
4.8.6 Deleting an index
Delete the index in the column of a specified container.
-
Sub-command
dropindex <Container name> <Column name> <Index type> ... -
Description of each argument
Argument Description Container name Specify the name of container that the column subject to the index operation belongs to. Column name Specify the name of the column subject to the index operation. Index type ... Specify the index type. Specify TREE, HASH or SPATIAL (or multiple) for the index type. -
Example:
// delete index
gs[public]> showcontainer cont003
Database    : public
Name        : cont003
Type        : COLLECTION
Partition ID: 27
DataAffinity: -

Columns:
No  Name                  Type            CSTR  Index
------------------------------------------------------------------------------
 0  col1                  INTEGER         NN    TREE()   [RowKey]
 1  col2                  STRING                TREE() HASH(myIndex)
 2  col3                  TIMESTAMP       NN    HASH()

gs[public]> dropindex cont003 col2 hash

gs[public]> showcontainer cont003
Database    : public
Name        : cont003
Type        : COLLECTION
Partition ID: 27
DataAffinity: -

Columns:
No  Name                  Type            CSTR  Index
------------------------------------------------------------------------------
 0  col1                  INTEGER         NN    TREE()   [RowKey]
 1  col2                  STRING                TREE()
 2  col3                  TIMESTAMP       NN    HASH()
[Memo]
- An error will not occur even if an index that has not been created is specified.
4.8.7 Deleting a trigger
Delete the trigger of a specified container.
-
Sub-command
droptrigger <Container name> <Trigger name> -
Description of each argument
Argument Description Container name Specify the name of the container whose trigger is going to be deleted. Trigger name Specify the trigger name to delete. -
Example:
gs[public]> droptrigger con01 tri03
4.8.8 Displaying trigger data
Display the trigger data of a specified container.
-
Sub-command
showtrigger <Container name> [<Trigger name>] -
Description of each argument
Argument Description Container name Specify the container name to be displayed. Trigger name Specify the trigger name to be displayed. Display a list of all trigger data if omitted. -
Example:
// Display the trigger data list of the specified container
gs[public]> showtrigger cont003
Name                 Type  Columns              Events
---------------------------------------------------------------
rtrig01              REST  [col1, col3]         [PUT]

gs[public]> showtrigger cont003 rtrig01
Name          : rtrig01
Type          : REST
Target Columns: [col1, col3]
Target Events : [PUT]

Destination URI: http://example.com
[Memo]
- The data displayed in a trigger list are the “Trigger name”, “Notification method”, “Column to be notified”, “Operation to be monitored (create new or update, delete a row)”.
- The data displayed in the specified trigger data are the “Trigger name”, “Notification method”, “Column to be notified”, “Operation to be monitored” and “Notification destination URI”. In addition, the “Destination name”, “Destination type“, “User“ and “Password” are also displayed together in a JMS notification.
- See the chapter on “Trigger Function” in the “GridDB API Reference” (GridDB_API_Reference.html) for the trigger function details.
4.9 Other operations
This section explains the sub-commands for other operations.
4.9.1 Echo back setting
Display the executed sub-command in the standard output.
-
Sub-command
echo <Boolean> -
Description of each argument
Argument Description Boolean Display the executed sub-command in the standard output when TRUE is specified. Default value is FALSE. -
Example:
// display the executed sub-command in the standard output
gs> echo TRUE
[Memo]
- gs_sh prompt "gs>" always appear in the standard output.
4.9.2 Displaying a message
Display the definition details of the specified character string or variable.
-
Sub-command
print <Message> -
Description of each argument
Argument Description Message Specify the character string or variable to display. -
Example:
// display of character string
gs> print print executed.
print executed.
[Memo]
- Append "$" in front of the variable name when using a variable.
4.9.3 Sleep
Set the time for the sleeping function.
-
Sub-command
sleep <No. of sec> -
Description of each argument
Argument Description No. of sec Specify the no. of sec to go to sleep. -
Example:
// sleep for 10 sec
gs> sleep 10
[Memo]
- Specify a positive integer for the no. of sec number.
4.9.4 Executing external commands
Execute an external command.
-
Sub-command
exec <External command> [<External command arguments>] -
Description of each argument
Argument Description External command Specify an external command. External command arguments Specify the argument of an external command. -
Example:
// display the file data of the current directory
gs> exec ls -la
[Memo]
- Pipe, redirect, and hear document cannot be used.
4.9.5 Terminating gs_sh
Terminate gs_sh.
-
Sub-command
exit quit -
Example:
// terminate gs_sh.
gs> exit
In addition, if an error occurs in the sub-command, the setting can be configured to end gs_sh.
-
Sub-command
errexit <Boolean> -
Description of each argument
Argument Description Boolean If TRUE is specified, gs_sh ends when an error occurs in the sub-command. Default is FALSE. -
Example:
// configure the setting so as to end gs_sh when an error occurs in the sub-command
gs> errexit TRUE
[Memo]
- There is no functional difference between the exit sub-command and quit sub-command.
4.9.6 Help
Display a description of the sub-command.
-
Sub-command
help [<Sub-command name>] -
Description of each argument
Argument Description Sub-command name Specify the sub-command name to display the description Display a list of the sub-commands if omitted. -
Example:
// display the description of the sub-command
gs> help exit
exit
The above command is used to terminate gs_sh.
[Memo]
- A description of gs_sh can be obtained with the command “gs_sh --help”.
4.9.7 Version
Display the version of gs_sh.
-
Sub-command
version -
Example:
// display the version
gs> version
gs_sh version 2.0.0
[Memo]
- The gs_sh version data can be obtained with the command “gs_sh --version” as well.
4.10 Options and sub-commands specifications
4.10.1 Options
-
Commands
gs_sh [<Script file>] gs_sh -v|--version gs_sh -h|--help -
Options
Option Essential Description -v|--version Display the version of the tool. -h|--help Display the command list as a help message.
[Memo]
- In order to batch process the gs_sh sub-command, a script file can be created. Extension of the script file is gsh.
- During gs_sh startup, .gsshrc script files under the gsadm user home directory are imported automatically. The .gsshrc contents will also be imported to the destination from other script files.
4.10.2 Sub-command list
-
GridDB cluster definition sub-command list
Sub-command Argument Description (*1) setnode <Node variable> <IP address> Define the node variable. <Port no.> [ <SSH port no.> ] setcluster <Cluster variable> <Cluster name> Define the cluster variable. <Multicast address> <Port no.> [ <Node variable> ... ] setclustersql <Cluster variable> <Cluster name> Define the SQL connection destination in the cluster configuration. <SQL address> <SQL port no.> modcluster <Cluster variable> Add or delete a node variable to or from the cluster variable. add|remove <Node variable> ... setuser <User name> <Password> Define the user and password to access the cluster. [ <gsadm password> ] set <Variable name> [ <Value> ] Define an arbitrary variable. show [ <Variable name> ] Display the detailed definition of the variable. save [ <Script file name> ] Save the variable definition in the script file. load [ <Script file name> ] Read and execute a script file. -
GridDB cluster operation sub-command list
*1 : Commands marked with an * can be executed by an administrator user only.Sub-command Argument Description *1 startnode <Node variable> | <Cluster variable> [ <Timeout time in sec.> ] Start the specified node. * stopnode <Node variable> | <Cluster variable> [ <Timeout time in sec.> ] Stop the specified node. * stopnodeforce <Node variable> | <Cluster variable> [ <Timeout time in sec.> ] Stop the specified node by force. * startcluster <Cluster variable> [ <Timeout time in sec.> ] Attach the active node groups to a cluster, together at once. * stopcluster <Cluster variable> [ <Timeout time in sec.> ] Detach all of the currently attached nodes from a cluster, together at once. * joincluster <Cluster variable> <Node variable> [ <Timeout time in sec.> ] Attach a node individually to a cluster. * leavecluster <Node variable> [ <Timeout time in sec.> ] Detach a node individually from a cluster. * leaveclusterforce <Node variable> [ <Timeout time in sec.> ] Detach a node individually from a cluster by force. * appendcluster <Cluster variable> <Node variable> [ <Timeout time in sec.> ] Add an undefined node to a pre-defined cluster. * configcluster <Cluster variable> Display the cluster status data. * config <Node variable> Display the cluster configuration data. * stat <Node variable> Display the cluster configuration data. * logs <Node variable> Display the log of the specified node. * logconf <Node variable> [ <Category name> [ <Output level> ] ] Display and change the log settings. *
-
Data operation sub-command list
*1 : Commands marked with an * can be executed by an administrator user only.Sub-command Argument Description *1 connect <Cluster variable> [ <Database name> ] Connect to a GridDB cluster. tql <Container name> <Query;> Execute a search and retain the search results. get [ <No. of acquires> ] Get the search results and display them in a stdout. getcsv <CSV file name> [ <No. of acquires> ] Get the search results and save them in a file in the CSV format. getnoprint [ <No. of acquires> ] Get the query results but do not display them in a stdout. tqlclose Discard the search results retained. tqlanalyze <Container name> <Query;> Execute the specified TQL command and display the execution plan and actual measurement values such as the number of cases processed etc. tqlexplain <Container name> <Query;> Displays the execution plan of the specified TQL command. sql <SQL command;> Executes an SQL command and retains the search result. sqlcount <Boolean> Set whether to execute count query when SQL querying. queryclose Close SQL. disconnect Disconnect user from a GridDB cluster.
-
Database management sub-command list
*1 : Commands marked with an * can be executed by an administrator user only.Sub-command Argument Description *1 createdatabase <Database name> Create a database. * dropdatabase <Database name> Delete a database. * getcurrentdatabase Display the current database name. showdatabase [ <Database name> ] Display the database list and access permissions data. grantacl <Database name> <User name> Grant the database access rights to user. * revokeacl <Database name> <User name> Revoke access rights to the database. *
-
User management sub-command list
*1 : Commands marked with an * can be executed by an administrator user only.Sub-command Argument Description *1 createuser <User name> <Password> Create a general user. * dropuser <User name> Delete a general user. * setpassword <Password> Change the own password. setpassword <User name> <Password> Change the password of a general user. showuser [ <User name> ] Displays the user data.
-
Container management sub-command list
*1 : Commands marked with an * can be executed by an administrator user only.Sub-command Argument Description *1 createcollection <Container name> <Column name> <Column type> [<Column name> <Column type> ...] Create a container (collection). createtimeseries <Container name> <Compression method> <Column name> <Column type> [<Column name> <Column type> ...] Create a container (timeseries container). createcontainer <Container data file> [ <Container name> ] Create a container from the container data file. dropcontainer <Container name> Delete a container. showcontainer [ <Container name> ] Display the container data. showtable [ <Table name> ] Display the table data. createindex <Container name> <Column name> <Index type> ... Create an index in the specified column. dropindex <Container name> <Column name> <Index type> ... Delete an index of the specified column. droptrigger <Container name> <Trigger name> Delete the trigger data. showtrigger <Container name> [ <Trigger name> ] Display the trigger data.
-
Other operation sub-command list
*1 : Commands marked with an * can be executed by an administrator user only.Sub-command Argument Description *1 echo <Boolean> Set whether to echo back. print <Message> Display the definition details of the specified character string or variable. sleep <No. of sec> Set the time for the sleeping function. exec <External command> [ <External command arguments> ] Execute an external command. exit Terminate gs_sh. quit Terminate gs_sh. errexit <Boolean> Set whether to terminate gs_sh when an error occurs. help [ <Sub-command name> ] Display a description of the sub-command. version Display the version of gs_sh.
5 Operating commands
5.1 Command list
The following commands are available in GridDB.
| Type | Function | Command | RPM package |
|---|---|---|---|
| (1) Start/stop node | Starting a node | gs_startnode | server |
| Stopping a node | gs_stopnode | client | |
| (2) User management | Registration of administrator user | gs_adduser | server |
| Deletion of administrator user | gs_deluser | server | |
| Changing password | gs_passwd | server | |
| (3) Cluster management | Joining a cluster configuration | gs_joincluster | client |
| Leaving a cluster configuration | gs_leavecluster | client | |
| Stopping a cluster | gs_stopcluster | client | |
| Getting cluster configuration data | gs_config | client | |
| Getting node status | gs_stat | client | |
| Adding a node to a cluster | gs_appendcluster | client | |
| Manual failover of a cluster | gs_failovercluster | client | |
| Getting partition data | gs_partition | client | |
| Increasing the no. of nodes of the cluster | gs_increasecluster | client | |
| Set up autonomous data redistribution of a cluster | gs_loadbalance | client | |
| Controlling the checkpoint of the node | gs_checkpoint | server | |
| (4) Log data | Displaying recent event logs | gs_logs | client |
| Displaying and changing the event log output level | gs_logconf | client | |
| (5) Backup/restoration | Backup | gs_backup | server |
| Check backup data | gs_backuplist | server | |
| Restoration | gs_restore | server | |
| (6) Import/export | Import | gs_import | client |
| Export | gs_export | client | |
| (7) Maintenance | Displaying and changing parameters | gs_paramconf | client |
[Memo]
- Operating commands can be executed by an administrator user only.
- See the chapter on “Import/Export” for details on import/export.
5.2 Common functions of operating commands
[Command option]
The options below are common options that can be used in all commands.
| Option | Description |
|---|---|
| -h | --help | Display the command help. |
| --version | Display the version of the operating command. |
[Example]
- Display the command help and version.
$ gs_startnode -h
Usage: gs_startnode [-u USER/PASS [-w [WAIT_TIME]] ]

Start the GridDB node.

$ gs_stat --version
gs_stat [V2.5.00]
The options below are common options that can be used in some of the commands.
| Option | Description |
|---|---|
| -s <Host>[: <Port no.> ] | -p <Port no.> | The host name or the server name (address) and port number |
| that is connection port no. of the operating command. | |
| The value "localhost (127.0.0.1):10040" is used by default. | |
| -u <User name>/<Password> | Specify authentication user and password. |
| -w|--wait [<No. of sec>] | Wait for the process to end. |
| There is no time limit if the time is not set or if the time is set to 0. | |
| -a|--address-type <Address type> | Specify the service type of the port, address to display. |
| system: Connection address of operating command | |
| cluster: Reception address used for cluster administration | |
| transaction: Reception address for transaction process | |
| sync: Reception address used for synchronization process | |
| --no-proxy | If specified, the proxy will not be used. |
[Memo]
- When executing an operating command, specify the administrator user as the authentication user.
[Termination status]
The end status of the command is shown below.
- 0:Normal
- 1:Error
- 2:Timeout
[Log file]
Log file of the command will be saved in ${GS_LOG}/command name.log.
[Example] The log file below is created if the GS_LOG value is " /var/lib/gridstore/log (default)" and the "gs_startnode" command is executed.
- /var/lib/gridstore/log/gs_startnode.log
5.3 Points to note during use
[Before using an operating command]
-
If a proxy variable (http_proxy) has been set up, specify the --no-proxy option or set the address (group) of the GridDB node in no_proxy and exclude it from the proxy. As an operating command will perform REST/http communications, the proxy server may be connected by mistake, thereby deactivating the operating command.
$ export http_proxy=proxy.example.net:8080
$ gs_paramconf -u admin/admin --show storeMemoryLimit
A00110: Check the network setting. (HTTP Error 403: Forbidden)

$ gs_paramconf -u admin/admin --show storeMemoryLimit --no-proxy
"1024MB"
- For commands which has the optional setting “server: port”, there is no need to specify the option if the port setting has not been changed from the default. In addition, if the optional setting “server: port” is specified, this command can be executed from a computer that is different from the one that started the node.
- When specifying the server:port used in an operating command, specify the value of /system/serviceAddress of the node definition file gs_node.json in the server and the value of /system/servicePort in the port.
[To compose a cluster]
A cluster is composed of a group of 1 or more nodes, consisting of a master with the rest being followers.
In a cluster configuration, the number of nodes already participating in a cluster and the number of nodes constituting a cluster are important. The number of nodes already participating in a cluster is the actual number of nodes joined to the cluster. The number of nodes constituting a cluster is the number of nodes that can join the cluster which is specified in the gs_joincluster command.
The number of nodes already participating in a cluster and the number of nodes constituting a cluster can be checked by executing a gs_stat command on the master node, with the values being /cluster/activeCount and /cluster/designatedCount respectively.
The main procedure to create/change a cluster configuration is shown below for reference purposes. See the following sections for details of each command.
- To compose a cluster
-
- Start all nodes joining the cluster (gs_startnode command execution).
- Specify the number of nodes constituting a cluster and cluster name for all nodes and attach them (join) to the cluster (gs_joincluster command execution).
- When Step 1) and 2) are completed, the master node is determined and service will be started.
- Check the cluster configuration status (gs_config command execution).
- To make a node stop
-
- Detach the node to stop from the cluster configuration (gs_leavecluster command execution).
- Stop the node (gs_stopnode command execution).
- To stop a cluster
-
- Stop the cluster and let all the nodes leave the cluster configuration (gs_stopcluster command execution).
- Stop each node when stopping all the nodes instead of just the cluster (gs_stopnode command execution).
- To restart a cluster
-
- Start a stopped node if the node has been stopped (gs_startnode command execution).
- Attach (join) all nodes constituting the cluster to the cluster (gs_joincluster command execution).
- Check the cluster configuration status (gs_config command execution).
- To add a node to a cluster in operation without stopping it
-
- Specify the destination cluster and attach (join) the nodes to the cluster (gs_appendcluster command execution).
- Check the cluster configuration status (gs_config command execution).
- To remove a node from a cluster
-
- Detach the node from the cluster (gs_leavecluster command execution).
- Check the cluster configuration status (gs_config command execution).
5.4 Starting/stopping a node
5.4.1 Starting a node
Execute the GridDB start node command on the machine executing the node. This command needs to be executed for each GridDB node.
-
Command
gs_startnode [-w|--wait [<No. of sec>] -u <User name>/<Password>] [--releaseUnusedFileBlocks] -
Options
Option Description --releaseUnusedFileBlocks Deallocate unused file blocks.
[Memo]
-
Specify the user name and password with -u option. If omitted, start configuration file will be referred.
- If the specified user name or password is invalid, an authentication error occurs.
-
By waiting for start completion with -w option, the following gs_joincluster command can be executed safely.
- Start completion means that the recovery of the database is completed.
- See the GridDB technical reference (GridDB_TechnicalReference.html) for details of the --releaseUnusedFileBlocks option.
5.4.2 Stopping a node
The following command is used to stop the GridDB node. To stop a node, the GridDB cluster management process needs to be stopped first.
-
Command
gs_stopnode [-f|--force] [-k|--kill] [-w|--wait [<No. of sec>]] [-s <Server>[:<Port no.>] | -p <Port no.>] -u <User name>/<Password> -
Options
Option Description -f|--force Stop a node by force. -k|--kill Force the node process of a local machine to stop.
[Memo]
- When stopping a specific node, the node cannot be stopped if it is joined to the cluster configuration. Stop the node after its detachment from the cluster (gs_leavecluster).
- When stopping all nodes, stop the GridDB cluster management process (gs_stopcluster) first and then stop the nodes in sequence.
- When a node is stopped, it may take a while for the process to be actually terminated due to the checkpoint process. Wait for a while until the node has stopped completely.
- Although a node can be forced to stop by specifying a --force option or --kill option, there is a risk that data may be lost.
- The node process of a remote machine cannot be stopped with the --kill option.
5.5 User management
The user management is used to perform registration/deletion/password change for GridDB administrator user.
The default user below exists after installation.
-
Default user
User Password Usecase example admin admin For authentication of operation administrator user, operation commands system manager For authentication of application user, client execution
[Points to note]
- A GridDB user is different from an OS user.
-
In order to use it for authentication purposes in the client, the same user data needs to be registered in all the nodes constituting the cluster. Copy the user definition file etc. so that the same user data will be referenced by all the nodes. The default file is as shown below.
-
/var/lib/gridstore/conf/password
-
- When user registration/deletion/password change is carried out, distribute the revised user definition file to all the nodes, stop the cluster, restart the nodes, and then recompose the cluster.
5.5.1 Registration of administrator user
-
Command
gs_adduser <User name> [-p|--password <Password>] -
Options
Option Description User name The username should start with "gs#", and only one or more ASCII alphanumeric characters and the underscore sign “_” can be used after “gs#”. -p|--password <Password> A prompt to input the password interactively appears by default.
[Memo]
- Execute as an OS user gsadm.
- The password is encrypted during registration.
- When an administration user is registered, distribute the user definition file of the node which executed the command to all the nodes, stop the cluster, restart the nodes, and then recompose the cluster.
- Users registered before V2.5 can be used directly as administrator users.
- Only “admin“, “system” can be re-registered even after they are deleted.
[Example]
-
Add an administrator user (“user name (gs#someone)”, “password (opensesami)”) to the user definition file.
$ gs_adduser -p opensesami gs#someone
$ gs_stopcluster -u admin/admin
Execute the following in all the nodes
$ gs_stopnode -u admin/admin
$ cp [User definition file with additional users] /var/lib/gridstore/conf/password
$ gs_startnode
$ gs_joincluster -c clsA  -n XX -u admin/admin
5.5.2 Deletion of administrator user
-
Command
gs_deluser <User name>
[Memo]
- Execute as an OS user gsadm.
- When an administration user is deleted, distribute the user definition file of the node which executed the command to all the nodes, stop the cluster, restart the nodes, and then recompose the cluster.
[Example]
-
Delete the specified administrator user (gs#someone).
$ gs_deluser gs#someone
$ gs_stopcluster -u admin/admin
Execute the following in all the nodes
$ gs_stopnode -u admin/admin
$ cp [User definition file with deleted users] /var/lib/gridstore/conf/password
$ gs_startnode
$ gs_joincluster -c clsA  -n XX -u admin/admin
5.5.3 Changing password
-
Command
gs_passwd <User name> [-p|--password <Password>] -
Options
Option Description User name The name of the administrator user whose password is going to be changed. -p|--password <Password> Specify the password of the administrator user. A prompt to input the password interactively appears by default.
[Memo]
- Execute as an OS user gsadm.
- The password is encrypted during registration.
- When the password of an administration user is changed, distribute the user definition file of the node which executed the command to all the nodes, stop the cluster, restart the nodes, and then recompose the cluster.
[Example]
-
Change the password of a specified administrator user (“user name (gs#someone)”) to foobarxyz.
$ gs_passwd -p foobarxyz gs#someone
$ gs_stopcluster -u admin/admin
Execute the following in all the nodes
$ gs_stopnode -u admin/admin
$ cp [Revised user definition file] /var/lib/gridstore/conf/password
$ gs_startnode
$ gs_joincluster -c clsA  -n XX -u admin/admin
5.6 Cluster management
5.6.1 Joining a cluster configuration
When composing a GridDB cluster, the nodes need to be attached (joined) to the cluster. The following command is used to attach the nodes.
-
Command
gs_joincluster [-c|--clusterName <Cluster name>] [-n|--nodeNum <No. of nodes constituting a cluster>] [-w|--wait [<No. of sec>]] [-s <Server>[:<Port no.>]| -p <Port no.>] -u <User name>/<Password> -
Options
Option Description -c|--clusterName <Cluster name> Specify the cluster name. Default value is "defaultCluster”. -n|--nodeNum <No. of nodes constituting a cluster> Specify the number of nodes of the cluster to be composed. Default value is 1 (single node configuration).
[Memo]
- It is recommended to use a different cluster name than the default.
-
If the cluster name of the cluster definition file (
/cluster/clusterName) has been set up, an error will occur if the specified cluster name does not match the value set. - When attaching a new node to a stable cluster, use the node expansion command (gs_appendcluster).
- When composing a cluster by attaching a node to the cluster from a specific machine, use the -w option to wait for the process to complete.
- If a large scale expansion is required, stop the cluster once and then reconstitute the cluster with the new set of nodes.
[Example] Compose a 3-node cluster with the cluster name “example_three_nodes_cluster” using node A - C
-
Start the nodes constituting the cluster and attach them to the cluster.
Execute on node A
$ gs_startnode
$ gs_joincluster -c example_three_nodes_cluster -n 3 -u admin/admin -w
Execute on node B
$ gs_startnode
$ gs_joincluster -c example_three_nodes_cluster -n 3 -u admin/admin -w
Execute on node C
$ gs_startnode
$ gs_joincluster -c example_three_nodes_cluster -n 3 -u admin/admin -w
-
Node commencement is done separately in each of the nodes (as shown above) and node entry is performed from a specific node (as shown below). In the following case, node entry is done at A.
Execute on node A - C respectively
$ gs_startnode
Execute on node A
$ gs_joincluster -c example_three_nodes_cluster -n 3 -s <node B's server address> -u admin/admin
$ gs_joincluster -c example_three_nodes_cluster -n 3 -s <node C's server address> -u admin/admin
$ gs_joincluster -c example_three_nodes_cluster -n 3 -u admin/admin -w
5.6.2 Leaving a cluster configuration
The following command is used to detach a node from a cluster.
-
Command
gs_leavecluster [-f|--force] [-w|--wait [<No. of sec>]] [-s <Server>[:<Port no.>]| -p <Port no.>] -u <User name>/<Password> -
Options
Option Description -f|--force Detach a node by force.
[Memo]
- Use the cluster stop command (gs_stopcluster) to stop a cluster with a single node configuration.
-
If there is a risk of data loss, the node cannot leave the cluster.
- Use the --force option to force the node to leave the cluster. Stop the cluster first to detach the node safely off of the cluster.
- A cluster will be stopped automatically if the number of nodes participating in a cluster is reduced to less than half the number of nodes constituting the cluster due to nodes leaving the cluster.
[Example]
-
Execute a leave cluster command on the node that you want to detach from the cluster.
$ gs_leavecluster -u admin/admin
5.6.3 Stop all clusters
The following command is used to stop a cluster.
-
Command
gs_stopcluster [-w|--wait [<No. of sec>]] [-s <Server>[:<Port no.>]|-p <Port no.>] -u <User name>/<Password>
[Memo]
- To confirm that a cluster has come to a complete stop, check the status of all nodes constituting the cluster.
- To detach a node from a cluster not in operation, use the leave cluster command (gs_leavecluster).
[Example]
-
Execute a cluster stop command.
$ gs_stopcluster -u admin/admin
5.6.4 Getting cluster configuration data
The following command is used to get the cluster configuration data (data on list of nodes joined to a cluster).
-
Command
gs_config [-s <Server>[:<Port no.>]| -p <Port no.>] -u <User name>/<Password> [-a|--address-type <Address type>] -
Options
Option Description -a|--address-type <Address type> Specify the service type of the port, address to display. system: Connection address of operating command cluster: Reception address used for cluster administration transaction: Reception address for transaction process sync: Reception address used for synchronization process
[Memo]
- Address and port information of "master" (master node), "follower" (follower node), "self" (node which executed the command) will be displayed.
- Address and port information for multicast distribution to the clients will be displayed in “multicast”.
-
The system status (status) will be one of the following.
- INACTIVE: Stop
- ACTIVATING: Start operation
- ACTIVE: In operation
- DEACTIVATING: Start stop
- ABNORMAL: Abnormal stop
- NORMAL_SHUTDOWN: Start normal shutdown
[Example]
-
The following data is output when the cluster is composed of 3 nodes and cluster configuration data is acquired from the master.
$ gs_config -u admin/admin
{
    "follower": [                       // [array] follower data
        {
            "address": "192.168.11.10", // [string] connection address of operating command
            "port": 10040               // [number] connection port of operating command
        },
        {
           "address": "192.168.11.11",
           "port": 10040
        }
    ],
    "master": {                         // master data
        "address": "192.168.11.12",     // [string] connection address of operating command
        "port": 10040                   // [number] connection port of operating command
    },
    "multicast": {                      // multicast data
        "address": "239.0.0.20",        // [string] address for multi-cast distribution to client
        "port": 31999                   // [number] Port for multi-cast distribution to client
    },
    "self": {                           // own node data
        "address": "192.168.11.12",     // [string] connection address of operating command
        "port": 10040,                  // [number] connection port of operating command
        "status": "ACTIVE"              // [string] system status
    }
}
5.6.5 Getting node status
The following command gets the cluster data (cluster configuration data and internal data), or backup progress status.
-
Command
gs_stat [-t|--type <Type>] [-a|--address-type <Address type>] [--member] [-s <Server>[:<Port no.>]|-p <Port no.>] -u <User name>/<Password> -
Options
Option Description -t|--type <Type> Display data of the specified type. backup: Display the backup status -a|--address-type <Address type> Specify the service type of the port, address to display. system: Connection address of operating command cluster: Reception address used for cluster administration transaction: Reception address for transaction process sync: Reception address used for synchronization process --member When the cluster configuration method is the fixed list method or provider method, an address list of the cluster configuration members currently recognized by the node is displayed.
[Memo]
-
The cluster status (/cluster/clusterStatus) will be one of the following.
- MASTER: Master
- SUB_MASTER: Sub-master
- FOLLOWER: Follower
- SUB_FOLLOWER: Sub-follower
- SUB_CLUSTER: cluster is not in operation
-
The system status (/cluster/nodeStatus) will be one of the following.
- INACTIVE: Stop
- ACTIVATING: Start operation
- ACTIVE: In operation
- DEACTIVATING: Start stop
- ABNORMAL: Abnormal stop
- NORMAL_SHUTDOWN: Start normal termination
-
The name of the backup process under execution or last executed is displayed in the backup status (/checkpoint/mode).
- -: Completed or not in operation
- NORMAL_CHECKPOINT: Periodic checkpoint
- REQUESTED_CHECKPOINT: Manual checkpoint
- BACKUP: Full backup
- RECOVERY_CHECKPOINT: Checkpoint (during recovery)
- SHUTDOWN_CHECKPOINT: Checkpoint (during shutdown)
- INCREMENTAL_BACKUP_LEVEL_0: baseline of differential/incremental backup
- INCREMENTAL_BACKUP_LEVEL_1_CUMULATIVE: differential backup
- INCREMENTAL_BACKUP_LEVEL_1_DIFFERENTIAL: Incremental backup
[Example]
-
The following data is output when cluster data is acquired by nodes joined to the cluster in operation.
$ gs_stat -u admin/admin
{
                :
                :
    "cluster": {
        "activeCount": 1,
        "clusterName": "defaultCluster",
        "clusterStatus": "MASTER",
        "designatedCount": 1,
        "loadBalancer": "ACTIVE",
        "master": {
            "address": "192.168.10.11",
            "port": 10010
        },
        "nodeList": [
            {
                "address": "192.168.10.11",
                "port": 10010
            }
        ],
        "nodeStatus": "ACTIVE",
        "partitionStatus": "NORMAL",
        "startupTime": "2014-08-29T09:56:20+0900",
        "syncCount": 3
    },
                :
                :
}
5.6.6 Adding a node to a cluster
Add a new node to a cluster in operation.
-
Command
gs_appendcluster --cluster <Server>:<Port no.> [-w|--wait [<No. of sec>]] [-s <Server>[:<Port no.>] | -p <Port no.>] -u <User name>/<Password> -
Options
Option Description --cluster <Server>:<Port no.> Specify the server name (address) and port no. of the node to be added to the cluster.
[Memo]
- This operation is available only when the cluster is in operation and in a stable state (i.e. number of nodes already participating in a cluster = number of nodes constituting a cluster).
- If a large scale expansion is required, stop the cluster once and then reconstitute the cluster with the new set of nodes.
- When expanding a cluster with a single node configuration that is in operation, stop the cluster once first before re-composing the cluster.
[Example]
-
Add a new node to a cluster in operation.
Check the status of the cluster to add the nodes
$ gs_stat -s 192.168.33.29:10040  -u admin/admin
{
        :
    "cluster":{                                 // cluster-related
        "activeCount":5,                        // number of nodes already participating in a cluster
        "clusterName":"function_1",             // cluster name
        "clusterStatus":"MASTER",               // cluster status
        "designatedCount":5,                    // number of nodes constituting a cluster
        :
}
Check that the number of nodes = number of nodes already participating in a cluster
If the number of nodes constituting a cluster> number of nodes already participating in a cluster, execute a gs_joincluster (add node to cluster configuration)

Start the node you want to add and specify the server address and port no. of the node joined to the cluster in operation.
$ gs_startnode
$ gs_appendcluster --cluster 192.168.33.29:10040 -u admin/admin

Check the cluster status to see if the node has been added successfully to the cluster.
$ gs_stat  -u admin/admin
{
        :
    "cluster":{                                 // cluster-related
        "activeCount":6,                        // number of nodes already participating in a cluster
        "clusterName":"function_1",             // cluster name
        "clusterStatus":"MASTER",               // cluster status
        "designatedCount":6,                    // number of nodes constituting a cluster
        :
}
5.6.7 Manual failover of a cluster
The following command is used to execute GridDB cluster failover.
-
Command
gs_failovercluster [--repair] [-s <Server>[:<Port no.>] | -p <Port no.>] -u <User name>/<Password> -
Options
Option Description --repair Accept the data lost and execute a forced failover.
[Memo]
- This command can only be executed when the cluster is in operation.
-
Basically, the command is valid in the following cases as the cluster algorithm will be executed as a normal process.
- The user detects a cluster error and executes a failover immediately.
- At the end of the data recovery from the backup data, database recovery will be deemed to be complete and the system will be started even if the partition LSN maintained by the cluster is younger than the final update LSN (Permit data lost).
[Example]
-
Execute a cluster failover.
$ gs_failovercluster -u admin/admin
5.6.8 Getting partition data
The following command is used to display the partition data of a GridDB node.
-
Command
gs_partition [-n|--partitionId <Partition ID>] [--loss] [-a|--address-type <Address type>] [-s <Server>[:<Port no.>] | -p <Port no.>] -u <User name>/<Password> -
Options
Option Description -n|--partitionId <Partition ID> Specify the partition ID to display data. (Display all data by default) --loss Display only data from missing partitions. -a|--address-type <Address type> Specify the service type of the port, address to display. system: Connection address of operating command cluster: Reception address used for cluster administration transaction: Reception address for transaction process sync: Reception address used for synchronization process
[Memo]
- The --loss option can be used only when a cluster is in operation.
- Missing partitions are partitions that cannot be accessed, including those holding replicas.
[Example]
-
Get the partition data of a specific node of a cluster in operation.
$ gs_partition -u admin/admin
[
    {
        "backup": [],
        "catchup": [],
        "maxLsn": 300008,
        "owner": {
            "address": "192.168.11.10",
            "lsn": 300008,
            "port": 10010
        },
        "pId": "0",
        "status": "ON"
    },
        :
]
5.6.9 Increasing the no. of nodes of the cluster
Increase the no. of nodes of the GridDB cluster.
-
Command
gs_increasecluster [-s <Server>[:<Port no.>] | -p <Port no.>] -u <User name>/<Password>
[Memo]
- It runs only when the cluster is running and it is in stable state. Therefore, when adding a node to an active cluster, it is necessary to add one at a time.
- If you want to perform a large-scale expansion, stop the cluster and then reconfigure the cluster by specifying the number of expanded nodes as the number of initial configuration nodes.
- When a cluster is expanded by this command, if there is a node to be expanded, that node will join to the cluster. If there are multiple nodes to be added, one of the nodes will join to the cluster.
- If the node to be expanded is not present and the cluster is expanded by this command, if the node to be expanded is specified, that node will join to the cluster.
- It is not possible to extend a single node configuration cluster while it is running. Please reconfigure the cluster after stopping the cluster.
[Example]
-
Increase the no. of nodes of the GridDB cluster and append node to the cluster.
Confirm the cluster status.
$ gs_stat -s 192.168.33.29:10040  -u admin/admin
{
        :
    "cluster":{                                 // Cluster category
        "activeCount":5,                        // No. of the active nodes
        "clusterName":"function_1",             // Cluster name
        "clusterStatus":"MASTER",               // Cluster status
        "designatedCount":5,                    // No. of the designated nodes
        :
}
Confirm that the no. of the designated nodes is equaled to the no. of the active nodes.

Start the node to be expanded, execute the gs_joincluster command with the no. of nodes after expansion (6 nodes).
$ gs_startnode -u admin/admin -w
$ gs_joincluster -u admin/admin -c function_1 -n 6

Execute the gs_increasecluster for the cluster to be expanded.
$ gs_increasecluster -s 192.168.33.29:10040 -u admin/admin

Confirm that the node to be expanded has been added to the cluster.
$ gs_stat  -u admin/admin
{
        :
    "cluster":{                                 // Cluster category
        "activeCount":6,                        // No. of the active nodes
        "clusterName":"function_1",             // Cluster name
        "clusterStatus":"MASTER",               // Cluster status
        "designatedCount":6,                    // No. of the designated nodes
        :
}
5.6.10 Set up autonomous data redistribution of a cluster
Enable/disable autonomous data redistribution of a GridDB cluster, or display the setting.
As in the case of stopping nodes and rejoining them in a cluster for rolling upgrade, by disabling autonomous data redistribution, you can eliminate redundant redistribution processing and reduce the load on the operations.
-
Command
gs_loadbalance [--on|--off] [--cluster] [-s Server[:<Port no.>] | -p <Port no.>] -u <User name>/<Password> -
Options
Option Description --on|--off Enable (--on) or Disable (--off) autonomous data redistribution. If these options are omitted, the current setting value is displayed. --cluster The setting is applied to all nodes of the cluster by specifying this option. If this option is omitted, the setting is applied to only the specified node.
[Memo]
- When you disable the autonomous data redistribution, you have to restore the setting to enable it again later. While it is not active, data replication is not performed so that the availability against node failure becomes lower.
[Example]
Confirm the settings of autonomous data redistribution on all nodes in a cluster.
$ gs_loadbalance -s 192.168.33.29:10040  -u admin/admin --cluster
192.168.33.29 ACTIVE
192.168.33.30 ACTIVE
192.168.33.31 ACTIVE

Disable the setting of the node, "192.168.33.31".
$ gs_loadbalance -s 192.168.33.31:10040  -u admin/admin --off
5.6.11 Controlling the checkpoint
Enable/disable the periodic checkpoint of a GridDB node, or execute manual checkpoint.
-
Command
gs_checkpoint [--on|--off]|[--manual [-w|--wait [No. of sec]]] [-s <Server>[:<Port no.>] | -p <Port no.>] -u <User name>/<Password> -
Options
Option Description --on|--off Enable (--on) or Disable (--off) the periodic checkpoint. If these options are omitted, the current setting value is displayed. --manual Perform the manual checkpoint.
[Memo]
- In operation, in case of disabling the periodic checkpoint temporarily, please be sure to re-enable it. While it is disabled, the size of transaction log file become larger and the time of backup operation or the time of recovery operation when restarting gets longer.
[Example]
# Disable the periodic checkpoint
$ gs_checkpoint -u admin/admin --off
# Perform the manual checkpoint and wait to complete.
$ gs_checkpoint -u admin/admin --manual -w
...
The manual checkpoint has been completed.
# Re-enable the periodic checkpoint
$ gs_checkpoint -u admin/admin --on
5.7 Log data
5.7.1 Displaying recent event logs
The following command is used to get the most recent GridDB event log.
-
Command
gs_logs [-l|--lines <No. of rows acquired>] [-g|--ignore <Exclusion key word>] [-s <Server>[:<Port no.>] | -p <Port no.>] -u <User name>/<Password> [<First key word> [<Second key word>]] -
Options
Option Description -l|--lines <No. of rows acquired> Specify the no. of rows to acquire. -g|--ignore <Exclusion key word> Ignore rows that include exclusion key words. <First key word> [<Second key word>] Get only rows that contain the key word.
[Memo]
-
Event data is output in the following format.
- Time, machine name, thread no., event type, event category, generation source file name, generation method, number of rows generated: Followed by any character string
- Check with the support desk for details.
[Example]
-
Get logs terminated by the checkpoint 3 times.
$ gs_logs -u admin/admin CP_END -l 3
2014-08-04T11:02:52.754+0900 NODE1 1143 INFO CHECKPOINT_SERVICE ../server/checkpoint_service.cpp void CheckpointService::runCheckpoint(EventContext&, int32_t, const std::string&) line=866 : [CP_END] mode=NORMAL_CHECKPOINT, backupPath=, commandElapsedMillis=132
2014-08-04T11:22:54.095+0900 NODE1 1143 INFO CHECKPOINT_SERVICE ../server/checkpoint_service.cpp void CheckpointService::runCheckpoint(EventContext&, int32_t, const std::string&) line=866 : [CP_END] mode=NORMAL_CHECKPOINT, backupPath=, commandElapsedMillis=141
2014-08-04T11:42:55.433+0900 NODE1 1143 INFO CHECKPOINT_SERVICE ../server/checkpoint_service.cpp void CheckpointService::runCheckpoint(EventContext&, int32_t, const std::string&) line=866 : [CP_END] mode=NORMAL_CHECKPOINT, backupPath=, commandElapsedMillis=138
5.7.2 Displaying and changing the event log output level
The following command is used to display or change the event log output level. Get the list of settings if the argument is not specified.
-
Command
gs_logconf [-s <Server>[:<Port no.>]|-p <Port no.>] -u <User name>/<Password> [<Category name> <Output level>] -
Options
Option Description <Category name> <Output level> Specify the category name and output level.
[Memo]
- When displaying a list of the event log output level, omit [Category output level] and execute.
- All output log data with an output level higher than the level specified will be output. For example, if INFO is set, the INFO, WARNING, and ERROR logs will be output.
-
A list of the output levels from high to low is shown below.
- ERROR
- WARNING
- INFO
- DEBUG
- When a node is shutdown, settings changed by an executed command will not be saved.
- The log output level is either the default value given in gs_node.json of the sample, or a level lower than that is recommended to be set. Please refer to the list of parameters in Annex for the default value.
[Example]
-
Change the log output level and display the event log status.
$ gs_logconf -u admin/admin CHUNK_MANAGER INFO
$ gs_logconf -u admin/admin
{
    "levels": {
        "CHECKPOINT_SERVICE": "INFO",
        "CHECKPOINT_SERVICE_DETAIL": "ERROR",
        "CHUNK_MANAGER": "INFO",
        "CLUSTER_OPERATION": "INFO",
            :
            :
    }
}
5.8 Backup/restoration
5.8.1 Backup
The following command is used to get GridDB backup data on a per-node basis while continuing services.
A backup of the entire cluster can be carried out while continuing services by backing up all the nodes constituting the cluster in sequence.
-
Command
gs_backup [--mode <Mode> [--skipBaseline]] -u <User name>/<Password> <Backup name> -
Options
Option Description --mode <Mode> Specify the backup mode. - auto: auto backup - auto_nostop: auto backup (no node stop when an error occurs) - baseline: Create a full backup of the differential/incremental backup baseline - since: After creating a baseline, perform a differential backup from the baseline of the updated data blocks - incremental: After creating a baseline, or after the last incremental, since backup, perform an incremental backup of the updated data blocks --skipBaseline If mode is auto or auto_nostop, omit a baseline backup operation. Otherwise, ignore this option. Backup name Specify the directory name of the backup data.
<mode option>
- auto
-
As the data update log file is automatically copied to the backup directory, the user does not need to perform any backup. However, recovery may take a while when a failure occurs during backup of the log file. A full backup is recommended to be performed regularly.
- auto_nostop
-
Even if an error occurred in the log output on the backup end, the node will not stop even though a trace log output will be carried out to stop duplicated output. If auto_nostop is not specified, the node will stop as a system error.
- baseline
-
Create a backup data baseline. In a differential backup, differential data updated from the baseline is backed up.
- since
-
After executing a backup with a specified baseline, updated data will be backed up (differential backup).
- incremental
-
After executing a backup with a specified baseline, or after the last incremental, since backup was executed, updated data blocks will be backed up (incremental backup).
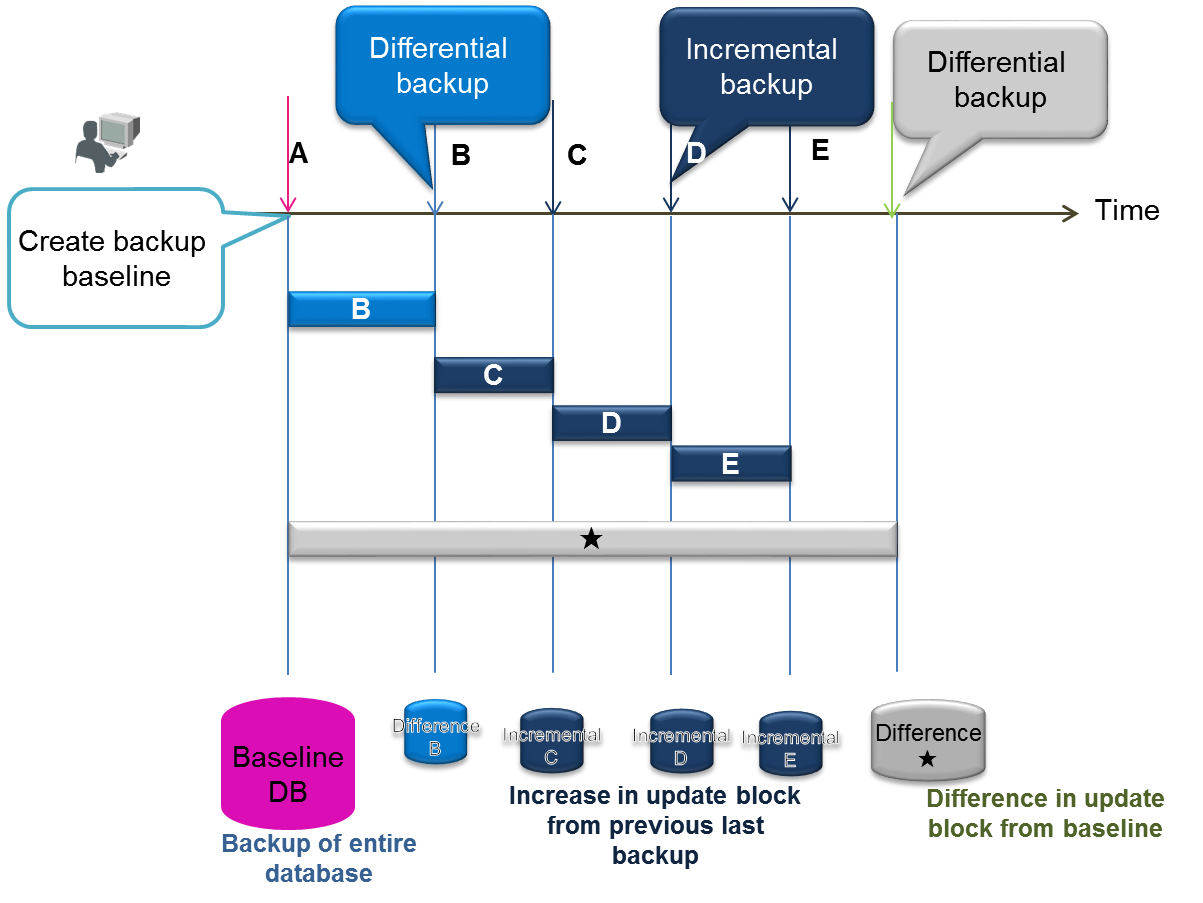
Backup
[Memo]
- Up to 12 alphanumeric characters can be set for the backup name.
- See “GridDB backup guide” (GridDB_BackupGuide.html) for the backup details.
- The backup file is created under the backup file directory specified in the node definition file (gs_node.json). It is recommended to store the backup file in a separate physical location from the data directory.
- When restoring a GridDB cluster database to the correct status, the backup and restoration processes need to be carried out for the entire cluster.
- Control will return after the command is executed but depending on the data size and online processing load, it may take several hours or more for the backup to complete. The progress status of the backup can be acquired with a gs_stat command.
- When a backup is performed while the cluster is in operation, the backup may be created with the entire cluster in a non-conforming state if multiple containers have are created. If necessary, ban transaction services so that the backup can be executed in the static state.
- In GridDB, data will be automatically re-arranged when a failure occurs. Therefore, if a failure occurs during backup, perform the backup again starting from the first node.
- When specifying --skipBaseline option with the automatic log backup, please take a backup using the other method instead of the online backup function of GridDB. See “GridDB backup guide” (GridDB_BackupGuide.html) for the details.
[Example]
-
Perform a backup in the node being started
Check the directory where the backup file is stored (backup directory) $ cat /var/lib/gridstore/conf/gs_node.json # configuration check { "dataStore":{ "dbPath":"/var/lib/gridstore/data", "backupPath":"/var/lib/gridstore/backup", # backup directory "storeMemoryLimit":"1024MB", "concurrency":4, "logWriteMode":1, "persistencyMode":"NORMAL" : : } Execute backup $ gs_backup -u admin/admin 20150425 # backup execution Depending on the data size and load condition, it may take several hours or more for the backup to be completed. The progress status of the backup can be checked with a gs_stat command. $ gs_stat -u admin/admin --type backup BackupStatus: Processing # backup in progress -
The backup status output by gs_stat (BackupStatus) is one of the following.
- Processing: Full backup execution in progress
- Processing (Baseline): Creation of differential/incremental backup baseline in progress (full backup)
- Processing (Since): Differential backup in progress
- Processing (Incremental) Incremental backup in progress
- -: Completed or not in operation
-
The following file is created upon executing a backup.
-
Directory specified in BACKUPNAME will be created under the backup directory (
/var/lib/gridstore/backup). During a differential/incremental backup, BACKUPNAME_lv0 (baseline directory of differential/incremental backup ), BACKUPNAME_lv1_NNN_MMM (differential (Since) and incremental (Incremental) directory of differential/incremental backup) are created. -
The backup files below will be created.
- Checkpoint file (gs_cp_n_p.dat)
- Transaction log file (gs_logs_n_m.log)
- Backup data file (gs_backup_info.json,gs_backup_info_digest.json)
- LSN data file (gs_lsn_info.json)
-
Directory specified in BACKUPNAME will be created under the backup directory (
5.8.2 Checking backup data
The following is used to get a list of the backup data in the backup directory set up in the node definition file (gs_node.json).
-
Command
gs_backuplist [-s <Server>[:<Port no.>]|-p <Port no.>] -u <User name>/<Password> [--partitionId <Partition ID>|<Backup name>] -
Options
Option Description --partitionId <Partition ID> Display the LSN data of the specified partition in a list. Backup name Specify the backup name.
[Memo]
- A list of the backup data can be displayed regardless of the startup status of the nodes. The Status appears as “P” if the backup process is in progress with the nodes started.
- If the status displayed is NG, the backup file may be damaged and so restoration is not possible.
- Backup names marked with an “*” at the start of the name in the list display is differential/incremental backup data.
- The status of the differential/incremental backup is always displayed as "-". Multiple backups taken in differential/incremental backup can be checked with detailed data specifying the backup name.
[Example]
-
Verify the backup data in the node where you want to check the list of backup data.
Display a list of the backup names.
$ gs_backuplist -u admin/admin

BackupName   Status   StartTime                EndTime
------------------------------------------------------------------------
*201504          --  2015-04-01T05:20:00+0900 2015-04-24T06:10:55+0900
*201503          --  2015-03-01T05:20:00+0900 2015-04-24T06:05:32+0900
  :
 20141025NO2     OK   2014-10-25T06:37:10+0900 2014-10-25T06:37:10+0900


Specify the individual backup name and display the detailed data.
$ gs_backuplist -u admin/admin 201504

BackupName : 201504

BackupData            Status   StartTime                EndTime
--------------------------------------------------------------------------------
201504_lv0                OK  2015-04-01T05:20:00+0900 2015-04-01T06:10:55+0900
201504_lv1_000_001        OK  2015-04-02T05:20:00+0900 2015-04-01T05:20:52+0900
201504_lv1_000_002        OK  2015-04-03T05:20:00+0900 2015-04-01T05:20:25+0900
201504_lv1_000_003        OK  2015-04-04T05:20:00+0900 2015-04-01T05:20:33+0900
201504_lv1_000_004        OK  2015-04-05T05:20:00+0900 2015-04-01T05:21:15+0900
201504_lv1_000_005        OK  2015-04-06T05:20:00+0900 2015-04-01T05:21:05+0900
201504_lv1_001_000        OK  2015-04-07T05:20:00+0900 2015-04-01T05:22:11+0900
201504_lv1_001_001        OK  2015-04-07T05:20:00+0900 2015-04-01T05:20:55+0900


When investigating the LSN no. of the data maintained in the partition.
$ gs_backuplist -u admin/admin --partitionId=68
 BackupName      ID   LSN
---------------------------------------------------------------------------------
*201504          68   81512
*201503          68   2349
 20140925        68   0
5.8.3 Restoration
The following command is used to restore a GridDB backup file.
-
Command
gs_restore [--test] [--updateLogs] <Backup name> -
Options
Option Description --test Get backup data used for restoration purposes without performing a restoration. --updateLogs If specified, restore only log and json files and overwrite existing files. Backup name Specify the directory name of the backup file to restore.
[Memo]
- When restoring data, the node needs to be stopped.
- Take note of the number of partitions and the parameter value of the processing parallelism in the cluster definition file. Set the configuration value of the node to restore to be the same as the configuration value of the backup node. The node cannot start correctly if it is not the same.
- If you want to restore the backup state correctly, the backup and restoration tasks need to be carried out for the entire cluster.
- For example, even if some of the nodes are restored, these nodes cannot be returned to the state they were in at the time of the backup. After restoration, it is necessary to attach the nodes to the cluster in operation in order to use the data. However, if the data is updated in the cluster after backup, the restored data will be updated by the (updated) cluster data. In particular, if the cluster configuration has changed from the time the backup was created, there will be no restoration effect. As the data will be autonomously re-arranged if the node is forced to join a cluster, there is a high probability that the data will become invalid even when restored.
- If data is missing in the backup data file, or if the contents have been revised, a GridDB node will not be able to start services.
- If a signal (Ctrl+C) is sent in the middle of a restoration and the process gets interrupted, the data in the middle of the restoration will be deleted.
[Example]
-
Restore backup data. Execute a restoration with the executing node stopped.
Move the files in the database file directory Specify the database file directory with the node definition file (gs_node.json) $ mv ${GS_HOME}/data/*.{dat,log} ${GS_HOME}/temp # Move the database file Check the data to be restore prior to the restoration $ gs_restore --test 20150424 BackupName : 20150424 BackupFolder : /var/lib/gridstore/data/backup RestoreData Status StartTime EndTime -------------------------------------------------------------------------------- 201504_lv0 201504_lv1_001_001 OK 2015-04-07T05:20:00+0900 2015-04-01T05:20:55+0900 Execute a restoration $ gs_restore 20150424 # restoration -
In this example, when a restore is executed, after the backup file group from the 201504_lv0 directory under the backup directory (
/var/lib/gridstore/backup) is copied to the data directory (/var/lib/gridstore/data), data in 201504_lv1_001_001 is also copied. - At the end of the restoration, follow the same procedure as a normal start-up to start the restored node and let it join a cluster.
- After start-up, the database file (backup file group) arranged by the restoration is imported and at the end of the import, the GridDB node starts services.
5.9 Maintenance
5.9.1 Displaying and changing parameters
The following command is used to display or change the node parameters.
-
Command
gs_paramconf [-s <Server>[:<Port no.>]|-p <Port no.>] -u <User name>/<Password> --show [<Parameter name>] | --set <Parameter name> <Value> -
Options
Option Description --show [<Parameter name>] Display the specified parameter. If the parameter is not specified in the command, all parameters will be displayed instead. --set <Parameter name> <Value> Change the specified parameter to the specified value.
[Memo]
- A parameter change (--set) changes the parameter value of a node in operation dynamically. When a node is shutdown, settings changed by the executed command will not be saved.
-
The following are the 2 parameters that can be specified.
- storeMemoryLimit: Upper limit of the store memory
- checkpointMemoryLimit: Upper limit of the checkpoint memory
- See Parameter list for details including the data type of the parameter, etc.
[Example]
-
Change the parameter
storeMemoryLimitand display the value.$ gs_paramconf -u admin/admin --set storeMemoryLimit 2048MB $ gs_paramconf -u admin/admin --show storeMemoryLimit "2048MB"
6 Export/import
In the GridDB export/import tools, to recover a database from local damages or the database migration process, save/recovery functions are provided in the database and container unit.
In addition, there is also a function to link up with RDB, and RDB data can also be collected and registered in GridDB.
6.1 Overview
In a GridDB cluster, container data is automatically arranged in a node within a cluster. The user does not need to know how the data is arranged in the node (data position transmission).
There is also no need to be aware of the arrangement position in data extraction and registration during export/import as well. The export/import configuration is as follows.
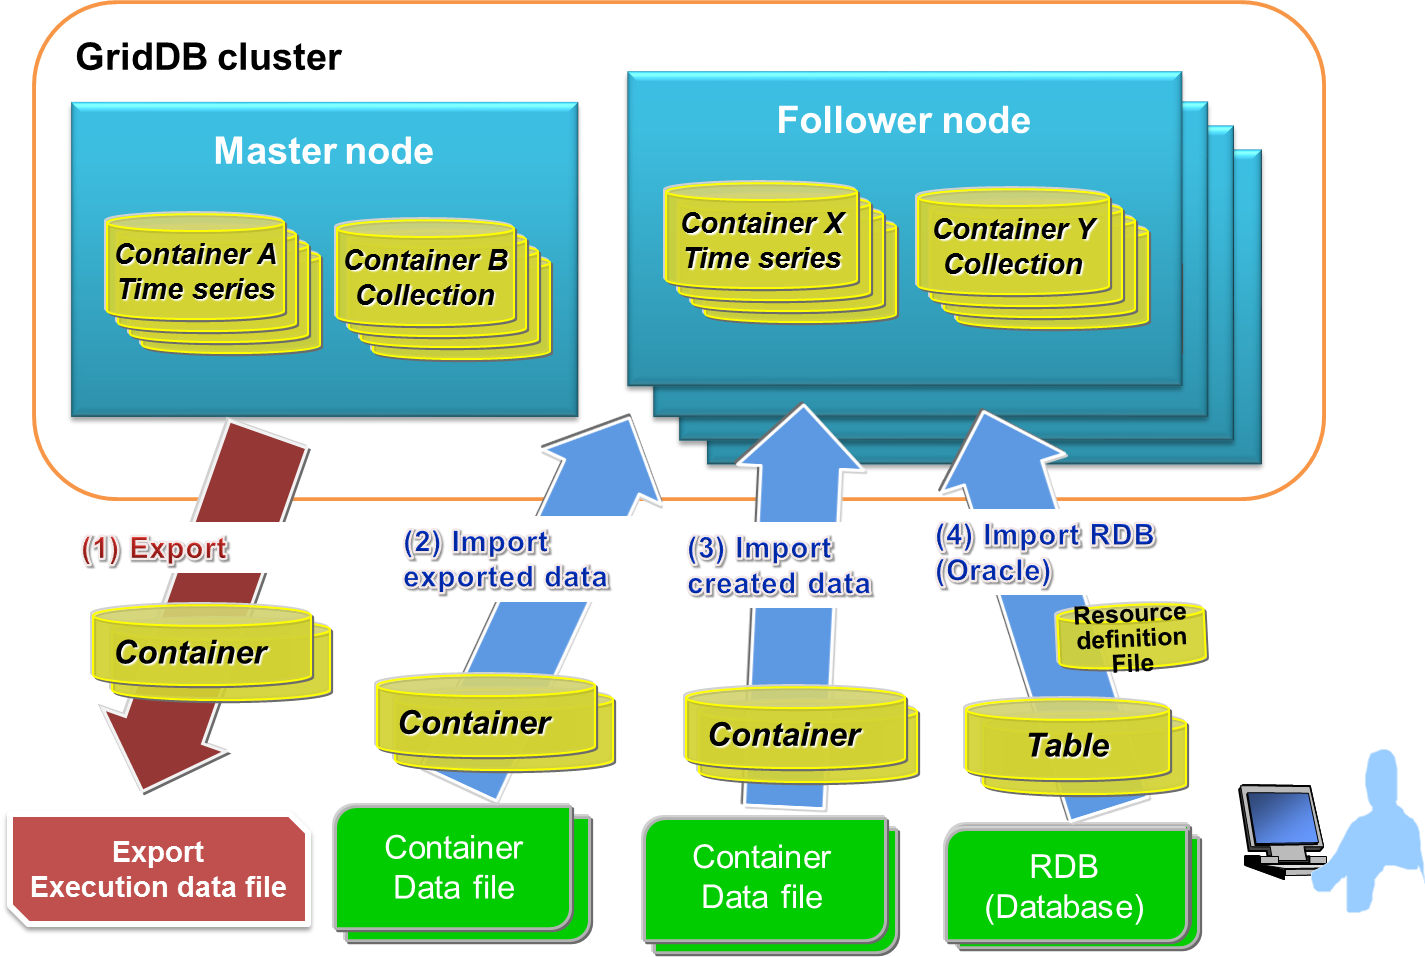
Export/import configuration
[Export]
(1) Save the container and row data of a GridDB cluster in the file below. A specific container can also be exported by specifying its name.
-
Container data file
- Save GridDB container data and row data.
- There are 2 types of format available, one for saving data in a container unit and the other for consolidating and saving data in multiple containers.
-
Export execution data file
- Save the data during export execution. This is required to directly recover exported data in a GridDB cluster.
See the various sections in Container data files and Export execution data file for details.
[Import]
(2) Import the container and export execution data files, and recover the container and row data in GridDB. A specific container data can also be imported as well.
(3) Import container data files created by the user, and register the container and row data.
(4) Import RDB (Oracle) data, then correlate and register data from an RDB table to a GridDB container.
[Memo]
- An exported container data file has the same format as the container data file created by a user.
- If the container during export is manipulated, the manipulated data may be referenced.
6.1.1 Container data files
Container data files are composed of metadata files and row data files.
A metadata file is a file in the json format which contains the container type and schema, the index set up, and the trigger data.
There are 2 types of row data file, one of which is the CSV data file in which container data is stored in the CSV format, and the other is the binary data file in which data is stored in a zip format.
-
CSV data file:
- Stores container row data as CSV data. Readability is high, and the file can be imported and edited with generic tools.
- If the row data is a specific data type such as BLOB, spatial data, array etc., the data is stored in an external object file while only the external object file name is stored in a CSV data file. An external object file is created for each row data.
-
Binary data file:
- Stores container row data in the Zip format. Can be created with the command gs_export only. Size is smaller compared to a CSV data file. In addition, the number of files can be reduced as there is no need to create external object files. However, binary data files are not readable and cannot be edited.
See Format of a container data file for details of the contents described in each file.
In addition, there are 2 types of container data file as shown below depending on the number of containers to be listed.
- Single container configuration: Holds 1 container data file for each container
- Multi-container configuration: Consolidates multiple containers into a single container data file
Hereinafter, container data files of various configurations will be written as single container data file and multi-container data file.
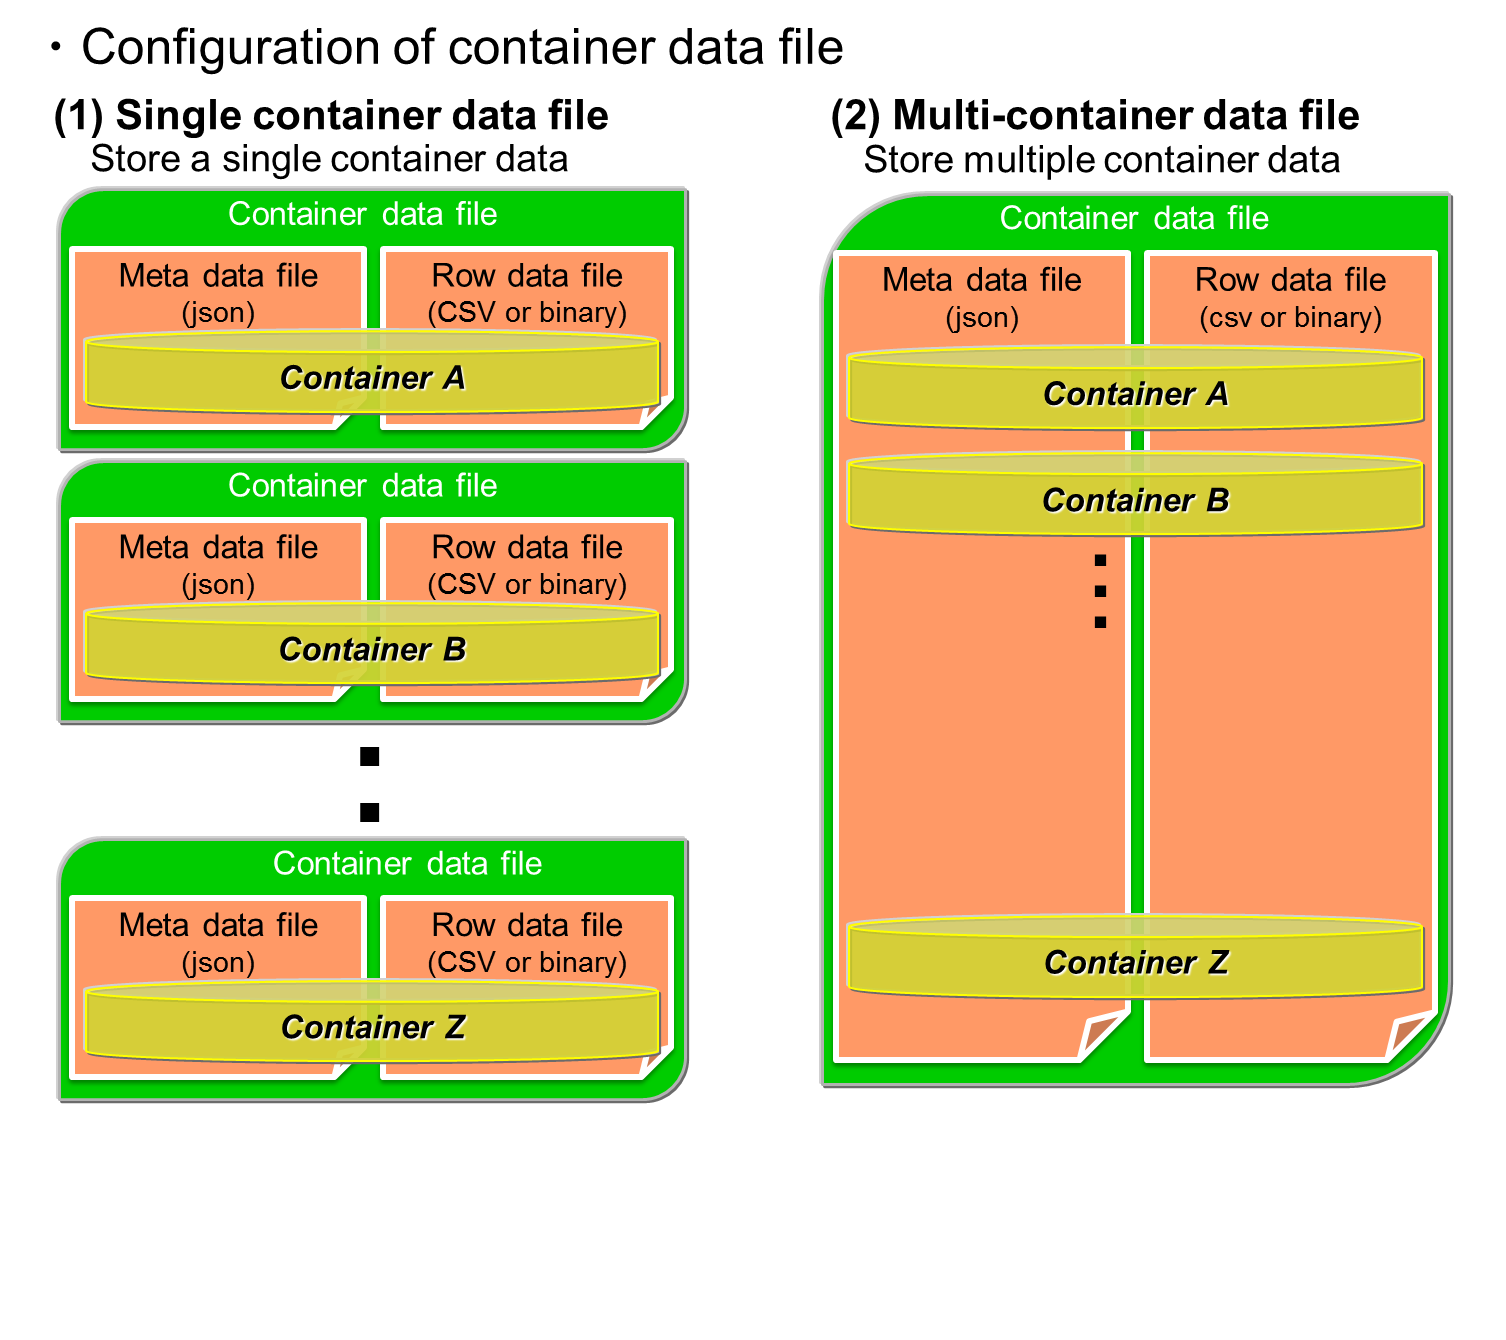
Container data file
When a large container is specified as a single container data file and export is executed, management becomes troublesome as a large amount of metadata files and row data files are created. On the other hand, even if a large container is specified as a multi-container data file, only 1 metadata file and row data file is output.
Therefore, it is recommended that these 2 configurations be used differently depending on the application.
A single container data file is used in the following cases.
- To output the current data of a specific container to perform data analysis.
- To create many containers with the same schema as existing containers to register data.
A multi-container data file is used in the following cases.
- To backup a specific container group.
- To move a database to a different GridDB cluster.
6.1.2 Export execution data file
Data such as the export date and time, the number of containers, container name etc. is saved in the export execution data file. This file is required to directly recover exported data in a GridDB cluster.
[Memo]
- The file name of an export execution data file is gs_export.json.
- Delete the export execution data if an exported container data file is edited manually. A registration error may occur due to discrepancies in the data.
- When importing without any export execution data file, it is essential that the container metadata file be specified. If not, import will fail.
- When importing from RDB, the export execution data file is not required.
6.2 Configuration of export/import execution environment
The following settings are required to execute an export/import command.
6.2.1 RPM package installation
The client package containing the export/import functions and Java library package need to be installed.
[Example]
# rpm -Uvh griddb-xx-client-X.X.X-linux.x86_64.rpm
Preparing...                   ########################################### [100%]
User and group has already been registered correctly.
GridDB uses existing user and group.
   1:griddb-xx-client          ########################################### [100%]

# rpm -Uvh griddb-xx-java_lib-X.X.X-linux.x86_64.rpm
Preparing...                   ########################################### [100%]
   1:griddb-xx-java_lib        ########################################### [100%]
6.2.2 Property file settings
Property file is /var/lib/gridstore/expimp/conf/gs_expimp.properties . Set together with the GridDB cluster configuration used as a gsadm user.
The property file contains the following settings.
| Parameter | Setting conditions | Default value | Description |
|---|---|---|---|
| mode | Essential | MULTICAST | Specify the type of connection method. If the method is not specified, the method used will be the multicast method. |
| MULTICAST: multicast method | |||
| FIXED_LIST: fixed list method | |||
| PROVIDER: provider method | |||
| hostAddress | Essential if mode=MULTICAST | 239.0.0.1 | Specify the /transaction/notificationAddress in the GridDB cluster definition file (gs_cluster.json). Multicast address used by the export/import tool to access a cluster. |
| hostPort | Essential if mode=MULTICAST | 31999 | Specify the /transaction/notificationPort in the GridDB cluster definition file (gs_cluster.json). Port of multicast address used by the export/import tool to access a cluster. |
| jdbcAddress | Essential if mode=MULTICAST on AE | 239.0.0.1 | Specify /sql/notificationAddress in the GridDB cluster definition file (gs_cluster.json) when using the multicast method. |
| jdbcPort | Essential if mode=MULTICAST on AE | 41999 | Specify /sql/notificationPort in the GridDB cluster definition file (gs_cluster.json) when using the multicast method. |
| notificationMember | Essential if mode=FIXED_LIST | - | Specify /cluster/notificationMember/transaction of the cluster definition file (gs_cluster.json) when using the fixed list method to connect. Connect address and port with a “:” in the description. For multiple nodes, link them up using commas. |
| Example)192.168.0.100:10001,192.168.0.101:10001 | |||
| jdbcNotificationMember | Essential if mode=FIXED_LIST on AE | - | Specify sql/address and sql/port under the /cluster/notificationMember of the cluster definition file (gs_cluster.json) when using the fixed list method to connect. Connect address and port with a “:” in the description. For multiple nodes, link them up using commas. |
| Example)192.168.0.100:20001,192.168.0.101:20001 | |||
| notificationProvider.url | Essential if mode=PROVIDER | - | Specify /cluster/notificationProvide/url of the cluster definition file (gs_cluster.json) when using the provider method to connect. |
| restAddress | - | 127.0.0.1 | Specify /system/listenerAddress of the GridDB node definition file (gs_node.json). Parameter for future expansion. |
| restPort | - | 10040 | Specify /system/listenerPort of the GridDB node definition file (gs_node.json). Parameter for future expansion. |
| clusterName | Essential | INPUT_YOUR_CLUSTER_NAME_HERE | Specify the cluster name specified when forming a cluster name configuration (specify with the gs_joincluster command). |
| logPath | - | /var/lib/gridstore/log | Specify the directory to output the error data and other logs when using the export/import tools Log is output in gs_expimp-YYYYMMDD.log under the directory. |
| commitCount | - | 1000 | Specify the number of rows as a unit to register data when registering container data with the import tool. When the numerical value becomes larger, the buffer for data processing gets larger too. If the row size is small, raise the numerical value, and if the row size is large, lower the numerical value. The parameter affects the registration performance for data import. |
| transactionTimeout | - | 2147483647 | Specify the time allowed from the start until the end of a transaction. When registering or acquiring a large volume of data, a large numerical value matching the data volume needs to be set. A maximum value has been specified for processing a large volume of data by default. (Unit: second) |
| failoverTimeout | - | 10 | Specify the failover time to repeat retry starting from the time a node failure is detected. This is also used in the timeout of the initial connection to the cluster subject to import/export. Increase the value when performing a process such as registering/acquiring a large volume of data in/from a container. (Unit: second) |
| jdbcLoginTimeout | - | 10 | Specify the time of initial connection timeout for JDBC. (Unit: second) |
| rdb.driver | Essential for RDB linkage | - | Parameter for RDB linkage. Specify the path of the JDBC driver. |
| rdb.kind | Essential for RDB linkage | oracle | Parameter for RDB linkage. Specify the type of RDB "oracle". |
| rdb.host | Essential for RDB linkage | - | Parameter for RDB linkage. Specify the host name (address)) used to access RDB. |
| rdb.port | Essential for RDB linkage | - | Parameter for RDB linkage. Specify the port no. used to access RDB. |
| rdb.database | Essential for RDB linkage | - | Parameter for RDB linkage. Specify the applicable database name. |
| rdb.url | Essential for RDB linkage | - | Parameter for RDB linkage. Specify the connection character string when accessing the RDB. Specify a set of the host, port and database or the url in the RDB connection destination. |
| rdb.user | Essential for RDB linkage | - | Parameter for RDB linkage. Specify the user to access the target database. |
| rdb.password | Essential for RDB linkage | - | Parameter for RDB linkage. Specify the password of the user to access the target database. |
| load.input.threadNum | - | 1 | Parameter for RDB linkage. Specify the number of processing threads to collect from RDB. (1-64) |
| load.output.threadNum | - | 1 | Parameter for RDB linkage. Specify the number of processing threads to register in GridDB. (1-16) |
| storeBlockSize | - | 64KB | Specify the block size specified in a GridDB cluster. The upper limit of the string data and binary data that can be registered in GridDB differs depending on the block size. |
| maxJobBufferSize | - | 512 | Specify the buffer size (in MB) to hold collection and registration data. |
6.3 Export function
The options that can be specified when using the export function is explained here (based on usage examples of the export function).
6.3.1 Specifying process target
- 1. How to specify a container
There are 3 ways to remove a container from a GridDB cluster, by specifying all the containers of the cluster: by specifying the database, and by specifying the container individually.
- (1) Specify all containers
-
- The entire containers and databases in the cluster are applicable.
- Specify --all option.
[Example]
$ gs_export --all -u admin/admin
[Memo]
- When executed by a general user, all the containers in the database (in which the general user has access rights to) will be applicable.
- (2) Specify the database
-
- All containers in the specified database are applicable.
- Specify the database name with the --db option. Multiple database names can also be specified repeatedly by separating the names with a " " (blank).
[Example]
$ gs_export --db db001 db002 -u admin/admin // Enumerate DB name. Container in the DB
[Memo]
- When executed by a general user, an error will occur if the general user has no access rights to the database specified in --db. (Process can continue if executed by --force. )
- (3) Specify container individually
-
- Specified container is applicable.
-
Enumerate the container name.
- Separate multiple container names with " " (blank) and specify them repeatedly in the --container option.
-
Regular expression and specification of the container names
- Specify the regular expression of the container names with a --containerregex option. A Java regular expression can be used in the specification. Enclose the specification with "" (double quotation) when specifying with a regular expression.
[Example]
$ gs_export --container c001 c002 -u admin/admin         // Enumerate container name
$ gs_export --containerregex "^c0" -u admin/admin        // regular expression specification: Specify containers whose container name start with c0
[Memo]
- Specify the name of the applicable database with the --prefixdb option in the --container/--containerregex option. If the --prefixdb option is omitted, the container in the default connection destination database “public” will be processed.
- When executed by a general user, an error will occur if the general user has no access rights to the database where the container specified in the --container/--containerregex option is stored. (Process can continue if executed by --force. )
- 2. How to specify a row
Rows located by a search query can be exported by specifying a search query to remove rows from a container.
All rows stored in a container which has not been specified in the search query will be exported.
- Specify search query
-
-
Specify the definition file describing the container name and search query with the --filterfile option. Describe the search query and its corresponding container in the definition file.
[Example] Execution example
$ gs_export -c c001 c002 -u admin/admin --filterfile filter1.txt

$ gs_export --all -u admin/admin --filterfile filter2.txt
[Example] Description of definition file
^cont_month     :select * where time > 100
^cont_minutes_.*:select * where flag = 0
cont_year2014   :select * where timestamp > TIMESTAMP('2014-05-21T08:00:00.000Z')
[Memo]
- Specify the containers with a regular Java expression. Example: If "container 1" is used in the description, all containers containing container 1 will be relevant (container 10, container 12 etc.). If fully consistent, use "^container1$" in the description.
- Among the containers subject to export which are specified in the --all and -c options, all rows in containers which the definition described in the definition file does not apply to will be exported.
- To describe the container and search query in 1 line, use a ":" for the separation.
- If the container applies to multiple definitions, the definition described at the beginning will be applied.
- Describe the file in the UTF-8 format.
- Execute the export test function to check whether the description of the definition file is correct.
-
Specify the definition file describing the container name and search query with the --filterfile option. Describe the search query and its corresponding container in the definition file.
- 3. How to specify user access rights
Information on GridDB cluster users and their access rights can also be exported. Use the following command when migrating all data in the cluster.
-
Specify the --all option and --acl option. However, only user information of a general user can be exported. Migrate the data on the administrator user separately (copy the user definition file).
[Example]
$ gs_export --all -u admin/admin --acl
[Memo]
- The command needs to be executed by an administrator user.
6.3.2 Specifying the output format of a row data file
A CSV data file or binary data file can be specified as the output format of a row data file.
- Output in the CSV data file
-
- Execute an export command without specifying the --binary option
- Output in the binary data file
-
- Specify the --binary [file size upper limit] option. Split the binary data file using the specified file size upper limit and export the file. The file size upper limit is specified in Mbytes. If the file size upper limit is not specified, the size upper limit will be 100 Mbytes. The maximum file size that can be specified is 1,000 Mbytes.
[Example]
$ gs_export -c c001 c002 -u admin/admin --binary

$ gs_export --all -u admin/admin --binary 500       // divide binary data file into 500 Mbytes each
6.3.3 Specifying the output configuration of container data file
A single container data file to create container data file in a container unit, or a multi-container data file to output all containers to a single container data file can be specified.
- Output using a single container data file
-
- If the --out option is not specified during export, the data will be output using a single container data file.
- Output using a multi-container data file
-
- It specifies the --out [file identifier] option. By specifying the file identifier, the file name of the metadata file will become “file identifier_properties.json”. The file will be named “file identifier.csv” or “file identifier_divN.mc” (N is the sequential number of the divided files) if the multi-container data file format is CSV, or binary respectively. The number of characters for the file identifier is limited to 20.
- If the file identifier is omitted in the --out [file identifier] option, the file identifier is the representation of executed date. (Example: 20131031_155015_810_properties.json, 20131031_155015_810.csv)
[Example]
$ gs_export -c c001 c002 -u admin/admin --out test

$ gs_export --all -u admin/admin --out           // file is created with the date
6.3.4 Specifying the output destination
The directory of the container data file can be specified as the output destination. Create a directory if the specified directory does not exist. If the directory is not specified, data will be output to the current directory when a command is executed. Use the -d option to specify the output destination.
[Example]
$ gs_export --all -u admin/admin --out test -d /tmp
[Memo]
- A directory which already contains container data files cannot be specified.
6.3.5 Specifying the number parallel executions
Get data to access a cluster in parallel with the export tool. If a command is executed in parallel on a cluster composed of multiple nodes, data can be acquired at a high speed as each node is accessed in parallel.
-
Execute in parallel for the specified number by specifying the --parallel option. When executed in parallel, the export data will be divided by the same number as the number of parallel executions. A range from 2 to 32 can be specified.
[Memo]
- The --parallel option can be specified only if the binary format (--binary option) and multi-container format (--out option) are specified.
[Example]
$ gs_export --all -u admin/admin --binary --out --parallel 4
6.3.6 Test execution function
Before exporting a container, the user can assess whether the export can be carried out correctly.
- Specify test execution
-
- The export sequence can be checked simply by adding the --test option to the export command. No files will be created as the process simply checks but does not actually acquire any data.
[Example]
$ gs_export -u admin/admin --all --test
Export Start.
[TEST Mode]
Directory       : /var/lib/gridstore/export
Number of target containers : 5

container_2 : 10
container_3 : 10
container_0 : 10
container_1 : 10
container_4 : 10

Number of target container:5 ( Success:5  Failure:0 )
Export Completed.
6.3.7 Error continuation specification
Export processing can be continued even if a row data acquisition error were to occur due to a lock conflict with another application.
-
By specifying the --force option, the export process will continue from the row data of the next container even if an acquisition error were to occur in a row data.
[Example]
$ gs_export --all -u admin/admin --force
[Memo]
- Regarding containers which skipped the processing due to an error, data will still be output to the container data file even though it is not complete. However, import processing will not be carried out as the data will not be recorded in the export execution file. After resolving the row data acquisition error, execute the export process for the relevant container again.
6.3.8 Other functions
- Detailed settings in the operating display
-
- Processing details can be displayed by specifying the --verbose option.
[Example]
$ gs_export --containerregex "^c0" -u admin/admin --verbose
Export Start.
Directory       : /data/exp
Number of target containers : 4

public.c003 : 1
public.c002 : 1
public.c001 : 1
public.c010 : 1
The row data has been acquired.: time=[5080]

Number of target container:4 ( Success:4  Failure:0 )
Export Completed.
- Suppressed settings in the operating display
-
- The processing status display can be suppressed by specifying the --silent option.
[Example]
$ gs_export -c c002 c001 -u admin/admin --silent
6.4 Import function
Import the container data file or RDB data into the GridDB cluster.
6.4.1 Types of data source for import
The input data sources used by the import tool are as follows.
- Container data file: Container data saved by the export function, or container data created by the user
-
RDB: Oracle database data
[Memo]
- RDB(Oracle) can specify only input destination with the import tool. It cannot specify an output destination with the export tool.
6.4.2 Importing from a container data file
Use the export function to import data in the exported data format into a GridDB cluster.
Specify process target
Processing data to be imported from the container data file needs to be specified.
- 1. How to specify a container
There are 3 ways to specify a container, by specifying all the containers in the container data file, by specifying the database, and by specifying the container individually.
- (1) Specify all containers
-
- All containers in all the databases are applicable.
- Specify --all option.
[Example]
$ gs_import --all -u admin/admin
- (2) Specify the database
-
- All containers in the specified database are applicable.
-
Enumerate a database name.
- Specify multiple database names repeatedly by separating the names with a " " (blank) in the --db option.
[Example]
$ gs_import --db db001 db002 -u admin/admin //Enumerate DB name. Container in the DB
- (3) Specify container individually
-
- Specified container is applicable.
-
Enumerate the container name.
- Separate multiple container names with " " (blank) and specify them repeatedly in the --container option.
-
Regular expression and specification of the container names
- Specify the regular expression of the container names with a --containerregex option. A Java regular expression can be used in the specification. Enclose the specification with "" (double quotation) when specifying with a regular expression.
[Example]
$ gs_import --container c001 c002 -u admin/admin    //Enumerate container names
$ gs_import --containerregex "^c0" -u admin/admin   //Regular expression specification: Specify containers whose container name start with c0
[Points to note]
- If the exported data in GridDB V3.2 or earlier includes the NewSQL tables created using NewSQL I/F, the NewSQL tables will be imported as collections (tables) in GridDB V3.5 or later. In addition, the index names attached to the indices of the NewSQL tables are not imported.
[Memo]
- When executed by an administrator user, a database will be created if the database does not exist at the storage location of the container.
- When executed by a general user, an error will occur if the general user has no access rights, or if the database does not exist at the storage location of the container. (Process can continue if executed by --force. )
- Specify the name of the applicable database with the --prefixdb option if the --container/--containerregex option is specified. If the --prefixdb option is omitted, the default connection destination database “public” will be processed.
- Check the container list stored in the container data file with the --list option.
If data is exported by specifying the --acl option in the export function, data on the user and access rights can also be imported. Use the following command when migrating all data in the cluster.
-
Specify the --all option and --acl option.
[Example]
$ gs_import --all --acl -u admin/admin
[Memo]
- The command needs to be executed by an administrator user.
- Use the following command when migrating all data in the cluster. Execute the command without any databases and general users existing in the migration destination.
Specifying the container data file
Specify the container data file. If this is not specified, the file in the current directory will be processed.
-
Specify the directory
- Specify the directory address of the container data file using the -d option.
- If the directory is not specified, the container data file in the current directory will be chosen instead.
[Example]
// Specify all containers from the current directory
$ gs_import --all -u admin/admin

// Specify multiple databases from a specific directory
$ gs_import --db db002 db001 -u admin/admin  -d /data/expdata

// Specify multiple containers from a specific directory
$ gs_import -c c002 c001 -u admin/admin  -d /data/expdata
[Memo]
- If the export execution data file (gs_export.json) does not exist, e.g. because the container data file is created manually; specify the metadata file (XXXXX_properties.json) using the -f option. If the -f command is not specified, import will fail.
Getting container list
The container data can be checked before importing.
[Example]
$ gs_import --list
Container List in local export file
DB            Name              Type            FileName
public        container_2       COLLECTION      container_2.csv
public        container_0       TIME_SERIES     container_0.csv
public        container_1       COLLECTION      container_1.csv
userDB        container_1_db    TIME_SERIES     userDB.container_1_db.csv
userDB        container_2_db    TIME_SERIES     userDB.container_2_db.csv
userDB        container_0_db    COLLECTION      userDB.container_0_db.csv
6.4.3 Importing from RDB
The following section explains how to import RDB (Oracle) data to a GridDB cluster.
Summary
Basically, importing from RDB is simply done by connecting to the Oracle database, collecting data with a SQL command from the specified table, and registering the data in a GridDB container.

Import from RDB
Data can be imported from RDB with the command below.
$ gs_import -u admin/admin --srcfile <resource definition file>
Specify the association between the Oracle table and GridDB container (mapping) in the resource definition file.
The following 4 settings can be specified in the json format in the resource definition file. The resource definition file is created in the RDB collection source unit.
- Connection information of RDB collection source/GridDB recovery destination
- RDB collection target table
- GridDB registered container
- Mapping data
Specifying the connection information of the RDB collection source/GridDB recovery destination
Configure the RDB connection data serving as the collection source (address, port no., etc.), JDBC driver data, and GridDB recovery destination connection data.
| Path of JDBC driver | Property file |
| RDB connection data of collection source | Property file or resource definition file |
| GridDB connection data of recovery destination | Property file or resource definition file |
[Memo]
- If the connection data has been configured in the resource definition file, use the data in the resource definition file. If the setting is omitted, use the data listed in the property file.
- See the property file and resource definition file for the description format.
Specifying the RDB collection target table
Specify the processing data to be imported from the Oracle database.
- (1) Specify the table name
-
- All columns in the specified table will be applicable.
- If the items select, where, orderby are specified, the data can also be narrowed down by using column filters and conditional filters.
[Example]
"table" : "customers",
"select" : "id, name",
"where" : "id > 5000"
The SQL to be executed is “select id, name from customers where id > 5000”.
- (2) Specify the SQL command
-
- SQL execution result is applicable.
[Example]
select * from table;                  // all columns in a table
select id, name, data from customer   // id, name, and data columns
[Memo]
-
About the column order when registered in GridDB
- If a table is specified: Same column order as a Oracle table
- If a SQL command is specified: Same as the column order specified in SQL
- If you want to change the Oracle table column order and the GridDB column order, either choose "select" for the table specified, or specify the order of the column name by specifying a SQL command.
- Note the column specification order in GridDB as only the first column can be set as the row key.
- The settings in (1) and (2) cannot be used together.
- If the SQL command is specified, the container division to be described later cannot be used.
Specifying a container subject to GridDB registration
Specify a GridDB container at the registration destination.
- Container name
- Container type
- Row key
- Index
- Trigger
- Time series data (if the container type is a timeseries container)
All registration destination data can be omitted, and association is also possible through automatic conversion of the mapping.
However, if a processing table is specified in a SQL command, the container name must also be specified.
Specifying mapping data
Perform data association between Oracle and GridDB.
1. Auto conversion
Oracle tables will be associated with GridDB containers according to the default rules. The user does not need to perform definition of the conversion.
[Default rules]
| Item | Description | Remarks |
|---|---|---|
| Container name | Specified table name if the table name is specified | |
| Specified container name if the SQL is specified | ||
| Container type | Collection | |
| Column | Name by column in SQL execution results. Specify the column name if names by column do not exist. | |
| Column data type | Data type associated with the RDB column data type. |
-
An error will occur if the Oracle table name and column name do not satisfy the GridDB naming rules (see below).
- Kanji, hiragana and katakana characters are used
- Symbol $, # are used.
-
If the above-mentioned naming rules are not satisfied, append another name to the column by following the procedure in “Specifying the processing table”.
[Example]
select 価格 as price from table
Perform association between Oracle data type and GridDB data type as shown below.
| Data type | Oracle | GridDB | Remarks |
|---|---|---|---|
| Text data type | CHAR | STRING | |
| VARCHAR2 | STRING | ||
| Numerical value data type | NUMBER(precision, scale) | DOUBLE | |
| NUMBER(precision) | LONG | ||
| Date data type | DATE | TIMESTAMP | |
| TIMESTAMP | TIMESTAMP | ||
| LOB data type | CLOB | STRING | |
| BLOB | BLOB | ||
| RAW type | RAW | STRING | |
| ROWID type | ROWID | STRING |
[Memo]
- Not compatible with the Oracle extension data type.
-
If the data type of the column is an unsupported data type, it will behave as follows.
- If all columns are specified by specifying the tables subject to collection ("table" only specification, or "select" is "*" in a "table" specification), columns with unsupported data types will be skipped, and all other columns will be subject to acquisition.
- For all other cases, an error will occur if there are columns with unsupported data types. However, if a --force option is used, columns with unsupported data types will be ignored and only columns with supported data types will be registered.
2. User definition conversion
The user can define the conversion rules.
Association between Oracle and GridDB is described in the resource definition file.
- The name and type (collection/timeseries container) of a GridDB container to store table data and SQL result data can be specified by the user.
- The name and data type of a GridDB column can be specified by the user.
The following association can be specified for the data type.
| Data type | Oracle | GridDB | Remarks |
|---|---|---|---|
| Text data type | CHAR | STRING, INTEGER | An error will occur if conversion to an INTEGER conversion failed. |
| VARCHAR2 | STRING, INTEGER | An error will occur if conversion to an INTEGER conversion failed. | |
| Numerical value data type | NUMBER(precision, scale) | BYTE, SHORT, INTEGER, LONG, FLOAT, DOUBLE | Digits may be dropped if the correct data type is not selected. |
| NUMBER(precision) | BYTE, SHORT, INTEGER, LONG, FLOAT, DOUBLE | Digits may be dropped if the correct data type is not selected. | |
| Date data type | DATE | TIMESTAMP | |
| TIMESTAMP | TIMESTAMP | ||
| LOB data type | CLOB | STRING | |
| BLOB | BLOB | ||
| RAW type | RAW | STRING | |
| ROWID type | ROWID | STRING |
[Memo]
- When converting a NUMBER, the data type can be specified as BYTE/SHORT/INTEGER/LONG/FLOAT/DOUBLE. Digits may be dropped if the correct data type is not selected.
- Data of the character data type and LOB data type data can be stored in GridDB as long as the size allows it. The size of the data that can be stored in GridDB is dependent on the block size of the node (64KB or 1MB). Set the block size of the node in the cluster definition file (gs_cluster.json), and a value that is the same as the setting in the property file.
-
If the data type of the column is an unsupported data type, it will behave as follows.
- If all columns are specified by specifying the tables subject to collection ("table" only specification, or "select" is "*" in a "table" specification), columns with unsupported data types will be skipped, and all other columns will be subject to acquisition.
- For all other cases, an error will occur if there are columns with unsupported data types. However, if a --force option is used, columns with unsupported data types will be ignored and only columns with supported data types will be registered.
Table association
An Oracle table can be associated with a GridDB container.
- (1) 1-to-1
-
An Oracle table can be associated with a GridDB container on a 1-to-1 basis.
- (2) 1-to-many
-
An Oracle table can be associated with multiple GridDB containers.
There are 2 types of 1-to-many association as shown below.
-
Column value split: Split a container by the row value
Classify data by the specified row value and store the data in a container for each value. The row value is appended at the end of the container name. ("Container name_row value")
Since the row value is assigned to the container name, the value has to be made up of alphanumeric characters and the underscore character only. If the name contains a different character type, an error will occur in the check process when a command is executed. An error will not result in the middle of creating a container as the check process is carried out before the container is created.
The only row data types that can be specified in a column value split are NUMBER, CHAR and VARCHAR2.
[Memo]
- When specifying a column value split, specify the processing target by the table name.
- For the column to be specified in a column value split, specify the column existing in the processing table, and the column included in the processing column.
- If the value of the column is Null, the name of the container where the data is stored will be "Container name_null".
[Example]
- Split the list of sensor data into containers according to the sensor ID
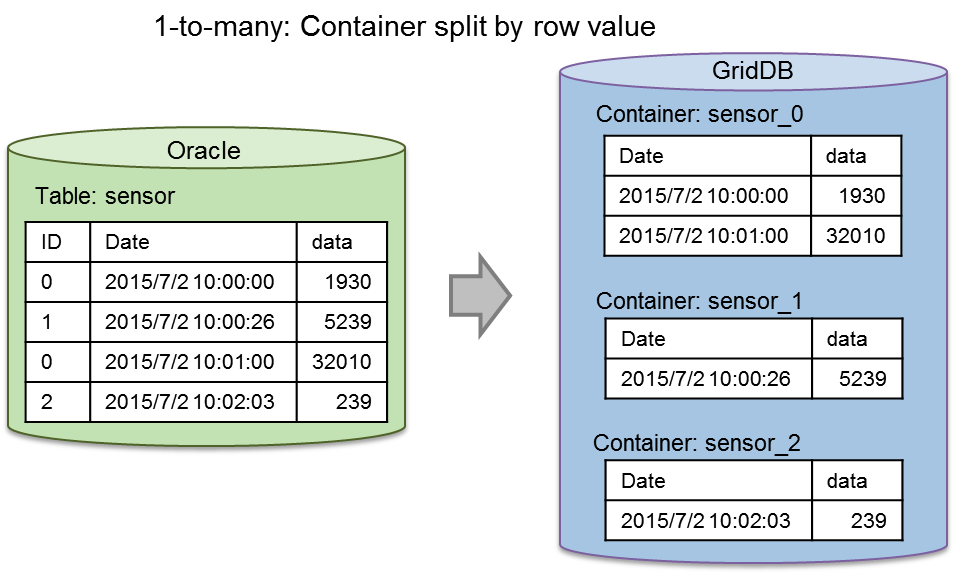
1-to-many: Column value split
-
Record number split: Split a container by the number of records
Specify the upper limit of a row to be stored in a single container If the upper limit is exceeded, the data is stored in a new container.
A serial number (integer starting from 0) is appended at the end of the container name. "Container name_serial no." (container_0, container_1, ...)
[Example]
- Split the list of sensor data into containers with 10,000 rows each
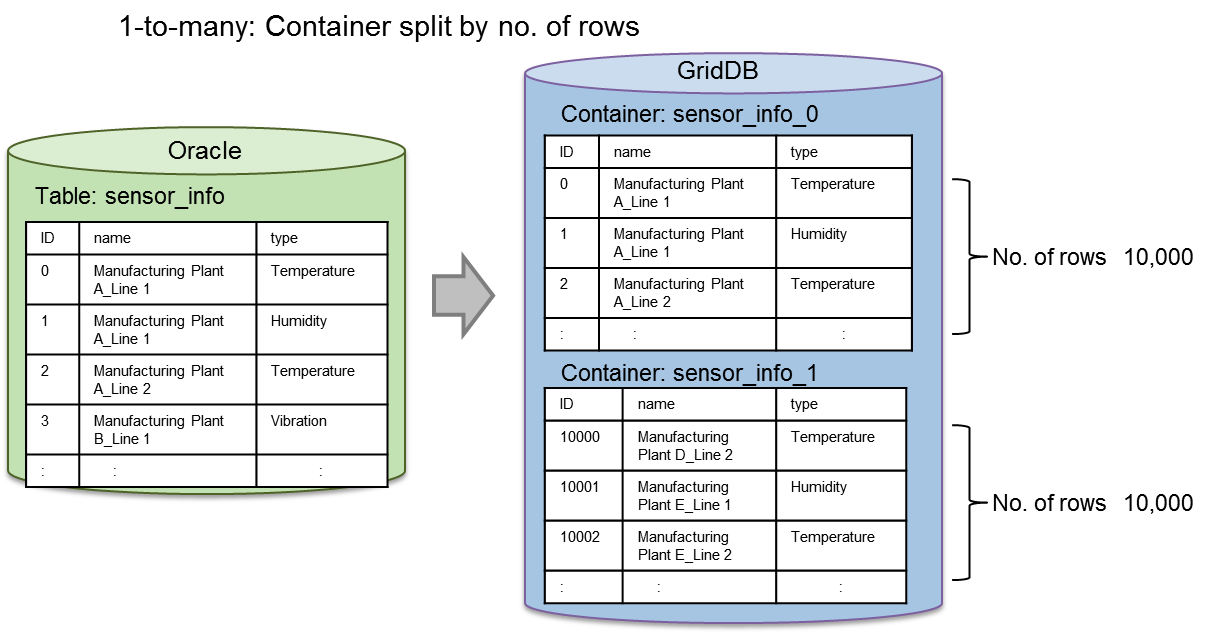
1-to-many: Record number split
[Memo]
- Both column value split and record number split can be specified. In this case, processing is carried out by the column value split first followed by record number split.
- In the case of a container split, an error will occur if a container with the same name already exists. Re-registration (--replace) is not possible even if data is added to an existing container (--append) or an existing container is deleted. Invalid even if the --append, --replace option is specified.
-
Column value split: Split a container by the row value
Column association
An Oracle column can be associated with a GridDB column on a 1-to-1 basis.
[Memo]
- If complex association including row consolidation and operation is necessary, create a view according to the conditions on the Oracle DB side and use the view as the acquisition target.
Resource definition file settings
Resource definition files are written in the json format. Specify the RDB (Oracle) data to be connected and the container data which is the recovery destination.
The settings required to connect and import data, to and from RDB (Oracle) are as follows.
| Parameters | Description |
|---|---|
| /inputSource | |
| /type | Specify "rdb" when using a RDB link. |
| /server | Can be omitted. RDB connection destination of the property file is used by default. *1 |
| /kind | Specify the type of RDB. Specify "oracle". |
| /host | Specify the address used to access RDB. |
| /port | Specify the port of the address used to access RDB. |
| /database | Specify the database name (SID). |
| /url | Specify the connection character string when accessing the RDB. (Specify the host, port, database or url. |
| /user | Specify the user to access the database. |
| /password | Specify the user password to access the database. |
| /outputSource | Can be omitted. GridDB connection destination of the property file is used by default. |
| /type | Specify "gridstore" when registering in GridDB. |
| /server | *1 |
| /host | Specify the address used to access GridDB. |
| /port | Specify the port of the address used to access GridDB. |
| /clusterName | Specify the cluster name to be connected. |
| /user | Specify the user to access the database. |
| /password | Specify the user password to access the database. |
| /targetList | |
| The following can be specified repeatedly in an array. | |
| /rdb | Specify the RDB collection targets. Either "table" or "sql" is required. |
| /table | Specify the table name. |
| /sql | Specify a SQL command. |
| /select | Specify column if the table name is specified. |
| /where | Filter the columns by conditions if the table name is specified. |
| /orderby | Sort the specified columns if the table name is specified. |
| /partitionTable | Specify true when accessing partition tables in parallel. |
| /gridstore | Specify a GridDB container at the registration destination. |
| /database | Specify the database name. Registered in the public database "public" by default. |
| /name | Specify the container name. |
| Container name may be omitted if the RDB collection target specifies the table name The table name will become the container name. | |
| Container name is required when specifying a SQL command. | |
| /type | Specify the container type (COLLECTION/TIME_SERIES). |
| Container type is a collection by default. | |
| /rowKeyAssigned | Specify whether there is any row key (true/false). *2 |
| /dataAffinity | Specify the data affinity name. |
| /indexSet | Specify the index. *3 |
| /triggerInfoSet | Specify a trigger. *3 |
| /compressionInfoSet | The compression method (NO/SS) can be specified for timeseries containers only *3 |
| /mapping | Can be omitted, and the following can be specified repeatedly. |
| /column | The following can be specified repeatedly. |
| /rdb | Specify the RDB column name. |
| /gridstore | Specify the GridDB column name. |
| /type | Specify the GridDB column type. |
| /containerSplit | Specify the container split method. |
| /type | Specify the column value split "columnValue" or record number split "dataNumber". |
| /column | For column value split, specify the column value to split. |
| /number | For record number split, specify the number of records to split. |
*1:/inputSource/server/type,host,port,database,user,password
- Set whether to configure all settings or not for the groups in /inputSource/server.
*2:/targetList/gridstore/rowKeyAssigned
- true: first column is set as the row key. An error will occur if the data type is not suitable for the row key.
- false or omitted: No row key will be set.
*3: See Metadata files for the description format of each item.
[Memo]
- Either the "table" specified in the table name or the "sql" specified in the SQL command is required.
- "sql" and "table","select","where","orderby" cannot be specified at the same time.
- When "sql" is specified in the SQL command, the GridDB container name cannot be omitted.
- For partition table ("partitionTable": true), specify "table" in the table name.
An example of a resource definition file is shown below. Connection data shall be specified in the property file.
-
[Example] When specifying the table name only
{ "inputSource" : { "type" : "rdb" }, "targetList" : [ { "rdb" : { "table" : "sample_table" } } ] } -
[Example] When specifying a SQL command to perform column mapping
{ "inputSource" : { "type" : "rdb" }, "targetList" : [ { "rdb" : { "sql" : "select * from sample_table order by id" }, "gridstore" : { "name" : "sample_collection" }, "mapping" : { "column" : [ {"rdb": "id", "gridstore":"sensor_id", "type" : "integer"}, {"rdb": "value", "gridstore":"sensor_value", "type" : "double"} ] } } ] } -
[Example] When attaching acquisition conditions targeting multiple tables in the respective table
{ "inputSource" : { "type" : "rdb" }, "targetList" : [ { "rdb" : { "table" : "sample_table", "select" : "id, value", "where" : "id > 100", "orderby" : "id" } }, { "rdb" : { "table" : "sample_table2", "select" : "*", "where" : "value > 1000", "orderby" : "id" } } ] } -
[Example] When dividing a table by the column value in the id column, and then further dividing it into 300 records at a time
{
    "inputSource" : {
        "type" : "rdb"
    },
    "targetList" : [
        {
            "rdb" : {
                "table" : "sample_table",
                "orderby" : "id"
            },
            "mapping" : {
                "containerSplit" : [
                    {"type":"columnValue", "column":"id"},
                    {"type":"dataNumber", "number":300}
                ]
            }
        }
    ]
}
Partition table
For the Oracle partition tables, the partition unit (sub-partition unit in the case of a composite type) can be accessed in parallel. Using this, data of a partition table can be acquired at a high speed.
When processing a partition table in parallel, set the "partitionTable" item to true in the collection target settings of the resource definition file.
[Memo]
-
When processing a partition table in parallel, a sort specified by a 'order by' will be carried out on a partition basis and registered in GridDB. As a result, the sorting order of all the tables will not be guaranteed.
- If there is a need to maintain the sorting order for all the tables, do not configure the parallel processing settings for the partition tables (specify false or do not specify the "partitionTable" item). In this case, since the process will not be executed in parallel on a partition basis, the import time may become longer.
Concurrency
The import process can be executed at a higher speed by making access to RDB and GridDB parallel.
When performing parallel processing, specify the --parallel option in the command line.
Collection from RDB and registration in GridDB will be executed respectively with a degree of parallelism that is specified in --parallel. If the degree of parallelism is not specified, the number of GridDB clusters and nodes will automatically become the degree of parallelism.
-
When you want to set in detail the collection parallelism (access to Oracle) and the registration parallelism (access to GridDB), list them down in the property file.
load.input.threadNum=64
load.output.threadNum=16
- The registration parallelism (access to GridDB) is best set at the following range: number of GridDB nodes < = N < = (number of GridDB nodes x node concurrency). Set it according to the machine environment.
<Example>
| Command line | Property file | No. of collected threads | No. of registered threads | |
|---|---|---|---|---|
| gs_import | - | -> | 1 | 1 |
| gs_import --parallel 3 | - | -> | 3 | 3 |
| gs_import --parallel | input.threadNum=16 | -> | 16 | 3 |
| output.threadNum=3 | ||||
| gs_import --parallel | Not specified | -> | No. of GridDB nodes | No. of GridDB nodes |
Preliminary checks and test run
The following items are checked prior to collection and registration processing. Preliminary checks on descriptive errors in the resource definition file and conformity of the specified data are carried out. If an error were to occur in the following checks, the processing of the tools will stop. The process cannot be continued even if the --force option is selected.
Preliminary check items
-
resource definition file
- Errors in the description format
- Omissions of essential items
- Conformity of combination of definitions
-
RDB
- Whether the table name and column name are valid character string for a container name
- Data type of column
- In the case of a column value split, whether the column name is valid character string for a container name
Perform a test run if you want to conduct a preliminary check to check out the operation only. Although communications between Oracle and GridDB are carried out during a test run, data registration will not be carried out in GridDB.
To perform a test run, specify the --test option together with the --srcfile option.
[Example]
$ gs_import -u admin/admin --srcfile partition_table.json --test
Start import
[Test mode]
Import test execution terminated. No. of SQL subject to processing: 1920
Import terminated
If an error occurs in the preliminary checks, the following display will appear.
[Example]
$ gs_import -u admin/admin --srcfile not_found_column.json --test
Start import
[Test mode]
D00C0C: A non-existent column has been specified in the mapping definition. : sql=[SELECT * FROM mytable], column=[NOT_FOUND_COLUMN]
SmartEDA/DDS linkage
Data can be registered from Oracle to GridDB by linking the data collection/event processing base SmartEDA with the data collection server (DDS). Data is collected from Oracle using the import tool and sent to the DDS via HTTP The DDS then registers the data received in GridDB. Data can be imported even if it exists in a subnet that does not allow multicast communications between the GridDB cluster and Oracle and the Import tools.
[Memo]
- See /usr/griddb/misc/dds-plugin/Readme.txt for the operating procedure.
- Data collection/event processing base SmartEDA products are required separately.
- Only the multicast method can be used for connecting a GridDB cluster.
6.4.4 Data registration option
When importing, if a specific option is not specified, an error will occur if the container that you are trying to register already exists in the GridDB cluster. Data can be added or replaced by specifying the next option. During data registration, the number of containers registered successfully and the number of containers which failed to be registered are shown.
Add/update data
- Data can be registered and updated in an existing container by specifying the --append option
- Data can be added, registered or updated only if the specified container data, such as the schema, index and trigger setting, are the same as the existing container.
-
The registration procedure according to the type of container is as follows.
Container type Row key assigned Behavior Collection true Columns with the same key will be updated while data with different keys will be added. false All row data will be added and registered. Timeseries true If compression is not specified, the time will be added and registered if it is newer than the existing registration data. If the time is the same as the existing data, the column data will be updated. If compression is specified, only rows newer than the existing data can be added. - For timeseries containers, if the time of the data to be registered is the same as the existing data, the existing row is overwritten. The number of rows is not increased.
Replace container
- Delete the existing container, create a new container, and register data in it by specifying the --replace option.
[Example]
$ gs_import -c c002 c001 -u admin/admin  --append
Import Start.(Append Mode)
Number of target containers : 2

public.c002 : 1
public.c001 : 1

Number of target container:2 ( Success:2  Failure:0 )
Import Completed.

$ gs_import -c c002 c001 -u admin/admin  --replace
Import Start.(Replace Mode)
Number of target containers : 2

public.c002 : 1
public.c001 : 1

Number of target container:2 ( Success:2  Failure:0 )
Import Completed.
6.4.5 Error continuation specification
The import process can be continued even if a registration error were to occur in a specific row data due to a user editing error in the container data file.
-
By specifying the --force option, the import process will continue from the row data of the next container even if a registration error were to occur in the row data.
[Example]
$ gs_import --all -u admin/admin -d /data/expdata --force
[Memo]
- Specify the container replacement option (--replace) to re-register a collection in which an error has occurred after revising the container data file.
6.4.6 Other functions
Detailed settings in the operating display
- Processing details can be displayed by specifying the --verbose option.
Suppressed settings in the operating display
- The processing status display can be suppressed by specifying the --silent option.
[Example]
$ gs_import -c c002 c001 -u admin/admin --append --silent
6.5 Command/option specifications
6.5.1 Export command
-
Command list
gs_export -u|--user <User name>/<Password> --all | --db <database name> [<database name>] | ( --container <container name> [<container name>] ... | --containerregex <regular expression> [<regular expression>] ...) [-d|--directory <output destination directory path>] [--out [<file identifier>] [--binary [<file size>]] [--filterfile <definition file name>] [--parallel <no. of parallel executions>] [--acl] [--prefixdb <database name>] [--force] [-t|--test] [-v|--verbose] [--silent] gs_export --version gs_export [-h|--help] -
Options
Option Essential Description -u|--user <user name>/<password> ✓ Specify the user and password used for authentication purposes. --all ✓ All containers of the cluster shall be exported. Either --all, --container, --containerregex or --db option needs to be specified. --db ✓ All containers in the specified database shall be exported. Either --all, --container, --containerregex, --db option needs to be specified. -c|--container <container name> ... ✓ Specify the container to be exported. Multiple specifications are allowed by separating them with blanks. Either --all, --container, --containerregex or --db option needs to be specified. --containerregex <regular expression> ... ✓ Specify the containers by the regular expression to be exported. Multiple specifications are allowed by separating them with blanks. When using a regular expression, enclose it within double quotations to specify it. Either --all, --container, --containerregex or --db option needs to be specified. This option can be used in combination with --container option. -d|--directory <output destination directory path> Specify the directory path of the export destination. Default is the current directory. --out [<file identifier>] Specify this when using the multi-container format for the file format of the output data. The single container format will be used by default. The number of characters in the file identifier is limited to 20. If the file identifier is specified, the file identifier will be used as the file name, and if it is omitted, the output start date and time will be used as the file name. --binary [<file size>] Specify this when using the binary format for the output format of the row data file. The CSV format will be used by default. Specify the output file size in MB. Default is 100MB. A range from 1 to 1000 (1GB) can be specified. --filterfile <definition file name> Specify the definition file in which the search query used to export rows is described. All rows are exported by default. --parallel <no. of parallel executions> Execute in parallel for the specified number. When executed in parallel, the export data will be divided by the same number as the number of parallel executions. This can be specified only for the multi-container format (when the --out option is specified). A range from 2 to 32 can be specified. --acl Data on the database, user, access rights will also be exported. This can be specified only if the user is an administrator user and --all option is specified. --prefixdb <database name> If a --container option is specified, specify the database name of the container. The containers in the default database will be processed if they are omitted. --force Processing is forced to continue even if an error occurs. Error descriptions are displayed in a list after processing ends. -t|--test Execute the tool in the test mode. -v|--verbose Output the operating display details. --silent Operating display is not output. --version Display the version of the tool. -h|--help Display the command list as a help message.
[Memo]
- If the -t (--test) option is specified, a query will be executed until the data is fetched. Container data file will not be created.
- If the -v (--verbose) option is specified, a message will appear during processing. If omitted, a message will appear only when there is an error.
- Create the respective directory and file if the specified directory path does not exist in the -d (--directory) option, and the specified file name does not exist in the --out option.
- If a --containerregex option is specified, Java regular expressions can be specified for the container names. See the Java “Class Pattern” for details.
6.5.2 Import command
-
Command list
gs_import -u|--user <user name>/<password> --all | --db <database name> [<database name>] | ( --container <container name> [<container name>] ... | --containerregex <regular expression> [<regular expression>] ...) --db <database name> [<database name>] [--append|--replace] [-d|--directory <import target directory path>] [-f|--file <file name> [<file name> ...]] [--count <commit count>] [--acl] [--prefixdb <database name>] [--force] [-v|--verbose] [--silent] When the input source is other resources: [--srcfile <resource definition file path> [--test]] gs_import -l|--list [-d|--directory <directory path>] [-f|--file <file name> [<file name> ...]] gs_import --version gs_import [-h|--help] -
Options
Option Essential Description -u|--user <user name>/<password> ✓ Specify the user and password used for authentication purposes. --all ✓ All containers in the import source file shall be imported. Either --all, --container, --containerregex or --db option needs to be specified. --db ✓ All containers in the specified database shall be imported. Either --all, --container, --containerregex, --db option needs to be specified. -c|--container <container name> ... ✓ Specify the container subject to import. Multiple specifications are allowed by separating them with blanks. Either --all, --container, --containerregex or --db option needs to be specified. --containerregex <regular expression> ... ✓ Specify the containers by regular expressions subject to import. Multiple specifications are allowed by separating them with blanks. When using a regular expression, enclose it within double quotations to specify it. Either --all, --container, --containerregex or --db option needs to be specified. This option can be used in combination with --container option. --append Register and update data in an existing container. --replace Delete the existing container, create a new container, and register data. -d|--directory <import target directory path> Specify the directory path of the import source. Default is the current directory. -f|--file <file name> [<file name> ...] Specify the container data file to be imported. Multiple specifications allowed. All container data files of the current directory or directory specified in d (--directory) will be applicable by default. --count <commit count> Specify the number of input cases until the input data is committed together. --acl Data on the database, user, access rights will also be imported. This can be specified only if the user is an administrator user and the --all option is specified for data exported by specifying the --acl option. --prefixdb <database name> If a --container option is specified, specify the database name of the container. The containers in the default database will be processed if they are omitted. --force Processing is forced to continue even if an error occurs. Error descriptions are displayed in a list after processing ends. -v|--verbose Output the operating display details. --silent Operating display is not output. --srcfile <resource definition file path> Set up the path of the resource definition file. Specify when importing from RDB. -l|--list Display a list of the specified containers to be imported. --version Display the version of the tool. -h|--help Display the command list as a help message.
[Memo]
- If -l (--list) option is specified, and options other than the -d (--directory) and -f (--file) option are specified, an option argument error will occur.
- If -v (--verbose) option is specified, a message will appear during processing. If omitted, a message will appear only when there is an error.
- If --containerregex option is specified, Java regular expressions can be used to specify the container names. See the Java “Class Pattern” for details.
6.6 Format of container data file
The respective file formats to configure container data files are shown below.
6.6.1 Metadata file
The metadata file stores the container data in the JSON format. The container data to be stored is shown below.
| Item | Description |
|---|---|
| Container name | Name of the container. |
| Container type | Refers to a collection or time series container. |
| Schema data | Data of a group of columns constituting a row. Specify the column name, data type, and column constraints. |
| Compression configuration data | Compression type data to be configured in a Time series data. Set up thinning compression with error, thinning compression without error, or no compression. |
| Index setting data | Index type data set in a container. Availability of index settings. Specify the type of index e.g. hash index, spatial index, tree index, etc. |
| Trigger (event notification) data | Notification is triggered when a container is updated (PUT/DELETE) by the JMS or REST interface. |
| Row key setting data | Set up a row key when collection container is used. For time series containers, either there is no row key set or the default value, if set, will be valid. |
| Table partitioning data | Specify table partitioning data. |
The tag and data items of the metadata in the JSON format are shown below. Tags that are essential for new creations by the user are also listed (tag setting condition).
| Tag name | Item | Description | Setting conditions |
|---|---|---|---|
| Common parameters | |||
| database | Database name | Database name | Arbitrary, "public" by default |
| container | Container name | Container name | Essential |
| containerType | Container type | COLLECTION/TIME_SERIES | Essential |
| containerFileType | Container file type | csv/binary | Essential |
| containerFile | Container file name | File name | Essential |
| dataAffinity | Data affinity name | Data affinity name | Arbitrary |
| rowKeyAssigned | Row key setting | true/false | Arbitrary, true by default |
| partitionNo | Partition ID | Partition ID | Arbitrary, output during export. Not used even if it is specified when importing. |
| columnSet | Column data set (, schema data) | Column data needs to match when adding data to an existing container | Essential |
| columnName | Column name | Essential | |
| type | Data type | BOOLEAN/ STRING/ BYTE/ SHORT/ INTEGER/ LONG/ FLOAT/ DOUBLE/ TIMESTAMP/ GEOMETRY/ BLOB/ BOOLEAN[]/ STRING[]/ BYTE[]/ SHORT[]/ INTEGER[]/ LONG[]/ FLOAT[]/ DOUBLE[]/ TIMESTAMP[] | Essential |
| notNull | NOT NULL constraint | true/false | Arbitrary, false by default |
| indexSet | Index data set | Can be set for each column. Non-existent column name will be ignored or an error will be output. | Arbitrary |
| columnName | Column name | Arbitrary (essential when indexSet is specified) | |
| type | Index type | HASH ( STRING/ BOOLEAN/ BYTE/ SHORT/ INTEGER/ LONG/ FLOAT/ DOUBLE/ TIMESTAMP ) SPATIAL ( GEOMETRY ), TREE ( STRING/ BOOLEAN/ BYTE/ SHORT/ INTEGER/ LONG/ FLOAT/ DOUBLE/ TIMESTAMP ) | Arbitrary (essential when indexSet is specified) |
| indexName | Index name | Index name, null indicates no specification. | Arbitrary, null by default |
| triggerInfoSet | Trigger setting | Arbitrary | |
| eventName | Trigger name | Trigger name | Arbitrary (essential when triggerInfoSet is specified) |
| notificationType | Notification method | JMS/REST | Arbitrary (essential when triggerInfoSet is specified) |
| targetEvents | Event to be monitored | PUT/DELETE | Arbitrary (essential when triggerInfoSet is specified) |
| targetColumnNames | Column name | Arbitrary column subject to notification (multiple columns can be specified using commas to separate them), BLOB/GEOMETRY/ARRAY data types can be set but these will not work. The “,” (comma) separator is used, and an error will occur if a non-existent column name is specified. | |
| notificationURI | Notification destination URI | Arbitrary (essential when triggerInfoSet is specified) | |
| JmsDestinationType | Destination type | topic/queue | Valid for JMS only |
| JmsDestinationName | Destination name | Arbitrary (essential when notificationType is JMS) Specify for JMS only | |
| JmsUser | JMS user name | Arbitrary (essential when notificationType is JMS) Specify for JMS only | |
| JmsPassword | JMS user password | Arbitrary (essential when notificationType is JMS) Specify for JMS only | |
| Table partitioning data | |||
| tablePartitionInfo | Table partitioning data | For Interval-Hash partitioning, specify the following group of items for both Interval and Hash as an array in that order | Arbitrary |
| type | Table partitioning type | HASH/INTERVAL | Essential if tablePartitionInfo is specified |
| column | Partitioning key | Column types that can be specified are as follows | Essential if tablePartitionInfo is specified |
| Any type if type=HASH | |||
| BYTE, SHORT, INTEGER, LONG, TIMESTAMP if type=INTERVAL | |||
| divisionCount | Number of hash partitions | (Effective only if type=HASH) Specify the number of hash partitions | Essential if type=HASH |
| intervalValue | Interval value | (Effective only if type=INTERVAL) Specify the interval value | Essential if type=INTERVAL |
| intervalUnit | Interval unit | (Effective only if type=INTERVAL) DAY only | Essential if type=INTERVAL and column=TIMESTAMP |
| Interval or interval-hash partitioning only parameter | |||
| expirationType | Type of expiration management | partition (when specifying partition expiration) | Arbitrary |
| expirationTime | Length of expiration | Integer value | Essential if expirationType is specified |
| expirationTimeUnit | Unit of the above length | DAY/ HOUR/ MINUTE/ SECOND/ MILLISECOND | Essential if expirationType is specified |
| TIME_SERIES only parameter | |||
| timeSeriesProperties | Compression data setting | Can only be specified when containerType is TIME_SERIES. | Arbitrary |
| compressionMethod | Compression method | NO/SS/HI | Arbitrary |
| compressionWindowSize | Compression window size | Integer value | Arbitrary |
| compressionWindowSizeUnit | Compression windows size unit | DAY/ HOUR/ MINUTE/ SECOND/ MILLISECOND | Arbitrary |
| expirationDivisionCount | Division count of row expiration | Integer value | Arbitrary |
| rowExpirationElapsedTime | Elapsed time of row expiration | Integer value | Arbitrary |
| rowExpirationTimeUnit | Elapsed time unit of row expiration | DAY/ HOUR/ MINUTE/ SECOND/ MILLISECOND | Arbitrary |
| compressionInfoSet | Settings for each column | Can only be specified if compressionMethod is HI. | Arbitrary |
| columnName | Column name | Arbitrary | |
| compressionType | Compression type | RELATIVE/ABSOLUTE | Arbitrary |
| width | Absolute error exists. Thinning and compression parameters | Floating-point number | Arbitrary, essential if compression is specified. An error occurs when both rate and span are specified. |
| rate | Relative error exists. Thinning and compression parameters | Floating-point number | Arbitrary, can only be specified when compressionMethod is HI. In SS/NO, ignored/error occurs. An error occurs when width is also specified. |
| span | Relative error exists. Thinning and compression parameters | Floating-point number | Arbitrary, can only be specified when compressionMethod is HI. In SS/NO, ignored/error occurs. An error occurs when width is also specified. |
[Memo]
- Metadata file is written in UTF-8.
- Container metadata is described in the json format in the metadata file of a single container data file.
- Container metadata is described in a json array in the metadata file of a multi-container data file.
-
When exporting, the metadata file is named according to the following rules.
-
When the format is a single container format
- <database name>.<container name>_properties.json
-
The database and container name in the file name are URL-encoded. If the length of "encoded database name.encoded container name" is over 140 characters, the file name is modified as connecting 140 characters from the beginning and the sequential number.
Example:
In the case of importing the next three containers,
      * database "db1", container "container_ ... _2017/08/01" (the container name that contains over 140 characters)
      * database "db1", container "container_ ... _2017/09/01" (the container name that contains over 140 characters)
      * database "db2", container "container_ ... _2017/10/01" (the container name that contains over 140 characters)

the name of each metadata file is as follows.
        db1.container ... 2017%2f08_0_properties.json
        db1.container ... 2017%2f09_1_properties.json
        db2.container ... 2017%2f10_2_properties.json
-
When the format is a multi-container format
- A file identifier is specified by --out option: <file identifier>_properties.json
- The file identifier is omitted in --out option: YYYYMMDD_HHmmss_SSS_properties.json
-
When the format is a single container format
[Points to note]
- Do not edit metadata files if row data files are exported in the binary format.
[Example1] Example of a collection in a single container file (public.c001_properties.json)
-
A single collection is described.
{
    "container": "c001",
    "containerFile": "public.c001.csv",
    "containerFileType": "csv",
    "containerType": "COLLECTION",
    "columnSet": [
        { "columnName": "COLUMN_ID",  "type": "INTEGER" },
        { "columnName": "COLUMN_STRING", "type": "STRING"}
    ],
    "indexSet": [
        { "columnName": "COLUMN_ID", "type": "TREE"},
        { "columnName": "COLUMN_ID", "type": "HASH"},
        { "columnName": "COLUMN_STRING", "type": "HASH" }
    ],
    "rowKeyAssigned": true
}
[Example 2] Example of a collection and timeseries container in a multi-container file (public.container01_properties.json)
-
For collections and timeseries containers
[
        {
                "container": "c001",
                "containerType": "collection",
                "containerFileType":"csv",
                "containerFile":"public.container01.csv",
                "rowKeyAssigned":true,
                "columnSet": [
                        { "columnName": "COLUMN_FLAG", "type": "BOOLEAN" },
                        { "columnName": "COLUMN_BLOB_DATA", "type": "BLOB" },
                        { "columnName": "COLUMN_STRING", "type": "STRING" }
                ],
                "indexSet":[
                        { "columnName":" COLUMN_STRING ", "indexType": "HASH" }
                ],
                "triggerInfoSet":[
                        {  "eventName":" FLAG_EVENT", "notificationType":"JMS",
                                "targetEvents":"DELETE", "targetColumnNames":"COLUMN_FLAG",
                                "notificationURI":"http://example.com",
                                "JmsDestinationType":"", "JmsDestinationName":"",
                                "JmsUser":"", "JmsPassword":"" },
                        {  "eventName":"STRING_EVENT", "notificationType":"REST",
                                "targetEvents":"PUT", "targetColumnNames":"COLUMN_STRING",
                                "notificationURI":"" }
                ]
        },
        {
                "container": "c002",
                "containerType": "timeSeries",
                "containerFileType":"csv",
                "containerFile":"public.container01.csv",
                "rowKeyAssigned":true,
                "dataAffinity":"month",
                "columnSet": [
                        { "columnName": "COLUMN_TIMESTAMP", "type": "TIMESTAMP" },
                        { "columnName": "COLUMN_FLAG", "type": "BOOLEAN" },
                        { "columnName": "COLUMN_BLOB_DATA", "type": "BLOB" },
                        { "columnName": "COLUMN_INTEGER", "type": "INTEGER" }
                ],
                "indexSet":[
                        { "columnName":" COLUMN_FLAG ", "indexType": "TREE" }
                ],
                "triggerInfoSet":[
                        {  "eventName":"TIMESTAMP_EVENT", "notificationType":"REST",
                                "targetEvents":"DELETE", "targetColumnNames":"COLUMN_TIMESTAMP",
                                "notificationURI":"",
                                "JmsDestinationType":"", "JmsDestinationName":"",
                                "JmsUser":"", "JmsPassword":"" }
                ],
                "timeSeriesProperties":[
                        { "compressMethod": "HI",
                         "compressionWindowSize":10, "compressionWindowSizeUnit":"SECOND",
                         "expirationDivisionCount":12,
                         "rowExpirationElapsedTime": 1, "rowExpirationTimeUnit": "DAY"}
                 ],
                 "compressionInfoSet":[
                        { "columnName":COLUMN_INTEGER", "compressionType":"RELATIVE",
                        "rate":"1.0E2", "span":"1.0E2" }
                 ]
        }
]
[Example 3] Example of a description for table partitioning
-
For hash partitioning (Showing only the description for table partitioning data)
"tablePartitionInfo":{ "type": "HASH", "column": "column03", "divisionCount": 16 } -
For interval partitioning (Showing only the description for table partitioning data)
"tablePartitionInfo":{ "type": "INTERVAL", "column": "timecolumn05", "intervalValue": 20, "intervalUnit": "DAY" } -
For interval-hash partitioning (Showing only the description for table partitioning data)
"tablePartitionInfo":[
     {
         "type": "INTERVAL",
         "column": "timecolumn05",
         "intervalValue": 10,
         "intervalUnit": "DAY"
     },
     {
         "type": "HASH",
         "column": "column03",
         "divisionCount": 16
     }
]
[Memo]
- For interval-hash partitioning, it is necessary to describe the partitioning data under the tablePartitionInfo in the order of INTERVAL, HASH. An error occurs if the order of description is not right.
6.6.2 Row data file (binary data file)
The row data file in the binary format can be created in the zip format by gs_export only. No readability, and cannot be edited as well. No readability, and cannot be edited as well.
6.6.3 Row data file (CSV data file)
The row data file in the CSV format describes the references to the metadata file which is the definition of a row in the container data file information section.
[Memo]
- A CSV data file is described using the UTF-8 character code.
<CSV data file format>
1. Header section (1st - 2nd row)
Header section contains data output during export. Header data is not required during import.
-
Assign a “#” at the beginning of the command to differentiate it. The format will be as follows.
"#(Date and time)  GridDB release version"
"#User: (user name)"
[Example]
"#2017-10-01T17:34:36.520+0900 GridDB V4.0.00"
"#User:admin "
2. Container data file data section (3rd and subsequent rows)
Describe the references to the metadata file.
-
Assign a “%” at the beginning of the command to differentiate it. The format of one row will be as follows.
"%","metadata file name"
3. Row data section (container data and subsequent sections)
The following section describes the row data.
- Assign a “$” at the beginning of the container name and describe the row data for the number of cases that you want to register in the container.
-
Separate the row data of the column with commas and describe them in one line of the CSV file.
"$","database name.container name"
"value","value","value", ... (number of column definitions)
"value","value","value", ... (number of column definitions)
    :
    :      //Describe the number of row cases you want to register
    :
[Memo]
- Backslash \ and double quote " included in row data must be escaped with a backslash.
-
For TIMESTAMP type, specify the value in "yyyy-MM-dd'T'HH:mm:ss.SSSZ" format.
- Example: "2016-12-25T00:22:30.000+0900"
4. Comments section
The comment section can be described anywhere in the CSV data file except the header section.
- Assign a “#” at the beginning of the command to differentiate it.
[Memo]
-
The CSV data file of a single container data file is configured as follows.
- 1. Header section, 2. Container data file data section, 3. Row data section
-
The CSV data file of a multi-container data file is configured as follows.
- 1. Header section, 2. Container data file data section, 3. Row data section (multiple)
<File name format>
The name of the CSV data file output by the export tool is as follows.
-
When the format is a single container format
- <database name>.<container name>.csv
- The database name and container name in the file name are URL-encoded. If the length of "encoded database name.encoded container name" is over 140 characters, the file name is modified as connecting 140 characters from the beginning and the sequential number.
-When the format is a multi-container format
- File identifier is specified by --out option: <file identifier>.csv
- File identifier is omitted by --out option: YYYYMMDD_HHmmss_SSS.csv
[Example] Description of a CSV data file (including external object file)
Data description of a metadata file in Example 1
"#2017-10-01T11:19:03.437+0900  GridDB V4.0.00"
"#User:admin"
"%","public.c001_properties.json"
"$","public.c001"
"1","Tokyo"
"2","Kanagawa"
"3","Osaka"
When the data below is included in some of the rows of the CSV data file, prepare an external object file separate from the CSV data file as an external object. List the references of the external data file in the target column of the CSV file.
“@data type:” (file name)
-
BLOB data
- List “@BLOB:” + (file name) as BLOB data in the “value” section of the relevant column.
- The file naming section has a format which is the file name + “.blob”.
- The binary file is located according to the rules of the file naming section.
-
Spatial data
- List “@GEOMETRY:” + (file name) as GEOMETRY data in the relevant “value” section.
- The file naming section has a format which is the file name + “.geometry”.
- List a spatial column in the external object file.
- Describe using character code UTF-8.
-
Array (BOOLEAN[]/ STRING[]/ BYTE[]/ SHORT[]/ INTEGER[]/ LONG[]/ FLOAT[]/ DOUBLE[]/ TIMESTAMP[])
- List “@(Data Type)_ARRAY:” + (file name) as ARRAY data in the relevant “value” section.
- The file naming section has a format which is the file name + “.(data type)_array”.
- If the length of the character string exceeds 100 characters, list down array data in the external object file.
- Describe using character code UTF-8.
-
Character string data
- List “@STRING:” + (file name) as STRING data in the relevant “value” section.
- The file naming section has a format which is the file name + “.string”.
- If the length of the character string exceeds 100 characters, or if it includes a line return (\r), list down string data in the external object file.
- Describe using character code UTF-8.
When an external object file is exported, the external object file name is created in accordance with the following rules during export.
-
When the format is a single container format
- <Database name>.<container name>_<row no.>_<column no.>.<data type>
- The row no. and column no. shows the sequence no. of the container data and they are numbered starting from 0.
-
When the format is a multi-container format
- File identifier specified in the --out option <File identifier>_<database name>_<container name>_<row no.>_<column no.>.<data type>
- File identifier omitted in --out option <Date and time>_<database name>_<container name>_<row no.>_<column no.>.<data type>
- The database name and container name in the file name are URL-encoded. If the length of "encoded database name.encoded container name" is over 140 characters, the file name is modified as connecting 140 characters from the beginning and the sequential number.
For import purposes, any file name can be used for the external object file. List down the CSV data file with a file name of any data type in the relevant column.
[Example] Naming example of an external object file
// When a collection (colb) having a BYTE array in the 3rd column is exported

Oct 4 12:51 2017 public.colb.csv
Oct 4 12:51 2017 public.colb_colb_0_3.byte_array
Oct 4 12:51 2017 public.colb_colb_1_3.byte_array
Oct 4 12:51 2017 public.colb_colb_2_3.byte_array
Oct 4 12:51 2017 public.colb_colb_3_3.byte_array
Oct 4 12:51 2017 public.colb_colb_4_3.byte_array
Oct 4 12:51 2017 public.colb_properties.json
[Example] Description of an external object file in a single container data file is shown below.
-
metadata file public.col01_properties.json
{ "version": "4.0.0", "container": "col01", "containerFile": "public.col01.csv", "containerFileType": "csv", "containerType": "COLLECTION", "columnSet": [ { "columnName": "name","type": "string" }, { "columnName": "status", "type": "boolean"}, { "columnName": "count", "type": "long" }, { "columnName": "lob", "type": "byte[]" } ], "indexSet": [ { "columnName": "name", "type": "TREE" }, { "columnName": "count", "type": "TREE" } ], "rowKeyAssigned": true } -
CSV data file public.col01.csv
"#2017-10-01T19:41:35.320+0900  GridDB V4.0.00"
"#User:admin"
"%","public.col01_properties.json"
"$","public.col01"
"name02","false","2","@BYTE_ARRAY:public.col01_0_3.byte_array"
-
External object file public.col01_col01_0_3.byte_array
1,10,15,20,40,70,71,72,73,74
7 Web API
7.1 Overview
GridDB provides a Web API to register rows, acquire rows and execute a SQL SELECT statement for GridDB cluster. The Web API is configured as a web application.
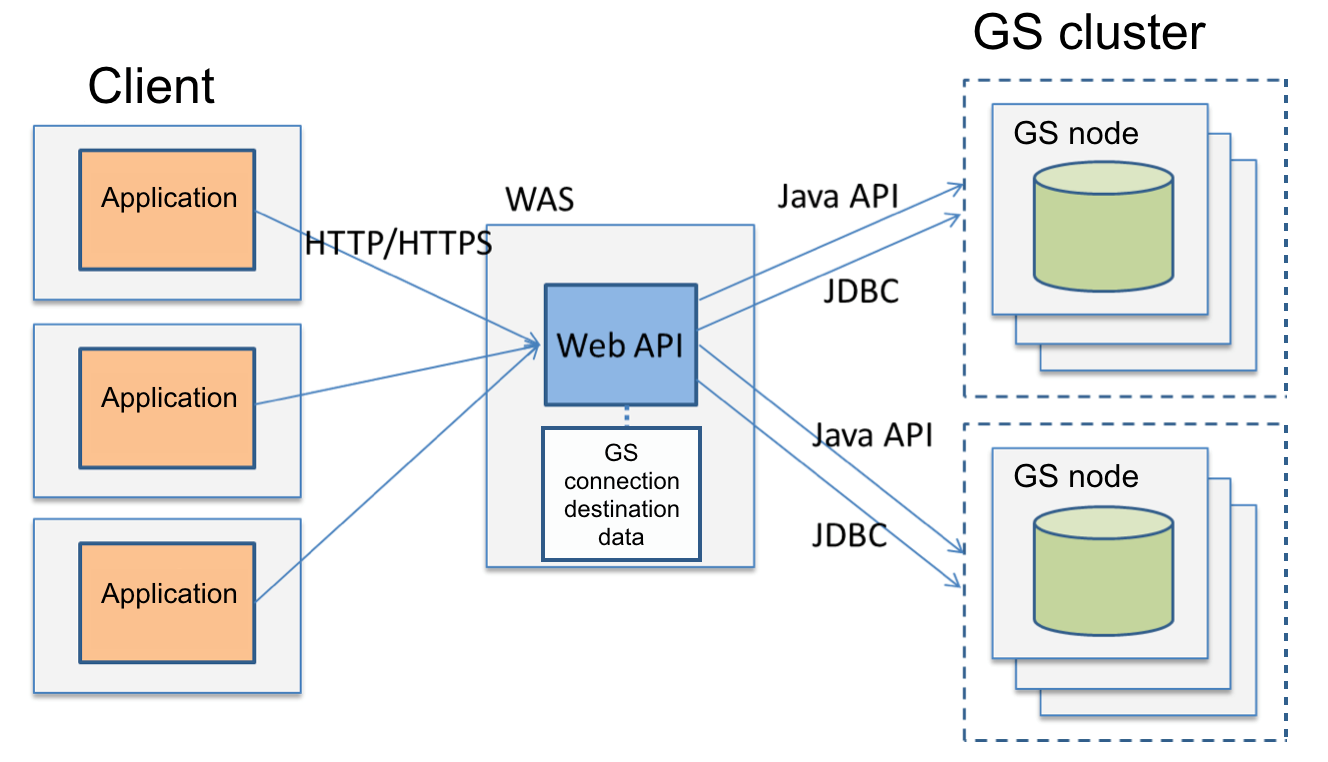
Web API
The functions of GridDB Web API are shown below.
-
Row registration
- Registers rows to the container.
-
Row acquisition
- Acquires rows from the container.
-
SQL SELECT execution
- Executes a SQL SELECT statement
7.2 Using Web API
To use gs_admin, Tomcat and Java have to be installed beforehand. The compatible versions are as follows.
- Apache Tomcat 7.0/8.0
- Oracle Java 7/8
The procedure to install and configure Web API is as follows.
- Installation of GridDB client package
- Deploy griddb.war in Tomcat
- Specifying cluster configuration
- (Optional) Configuring Web API behaviors
- (Optional) Configuring log output directory
7.2.1 Installation of client package
Install the GridDB client package (griddb-xx-client-X.X.X-linux.x86_64.rpm).
Log into a machine installed with the Web application as a root user, and install the package using the command below.
# rpm -Uvh griddb-xx-client-X.X.X-linux.x86_64.rpm
*xx indicates the GridDB edition. (se, ae, ve)
*X.X.X indicates the GridDB version.
After installing, Web API .war file and configuration files are installed as follows:
/usr/griddb/webapi/griddb.war                         : Web API .war file

/var/lib/gridstore/webapi/conf/griddb_webapi.properties  : Configuration file
                              /repository.json           : Cluster information definition file
                              /log                       : Log output directory
7.2.2 Deployment in Tomcat
Web API is a web application that runs in Tomcat. To use Web API, there is a need to deploy the Web API war file in Tomcat. Tomcat settings are omitted in this section.
The deployment procedure is as follows.
Deploy the Web API war file in Tomcat.
$ cp /usr/griddb/webapi/griddb.war [Tomcat installation directory]/webapps
7.2.3 Specifying cluster configuration
Specify the information of the cluster to be connected from the Web API in the cluster information definition file ( /var/lib/gridstore/webapi/conf/repository.json ).
Based on the value of the cluster definition file (gs_cluster.json) of the cluster to be connected, specify the cluster configuration method to "mode", and the address information corresponding to the method.
| Property | JSON Data type | Description |
|---|---|---|
| clusters | array | An array of the cluster information |
| name | string | Cluster name |
| mode | string | Connection method (MULTICAST/FIXED_LIST/PROVIDER) |
| (mode=MULTICAST) | ||
| address | string | Multicast address for row registration and acquisition |
| port | int | Multicast port for row registration and acquisition |
| jdbcAddress | string | Multicast address for SQL SELECT execution |
| jdbcPort | int | Multicast port for SQL SELECT execution |
| (mode=FIXED_LIST) | ||
| transactionMember | string | Connection destination list for row registration and acquisition |
| sqlMember | string | Connection destination list for SQL SELECT execution |
| (mode=PROVIDER) | ||
| providerUrl | string | Provider URL for all functions |
Example: In case of the multicast method
{
  "clusters" : [
    {
      "name" : "myCluster",
      "mode" : "MULTICAST",
      "address" : "239.0.0.111",
      "port" : 31999
    }
  ]
}
[Memo]
-
In GridDB Standard Edition, when using SQL SELECT execution, the response code 500 and the following response body will be returned.
{
  "version":"v1",
  "errorCode":"E2060B",
  "errorMessage":"[145028:JC_BAD_CONNECTION] Connection problem occurred (retryCount=x,
    elapsedMillis=xxxx, failureMillis=xxxx, queryTimeoutMillis=(not bounded),
    loginTimeoutMillis=xxxx, operation=LOGIN, reason=[145028:JC_BAD_CONNECTION] Failed to connect"
}
7.2.4 (Optional) Configuring Web API behaviors
Configure Web API behaviors by setting the configuration file (/var/lib/gridstore/webapi/conf/griddb_webapi.properties).
If not setting it will work with the default values. Configure the values according to the system.
| Property | Description | Default value |
|---|---|---|
| GridDB configuration | ||
| failoverTimeout | The timeout time (second) during an error retry when the Web API connected | 5 |
| to a node constituting a cluster which failed connects to a replacement node. | ||
| transactionTimeout | The timeout time (second) of transaction. | 30 |
| containerCacheSize | The maximum number of the container information on the container cache. | 100 |
| Web API configuration | ||
| maxGetRowSize | The upper limit of the size for row acquisition and SQL SELECT execution (MB) (1-2048) | 20 |
| maxPutRowSize | The upper limit of the size for row registration. (MB) (1-2048) | 20 |
| loginTimeout | The connection timeout time (second) for SQL SELECT execution | 5 |
| (An integer value can be specified. When it is less than 0, SQL SELECT statement can not be executed.) |
[Memo]
- Need to restart tomcat for the changes to take effect.
7.2.5 (Optional) Configuring log output directory
The Web API logs are output to the following directory by default.
/var/lib/gridstore/webapi/log
To change the output directory, edit the following file:
[Tomcat install directory]/webapps/griddb/v1/WEB-INF/classes/logback.xml
7.2.6 Starting and Stopping
To start or stop the Web API, start or stop the web application server.
7.3 Common functions (HTTP request/response)
This chapter describes the HTTP request /response part common to each function.
7.3.1 URI
The URI to be accessed when using the Web API.
http://<WAS domain>/griddb/v1/:path
[Memo]
- Specify the WAS domain according to the environment of the web application server on which the Web API is deployed.
- Specify path of each function as ":path".
- It is not allowed in this version's GridDB WEB APIs that clusters, databases and containers which name contains any special characters('-', '.', '/', '=') are specified in the path.
7.3.2 Request header
Specify the following headers to the request header.
| Field | Description | Required |
|---|---|---|
| Content-Type | Specify "application/json" when specifying the body as JSON. | ✓ (when specifying the body) |
| X-GridDB-User | Specify the user name to access. | ✓ |
| X-GridDB-Password | Specify the password of the user. | ✓ |
7.3.3 Request body
Specify the request body as JSON format. Please refer to the JSON format of each functions.
[Memo]
- Write JSON format data in UTF-8.
-
Write the date in UTC and in the following format:
- YYYY-MM-DDThh:mm:ss.SSSZ
-
Otherwise, an error will occur.
2016/01/17T14:32:33.888Z    -> An error occurs caused by incorrect separator string.
2016-01-18                  -> An error occurs caused by no time specification.
7.4 Row registration
This function registers the rows to the container.
Specify the rows to be registered in JSON format. Multiple rows can be registered in one container.
[Memo]
- The container to be registered must exist.
- When the container has no row key, a row will be newly created.
- When the container has a row key, if a row has the row key that already exists in the container will be updated, otherwise a row will be newly created.
- When an exception occurs during row registration processing, only some rows may be registered. Therefore, when retrying with an HTTP client when an exception occurs, the same row data may be registered duplicately in a container has no row key.
Path
/:cluster/dbs/:database/containers/:container/rows
| Path parameter | Description |
|---|---|
| :cluster | Cluster name |
| :database | Database name |
| (Specify “public” for public (default) database.) | |
| :container | Container (table) name |
HTTP method
POST
Request header
| Field | Description | Required |
|---|---|---|
| Content-Type | Specify "application/json" | ✓ |
| X-GridDB-User | Specify the user name to access. | ✓ |
| X-GridDB-Password | Specify the password of the user. | ✓ |
Request body
Specify the rows as following JSON format.
| Property | Description | Required |
|---|---|---|
| rows | An array of the rows. Row is an array of the column values. | ✓ |
Depending on the column data type, describe a column value with the following JSON data type.
| Column data type | JSON data type | Example | ||
|---|---|---|---|---|
| Primitive | Boolean type | BOOL | Boolean (true/false) | true |
| or text string ("true"/"false") | ||||
| String type | STRING | Text string | "GridDB" | |
| Integer type | BYTE/SHORT/INTEGER/LONG | Number or text string | 512 | |
| Floating point type | FLOAT/DOUBLE | Number or text string | 593.5 | |
| Date and time type | TIMESTAMP | Text string | "2016-01-16T10:25:00.253Z" | |
| * UTC | ||||
| * Format: | ||||
| YYYY-MM-DDThh:mm:ss.SSSZ | ||||
| Spatial type | GEOMETRY | Text string (WKT representation) | "POLYGON((0 0,10 0,10 10,0 10,0 0))" | |
| Array | Boolean type | BOOL | Array of boolean values | [true, false, true] |
| or array of text string values | ||||
| String type | STRING | Array of text string values | ["A","B","C"] | |
| Integer type | BYTE/SHORT/INTEGER/LONG | Array of numbers | [100, 39, 535] | |
| or array of text string values | ||||
| Floating point type | FLOAT/DOUBLE | Array of numbers | [3.52, 6.94, 1.83] | |
| or array of text string values | ||||
| Date and time type | TIMESTAMP | Array of text string values | ["2016-01-16T10:25:00.253Z" | |
| (Format is same as the primitive one) | , "2016-01-17T01:42:53.038Z"] |
[Memo]
- BLOB type is unsupported. An error occurs when specifying the container that has the BLOB column.
-
If a NULL value (null of JSON data type) is specified as column value, it operates as follows:
- When the NOT NULL constraint is specified for the column : Registration error will occur.
- Otherwise : A NULL value will be registered.
Response code
Please refer to Response code.
Response body
If processing is successful, the following JSON data will be returned.
| Property | Description |
|---|---|
| count | The number of processed rows. |
Please refer to response body in case of failure.
7.5 Row acquisition
This function acquire the rows from the container (table). It is also possible to narrow down the rows to be acquired by specifying conditions.
Path
/:cluster/dbs/:database/containers/:container/rows
| Path parameter | Description |
|---|---|
| :cluster | Cluster name |
| :database | Database name |
| (Specify “public” for public (default) database.) | |
| :container | Container (table) name |
HTTP method
GET
Request header
| Field | Description | Required |
|---|---|---|
| Content-Type | Specify "application/json" when specifying the body as JSON. | ✓ (when specifying the body) |
| X-GridDB-User | Specify the user name to access. | ✓ |
| X-GridDB-Password | Specify the password of the user. | ✓ |
Request body
The upper limit of the rows to be acquired and some conditions can be specified. If all conditions are omitted, all rows of the container can be acquired.
| Property | Description | JSON data type | Required |
|---|---|---|---|
| offset | Acquisition start position | An integer from 0 | - |
| limit | The number of rows to be acquired | An integer from 0 | - |
| condition | Condition expression | Text string | - |
| sort | Sorting expression | Text string | - |
[Memo]
- If "limit" is set to 0 (zero), all rows matching the condition can be acquired.
- "offset" can be used together with "limit".
Example: Acquires row data with a column "id" value of 50 or more, sorts it in descending order by the value of "id", and acquires 100 values from the 11th
{
  "offset" : 10,
  "limit"  : 100,
  "condition" : "id >= 50",
  "sort" : "id desc"
}
Response body
Acquired rows will be returned as the following JSON data.
| Property | Description | JSON data type |
|---|---|---|
| columns | An array of column information | Array |
| name | Column name | Text string |
| type | Data type | Text string |
| rows | An array of the rows | Array |
Example:
{
  "columns" : [
    {"name": "date", "type": "TIMESTAMP" },
    {"name": "value", "type": "DOUBLE" },
    {"name": "str", "type": "STRING" }
  ],
  "rows" : [
    ["2016-01-16T10:25:00.253Z", 100.5, "normal" ],
    ["2016-01-16T10:35:00.691Z", 173.9, "normal" ],
    ["2016-01-16T10:45:00.032Z", 173.9, null ]
  ]
}
Depending on the column data type, column values with the following JSON data type will be returned.
| Column data type | JSON data type | Example | ||
|---|---|---|---|---|
| Primitive | Boolean type | BOOL | Boolean (true/false) | true |
| String type | STRING | Text string | "GridDB" | |
| Integer type | BYTE/SHORT/INTEGER/LONG | Number | 512 | |
| Floating point type | FLOAT/DOUBLE | Number | 593.5 | |
| Date and time type | TIMESTAMP | Text string | "2016-01-16T10:25:00.253Z" | |
| * UTC | ||||
| * Format: | ||||
| YYYY-MM-DDThh:mm:ss.SSSZ | ||||
| Spatial type | GEOMETRY | Text string (WKT representation) | "POLYGON((0 0,10 0,10 10,0 10,0 0))" | |
| Array | Boolean type | BOOL | Array of boolean values | [true, false, true] |
| String type | STRING | Array of text string values | ["A","B","C"] | |
| Integer type | BYTE/SHORT/INTEGER/LONG | Array of numbers | [100, 39, 535] | |
| Floating point type | FLOAT/DOUBLE | Array of numbers | [3.52, 6.94, 1.83] | |
| Date and time type | TIMESTAMP | Array of text string values | ["2016-01-16T10:25:00.253Z" | |
| (Format is same as the primitive one) | , "2016-01-17T01:42:53.038Z"] |
[Memo]
- BLOB type is unsupported. An empty string will be returned when specifying the container that has the BLOB column.
- If a column value is NULL value, the null of JSON data type will be returned.
- Partitioned container is unsupported for row acquisition.
7.6 SQL SELECT execution
This function executes a SQL SELECT statement in a GridDB database. It can be used only for GridDB Advanced Edition.
Path
/:cluster/dbs/:database/sql
| Path parameter | Description |
|---|---|
| :cluster | Cluster name |
| :database | Database name |
| (Specify “public” for public (default) database.) |
HTTP method
GET or POST
Request header
| Field | Description | Required |
|---|---|---|
| Content-Type | Specify "application/json". | ✓ |
| X-GridDB-User | Specify the user name to access. | ✓ |
| X-GridDB-Password | Specify the password of the user. | ✓ |
Request body
Specify a SQL SELECT statement as following JSON format.
| Property | Description | JSON data type | Required |
|---|---|---|---|
| type | Type of query statement | Text string | - |
| (Only "sql-select" can be specified.) | |||
| stmt | A SQL SELECT statement | Text string | ✓ |
Example:
{
  "type" : "sql-select",
  "stmt" : "select * from emp;"
}
Response body
Acquired rows will be returned as the following JSON data.
| Property | Description | JSON data type |
|---|---|---|
| columns | An array of column information | Array |
| name | Column name | Text string |
| type | Data type | Text string |
| rows | An array of the rows | Array |
Example:
{
  "columns" : [
    {"name": "date", "type": "TIMESTAMP" },
    {"name": "value", "type": "DOUBLE" },
    {"name": "str", "type": "STRING" }
  ],
  "rows" : [
    ["2016-01-16T10:25:00.253Z", 100.5, "normal" ],
    ["2016-01-16T10:35:00.691Z", 173.9, "normal" ],
    ["2016-01-16T10:45:00.032Z", 173.9, null ]
  ]
}
Depending on the column data type, column values with the following JSON data type will be returned.
| Column data type | JSON data type | Example | ||
|---|---|---|---|---|
| Primitive | Boolean type | BOOL | Boolean (true/false) | true |
| String type | STRING | Text string | "GridDB" | |
| Integer type | BYTE/SHORT/INTEGER/LONG | Number | 512 | |
| Floating point type | FLOAT/DOUBLE | Number | 593.5 | |
| Date and time type | TIMESTAMP | Text string | "2016-01-16T10:25:00.253Z" | |
| * UTC | ||||
| * Format: | ||||
| YYYY-MM-DDThh:mm:ss.SSSZ |
[Memo]
- In case that column value is NULL, null will be returned for the column in JSON data.
- BLOB, GEOMETRY and array types are not supported in this function.
- For BLOB columns, “BLOB” will be returned as data type, and an empty string will be returned as data value in case that the column value is not NULL.
- For GEOMETRY and array columns, “UNKNOWN” will be returned as data type, and null will be returned as data value.
7.7 Checking of operation
To check the operation of the Web API, use curl command in linux or another command.
-
Example: Row registration
curl -X POST -H "X-GridDB-User:user" -H "X-GridDB-Password:password" \\ -H "Content-type:application/json" -d '{"rows":[["value", 1]]}' \\ http://host:port/griddb/v1/cluster/dbs/public/containers/test/rows -
Example: Row acquisition
curl -H "X-GridDB-User:user" -H "X-GridDB-Password:password" \\
http://host:port/griddb/v1/cluster/dbs/public/containers/test/rows
-
Example: SQL SELECT execution
curl -X POST -H "X-GridDB-User:user" -H "X-GridDB-Password:password" \\
-H "Content-type:application/json" -d '{"stmt":"select * from test"}' \\
http://host:port/griddb/v1/cluster/dbs/public/sql
7.8 Uninstallation
Stop the web application server and remove [Tomcat install directory]/webapps/gridstore/v1 directory and the deployed .war file.
8 Long term archive
8.1 Overview
Long term archive is a function saving data to be erased by the expiry release function of GridDB to open format (Apache avro) files. They are used as follows.
- Refer and analyse contents after recovering on GridDB by the import tool (gs_import)
-
Implement an application program for data utilization including libraries such as Apache Avro
- Convert to the useful data type (e.g. CSV, JSON)
- Import to another data management system
So far it is impossible to apply the expiry release function to the data which can be referred. The archive function enables users to apply the expiry release function to such data in various situations because it can save expiry data to external files.
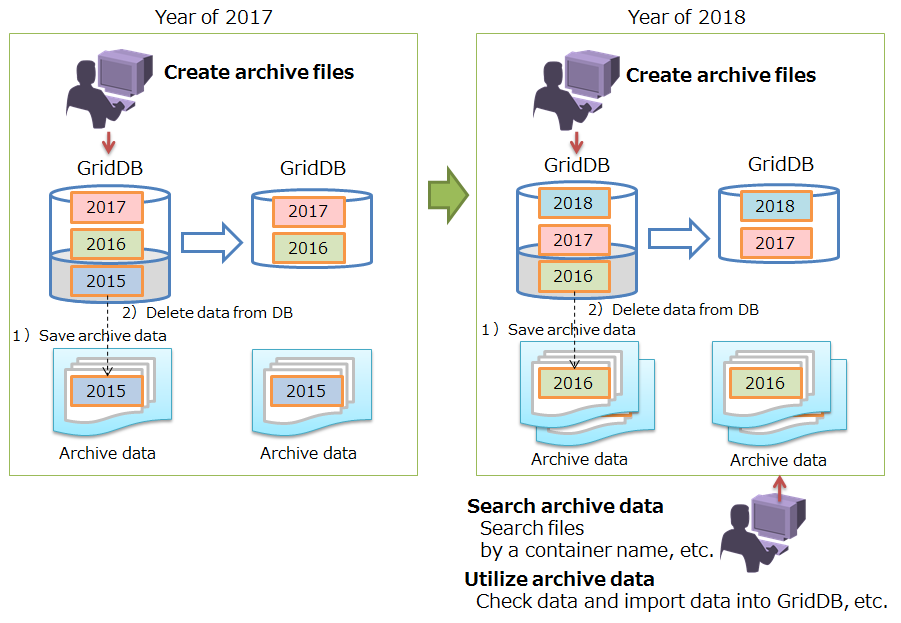
Long term archive overview
8.2 Functions
8.2.1 Archive target data
Data having become erasable by the expiry release function are called "cold data" in this document. The cold data is a target for archiving in the long term archive function. Note that expiry release data does not become cold data immediately. An example (available period:2, the number of division:1) is as follows.

Expiry release and cold data
See "GridDB technical reference" (GridDB_TechnicalReference.html) for the details of expiry release function.
8.2.2 Creating archives
You can save cold data to an external file (archive file) with an archive function. The file is saved as an open format binary (Apache Avro). The data having become cold data is deleted from GridDB.
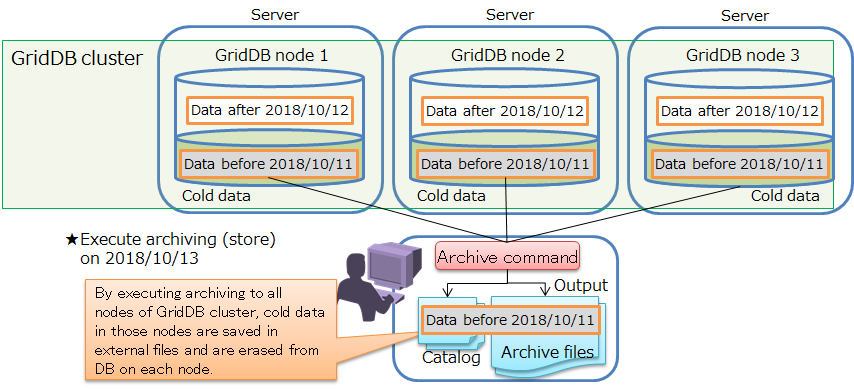
Output files
[Memo]
- So far there has been a mode (automatic deletion is valid) deleting expiry release data automatically. The mode (automatic deletion is invalid) accumulating cold data in GridDB until it is saved to an external file is added so that it can use the long term archive function. You need to disable the automatic deletion when you use the long term archive (Disabling automatic erasing). In the case, save cold data to an external file periodically with the long term archive function. Note that the database size keeps increasing if you do not use the long term archive function because cold data in GridDB is not deleted automatically.
- If a container has been deleted explicitly through SQL or NoSQL APIs, you can not archive data because the cold data in the container is deleted simultaneously. Also, if the schema of a container is changed except for adding columns to the end, users cannot save data of the container with the long term archive function as well.
- Users cannot save expired data to a container on which the expiry release is set. Therefore, gs_archive cannot save the data.
8.2.3 Searching and using archives
You can search archive files with a search function of the long term archive to utilize them.
- Users must execute this function on the client machine which holds archive files. (Connecting GridDB is not required.)
- A database name, container names, and the range of the data available start date (input date in the row key of a container/table or the partition key) can be specified as a condition to search files.
- The bunch of tar format archive files are searched to show the list of a row data file path including corresponding data.
When a database name and container names are used as a condition, files which hold data exactly matching them are displayed. When the start date range is specified, data included by the range are searched.
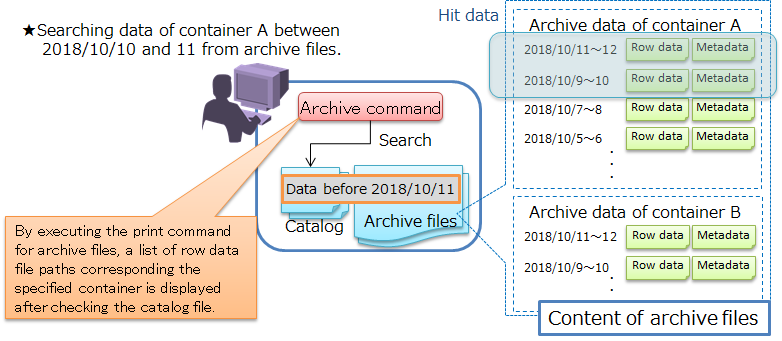
Searching archives
The data are saved as an open format based on the Apache Avro. Users can utilize retrieved files as follows.
- Restore data on GridDB with the import tool (gs_import) to refer and analyze them on GridDB
-
Develop application programs, such as following programs, from scratch or by using Apache Avro libraries.
- Converting data to other useful formats (ex. CSV, JSON)
- Migrating data to other data management system (ex. RDB)
A few sample scripts and programs are provided as examples of utilizing archive files. See Sample scripts and programs for the details of them. See also Output files for the file organization and File formats for the file formats.
8.3 How to use
The long term archive function is executed by a tool, gs_archive. Users can run gs_archive on a GridDB client machine in accordance with the following format.
| gs_archive | <command> <option>... |
The command is called "archive command." Users can specify the following options.
- store
- Save cold data, expired data which have been erasable, in archive files and erase them from GridDB.
- Display the files which hold specified data.
First of all, the way to construct an environment to use the tool is described as follows.
8.3.1 Environment construction
8.3.1.1 Install
Having installed Java is required to use gs_archive. Available Java versions are as followed.
- Oracle Java 7/8
Users can install the long term archive tool through installing the GridDB client package. The followings are included in the package.
- Archive tool
- gs_archive
- Archive configuration file
- archive/conf/gs_archive.properties
- Archive engine
- gsserver_archive
The archive tool accepts user's requests in a command format and requests a processing to the archive engines on GridDB nodes as necessary.
The target machines of the installation are different depending on the commands to use.
-
To use both store and print commands
- Install the client package to each node of a GridDB cluster
- Install the package to a client machine when you want to execute the archive tool on the client machine except nodes of a cluster
-
To use only print command
- Install the package only to a client machine to manage archive files
8.3.1.2 Installed directories and files
The directories created for the long term archive by the GridDB client package are as followed.
/var/lib/gridstore/          # GridDB client's home directory
    archive/                 # Long term archive's root directory
        conf/                # Configuration files are placed
        data/                # Archive files are created
        tmp/                 # gs_archive uses as a working directory
    log/                     # gs_archive and gsserver_archive writes logs
The files are placed on the following directories.
-
archive/conf/
- gs_archive.properties
- Settings for gs_archive's execution
-
archive/data/
- Output files of store commands
- By default those files are placed here
-
log/
- gs_archive_cmd-YYYYMMDD.log
- The log information of gs_archive are written in this file (YYYYMMDD: The date written the log information)
8.3.2 Initial setting
Prepare the following procedure to use the long term archive tool.
- Design and create target containers
- Disable automatic erasing of expired data (disabling automatic erasing)
- Set properties such as GridDB cluster information in the setup file
8.3.2.1 Setting for the expiry release container
- 1. Determine which data are targets of the long term archive in data design
- 2. Determine which containers are to store the target data when designing containers and tables on GridDB
-
3. Examine the expiry release settings on each target container in doing physical design on GridDB
- Data available period
-
In the case that the available period is long, there is a possibility that a GridDB load increases because the amount of data for archiving increases.
[Memo]
- Users cannot change the expiry release settings after creating the container. It is required to recreate the container for that case.
- All the rows within the period (available period / the number of division) is output as a file if you archive the container in which the row expiry release is set. All the rows in a data partition is output as a file if you archive the container in which the table expiry release is set.
- See "GridDB technical reference" (GridDB_TechnicalReference.html) for the details of expiry release function.
8.3.2.2 Disable automatic erasing
You need to set the mode in which cold data are accumulated in GridDB without been deleted automatically before activating the GridDB server to use the long term archive function. Set /dataStore/autoExpire to false in gs_node.json. This setting is required on all nodes of GridDB cluster.
[Memo]
- Users must do this setting before storing target data of long term archive.
8.3.2.3 Long term archive tool setting
You can set the archive tool with the property format setting file (/var/lib/gridstore/archive/conf/gs_archive.properties). There are a required item and an optional item.
-
Optional item
- Archive file output directory (default: /var/lib/gridstore/archive/data)
- Archive file division condition (e.g., the number of cold data stored in a file and the capacity)
See Setting file for the details of the setting items.
8.3.3 Store command
8.3.3.1 Overview of the processing
When a user executes the store command, the following process is executed on each node of GridDB clusters and the client machine on which the command is called.
-
1. Processing on each node of GridDB cluster
- A designated utility program (archive engine: gsserver_archive) saves cold data to row data files on each node.
-
2. Processing on the client machine executing the store command
- gs_archive moves the row data files from each node to the client machine.
- Metadata files corresponding each row data file are created.
- Archive files are created, then row data files and metadata files are moved into the archive files, finally a catalog file which has descriptions about the relations between files (row data and metadata files) and data is written.
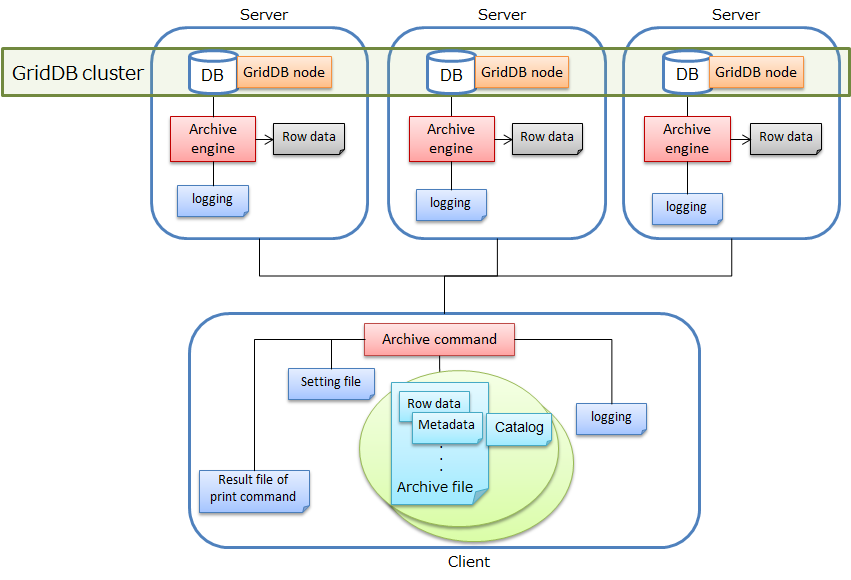
System architecture of long term archive
8.3.3.2 How to use the store command
The store command executes to save cold data in archive files and delete them from GridDB. If the configuration of GridDB cluster changes during the execution, the command doesn't terminate normally. To avoid this situation, run the store command by the following steps.
- Disable automatic reconfiguration: gs_loadbalance -u <user>/<password> --off --cluster [-s server[:port]]
- Run "store" command
- Enable automatic reconfiguration: gs_loadbalance -u <user>/<password> --off --cluster [-s server[:port]]
See the setting of automatic cluster reconfiguration for the details of gs_loadbalance.
[Memo]
- Users must validate the automatic cluster reconfiguration after executing the store command
- Specify a GridDB node by "-s" option of gs_loadbalance
- Only GridDB administrators can use the store command and multiple users should not use the command simultaneously.
-
A container is created in GridDB when the store command is executed. Do not delete or update the following container.
- database name
- _griddb_operation_tool
- container name
- archive_info
- Specify the current time in the "simulateErasableExpiredTime" with gs_paramconf if you confirm the cold data size in the DB file. If you execute gs_stat after setting, the number of block of data which have become cold data resulting from expiration is displayed in "simulateExpiredNum." (There is a possibility that it takes a long time to display the result if the cold data size is huge.)
- Execute the store command

# An execution of the store command
% gs_archive store -u admin/admin
Archive File Count: 692   # number of files which saved cold data
Archive File Directory: path=/var/lib/gridstore/archive/data/20180801040000000Z # directory in which archive files have been created
The store command is executed in two steps, saving cold data in files on each GridDB node and collecting the files to the client machine. Users can run the command in parallel by using "--parallel" option when the GridDB cluster has multiple nodes. The following example is to run the store command in 2 parallels.
# An example of parallel execution
% gs_archive store -u admin/admin --parallel 2
See the store command options for details of the store command specification.
8.3.3.3 Output files
The following two types of files are created after the store command execution.
- Catalog file: a file describing relations between cold data and archive files
- Archive file: files for saving cold data
The following two types of files are included in archive files in pairs.
- Row data file: files holding cold data (Apache Avro format)
- Metadata file: files holding metadata, such as schema and saved data range, of cold data (JSON format)
A range of cold data which has been become erasable simultaneously is saved in a row data file.
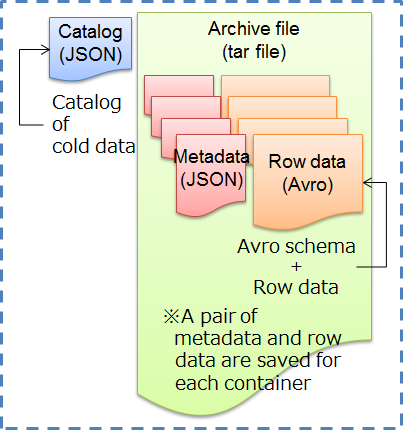
Archive file and catalog file
One or more archive files are created by the store command execution.
- An Archive file is created corresponding each GridDB database
- An Archive file is divided in multiple files when the amount of row data files reaches the specified size(default is 100MB) or the number of the file reaches the specified number (default is 10,000).
Only one catalog file is created when the store command is executed. Relations between files (row data files, metadata files, and archive files) and ranges of cold data are described in the catalog file. Each range of cold data is represented by the combination of database, container, and key column value. See catalog file for the details of a catalog file.
Archive files and a catalog file are created under the output directory of store command called archive directory (the default is /var/lib/gridstore/archive/data). Each execution of the store command creates a child directory which represents the execution date (UTC time), then output files are placed under the child directory. Note that the execution date is not based on the client machine's time. It's based on the latest time of GridDB nodes. Cold data which have become erasable by the time are targets of archiving.
The date (UTC time) format in directory and file names for archiving are as followed.
-
The date format in directory and file names
YYYYMMDDHHmmssSSSZ YYYY Year 4 digits MM Month 2 digits (01~12) DD Day 2 digits (01~31) HH Hour 2 digits (00~23) mm Minute 2 digits (00~59) ss Second 2 digits (00~59) SSS Millisecond 3 digits (000~999) Z Representing UTC time
The name templates of archive file and catalog file are as followed.
-
Archive file name
<execution time>_<nnnn>.tar execution time Same as the archive directory name nnnn Sequential number (0001~) -
Catalog file name
<execution time>_catalog.json execution time Same as the archive directory name
An example of above names are as followed.
- An example of output files
# An example of archive files and a catalog file (The command was executed at 4am on August 1, 2018 (UTC time))
/var/lib/gridstore/archive/data/   # Archive directory
    20180801040000000Z/
        20180801040000000Z_0001.tar    # Archive file
        20180801040000000Z_0002.tar    # Archive file
        20180801040000000Z_0003.tar    # Archive file
        20180801040000000Z_0004.tar    # Archive file
        20180801040000000Z_0005.tar    # Archive file
        20180801040000000Z_catalog.json  # Catalog file
Row data file paths and metadata file paths in an archive file are as followed.
-
Row data and metadata file path templates
<execution time>/<partition number>/<expired date>/<partition number>_<internal data id>_<expired date>.avro Row data file path <execution time>/<partition number>/<expired date>/<partition number>_<internal data id>_<expired date>.json Metadata file path execution time Same as the archive directory partition number GridDB partition number 5 digits (00000~) expired date Expired date of the cold data internal data id Internal data ID - An example of row data and metadata file paths.
% tar tf 20180801040000000Z_0001.tar
20180801040000000Z/00099/20180606145959999Z/00099_0000000000000000_20180606145959999Z.avro # Row data file
20180801040000000Z/00099/20180606145959999Z/00099_0000000000000000_20180606145959999Z.json # Metadata file
20180801040000000Z/00015/20180606145959999Z/00015_0000000000000001_20180606145959999Z.avro # Row data file
20180801040000000Z/00015/20180606145959999Z/00015_0000000000000001_20180606145959999Z.json # Metadata file
‥
8.3.4 print command
The print command shows a list of cold data saved in the archive directory. The command doesn't require to connect a GridDB cluster because it shows the result for scanning the catalog file in the archive directory. Users must run the print command on the same machine on which they executed the store command.
The displayed items are as followed.
| Item name | Displayed information |
|---|---|
| container | <database name>.<container name> |
| startTime | Start time of the cold data |
| endTime | End time of the cold data |
| archiveFile | Archive file name including the following files |
| metaFile | Path to the file holding metadata of the cold data |
| rowFile | Path to the file holding row data of the cold data |
The example of executing the print command is as follows.
# An example of print command execution
% gs_archive print
container=public.ExpRow_Time_NoPart_-./=
startTime=2017-07-08T15:00:00.000Z
endTime=2017-08-07T14:59:59.999Z
archiveFile=/var/lib/gridstore/archive/data/20180801040000000Z/20180801040000000Z_0001.tar
metaFile=20180801040000000Z/00068/20180603145959999Z/00068_0000000000000002_20180603145959999Z.json
rowFile=20180801040000000Z/00068/20180603145959999Z/00068_0000000000000002_20180603145959999Z.avro
#---------------------------
container=public.ExpRow_Time_NoPart_0001
startTime=2017-07-08T15:00:00.000Z
endTime=2017-08-07T14:59:59.999Z
archiveFile=/var/lib/gridstore/archive/data/20180801040000000Z/20180801040000000Z_0001.tar
metaFile=20180801040000000Z/00073/20180603145959999Z/00073_0000000000000000_20180603145959999Z.json
rowFile=20180801040000000Z/00073/20180603145959999Z/00073_0000000000000000_20180603145959999Z.avro
#---------------------------
...
Users can specify a database name, a container name, and a data range as a condition to filter the list. The data range is represented by date type values stored in the row key or the partitioning key of the container/table. Row data files including cold data information of the "ExpRow_Time_NoPart_001" container of the "public" database, meta data files, and the archive file path list including those files are displayed in the following example of executing the print command.
# An example of showing only information for the container "ExpRow_Time_NoPart_0001" of "public" database.
% gs_archive print --db public --container ExpRow_Time_NoPart_0001
container=public.ExpRow_Time_NoPart_0001
startTime=2017-07-08T15:00:00.000Z
endTime=2017-08-07T14:59:59.999Z
archiveFile=/var/lib/gridstore/archive/data/20180801040016000Z/20180801040016000Z_0001.tar
metaFile=20180801040016000Z/00073/20180603145959999Z/00073_0000000000000000_20180603145959999Z.json
rowFile=20180801040016000Z/00073/20180603145959999Z/00073_0000000000000000_20180603145959999Z.avro
#---------------------------
container=public.ExpRow_Time_NoPart_0001
startTime=2017-08-07T15:00:00.000Z
endTime=2017-09-06T14:59:59.999Z
archiveFile=/var/lib/gridstore/archive/data/20180801040016000Z/20180801040016000Z_0001.tar
metaFile=20180801040016000Z/00073/20180703145959999Z/00073_0000000000000000_20180703145959999Z.json
rowFile=20180801040016000Z/00073/20180703145959999Z/00073_0000000000000000_20180703145959999Z.avro
#---------------------------
The result of print command can be stored in a CSV file delimited by tabs at the same time that it is displayed on the terminal.
# An example of storing the result of print command in a csv file
% gs_archive print --db public --container ExpRow_Time_NoPart_0001 --output ExpRow_Time_NoPart_0001.csv
...
% cat ExpRow_Time_NoPart_0001.csv
public.ExpRow_Time_NoPart_0001  2017-07-08T15:00:00.000Z        2017-08-07T14:59:59.999Z        /var/lib/gridstore/archive/data/20180801040000000Z/20180801040000000Z_0001.tar 20180801040000000Z/00073/2018060314595999$
public.ExpRow_Time_NoPart_0001  2017-08-07T15:00:00.000Z        2017-09-06T14:59:59.999Z        /var/lib/gridstore/archive/data/20180801040000000Z/20180801040000000Z_0001.tar 20180801040000000Z/00073/2018070314595999$
See print command options for the details of the print command usage. Moreover, see File formats for the details of data type in a meta data file and a row data file.
8.3.5 Sample scripts and programs
Sample scripts and programs to utilize archive files searched by the "print" command are provided. They are stored in the zip files in /usr/griddb/docs
-
A sample script to extract row data files from archive files (tar files)
-
collect_archive.sh: Receiving the result of "print" command and expanding all archive files in the result
- Example: gs_archive print | ./collect_archive.sh
-
collect_archive.sh: Receiving the result of "print" command and expanding all archive files in the result
-
A sample program to convert data in row data files to CSV
- ConvertAvroToCSV.java: A sample program to convert a row data file to a CSV file
-
A sample script to import archive files (Apache Avro files) to GridDB for analysis.
-
import_archive.sh: A sample script import row data files (Avro format) to GridDB
- Importing all row data files under the specified directory to GridDB
- Set the GridDB connection information in the setting file for gs_import
- Example: sh import_archive.sh <user name> <password> /var/lib/gridstore/archive/data/20180801040000000Z
-
import_archive.sh: A sample script import row data files (Avro format) to GridDB
-
A sample program to import archive files to PostgreSQL for analysis on other DBs
- ImportAvroIntoPostgreSQL.java
- A sample program to import row data files into PostgreSQL.
8.4 Command/Option specification
-
Synopsis
gs_archive store -u|--user <user name>/<password> [--parallel <number of threads>] gs_archive print [-d <archive directory>] [--db <database name> [--container <container name>]... [--containerregex <regular expression for container name>]...] [--startTime <start time of required data>] [--endTime <end time of required data>] [--output <output file>] gs_archive
[Memo] When not specifying both "store" command and "print" command and entering only "gs_archive", the command usage of both commands is displayed.
- Options of store command
| Option | Required | Description |
|---|---|---|
| -u|--user <user name>/<password> | ○ | Specify the user name and password of a GridDB administrator. |
| --parallel <number of threads> | Specify the number of threads to run "store" in parallel on multiple nodes. When not specified this option or the value less than or equal to 2 is specified, the command is executed sequentially. And the upper limit of the value is the number of GridDB cluster nodes. If the value exceeding that is specified, it is executed in the maximum parallel, i.e. the number of nodes. |
- Options of print command
| Option | Required | Description |
|---|---|---|
| -d <archive directory> | Specify the directory where archive files have been placed. The "print" command searches the directory tree rooted at this directory and recursively tries to find archive files. The default value of this option is /var/lib/gridstore/archive/data. | |
| --db <database name> | Specify the database name of required data as a search condition. | |
| --container <container name> | Specify the container name of required data as a search condition. When specifying this option, a database name is also needed to be specified together. Multiple options can be specified for this option. When specified multiple options or specified with "containerregex" option, the files which has data matching one of those conditions are searched and displayed. | |
| --containerregex <regular expression of container names> | Specify the regular expression for container names of required data as a search condition. When specifying this option, a database name is also needed to be specified together. Multiple options can be specified for this option. When specified multiple options or specified with "containerregex" option, the files which has data matching one of those conditions are searched and displayed. | |
| --startTime <start time of required data> | Specify the value of the key column set for the expiry release function as a starting time of required data which means a search condition. When this option is specified with other conditions, the files which match all conditions are searched and displayed. | |
| --endTime <end time of required data> | Specify the value of the key column set for the expiry release function as an ending time of required data which means a search condition. When this option is specified with other conditions, the files which match all conditions are searched and displayed. | |
| --output <output file> | Specify the output file to be written the result of this command. |
8.5 Setting file
-
Users can specify the following settings in /var/lib/gridstore/archive/conf/gs_archive.properties
Parameter Required Default Description mode required MULTICAST Specify the connection method for GridDB. MULTICAST :multicast method FIXED_LIST:fixed list method PROVIDER :provider method clusterName required Specify the cluster name of GridDB which is used in the command "gs_joincluster". hostAddress required if mode=MULTICAST 239.0.0.1 Specify the value of /transaction/notificationAddress in gs_cluster.json. hostPort required if mode=MULTICAST 31999 Specify the value of /transaction/notificationPort in gs_cluster.json. notificationMember required if mode=FIXED_LIST Specify the list of cluster node's addresses and ports when using fixed list method. notificationProvider.url required if mode=PROVIDER Specify the value of /cluster/notificationProvider/url in gs_cluster.json. jdbcAddress required for GridDB AE if mode=MULTICAST 239.0.0.1 Specify the value of /sql/notificationAddress in gs_cluster.json. jdbcPort required for GridDB AE if mode=MULTICAST 41999 Specify the value of /sql/notificationPort in gs_cluster.json. sqlMember required for GridDB AE if mode=FIXED_LIST Specify the list of cluster node's JDBC address and ports when using fixed list method. ospassword required Specify the password for the Operating System user "gsadm". sshPort 22 Specify the SSH port to use. archiveDataPath archive/data Specify the file path to directory to place archive files. archiveTempPath archive/tmp Specify the file path to working directory of the archive tool. tarMaxFileSize 100 Specify the max amount size(MB) of row data files in an archive file. (1MB~1024MB) tarMaxFileCount 10000 Specify the max number of row data files in an archive files. (10~10000) storeMemoryLimit 1024MB Specify the upper limit and its unit of "store memory" for GridDB archive engine.
8.6 File formats
8.6.1 Row data file
Row data file is written in the Apache Avro format. The files consist of a header part and data blocks.
-
Header
- A schema description in JSON format is stored.
- In row data files, the description represents a container schema.
-
Data block
- One or more data blocks are stored in a file and each block is compressed in ZIP format.
- In row data files, row data is stored in these blocks.
When building application programs to work with external systems, acquire the schema information from the header and read row data based on the schema in those programs.
- Schema description
A container's schema is written in the header of row data files in following JSON format.
| field | Description | JSON type | Note |
|---|---|---|---|
| type | Schema type | string | Fixed to "record". |
| name | Container name (translated) | string | When used letters other than alphanumeric characters and '_' in the container name, the translated name by the rules in the following [Memo] is written here. |
| namespace | Database name | string | |
| doc | Container name (original) | string | When a translated name is written in the "name" field, the original name is described here. |
| fields | Information of columns | array | A JSON object's array which represents each column information is written. |
| name | Column name (translated) | string | When used letters other than alphanumeric characters and '_' in any column name, all of the column names are translated by the rules in the following [Memo] and they are written here. |
| doc | Column name (original) | string | When any column name is translated, each original name is written here. Otherwise, if there aren't any translated column names, this field is not written. |
| default | Default value | Depending on the column type | The default value corresponding the GridDB data type is written. |
| type | Column type information | JSON object or array | An array for nullable columns (see the following [Memo]), otherwise JSON object representing a column type. |
| type | Avro data type | string | Other than GridDB array columns, a string which represents the Avro data type corresponding a GridDB data type. The value of this field for GridDB array columns is "array" and the element type of the array is written in the "items" field. |
| items | Element type of array | JSON object | Only when the column is an array, this field is written. |
| type | Avro data type of array element | string | An Avro data type of the array column is written. |
| logicalType | GridDB data type of array element | string | A GridDB data type of the array column is written. When an Avro data type such as "int", corresponding multiple GridDB types such as BYTE, SHORT and INTEGER is described in the above "type" field, the original data type of the column is written. |
| logicalType | GridDB data type of column | string | Other than GridDB array columns, the GridDB data type is written here. When an Avro data type such as "int", corresponding multiple GridDB types such as BYTE, SHORT and INTEGER is described in the above "type" field, the original data type of the column is written. This field is not written for array columns. |
[Memo]
-
A GridDB name conversion rule for Apache Avro (for container or column names including letters other than alphanumeric characters and '_')
- Letters including '_' other than alphanumeric characters and a digit letter if it is the head of the name are converted to "_XX" (XX means 2 hex digits)
-
The type representation for a nullable column
- "type": ["null", <a JSON object represents a column type information>]
- Data type mapping from GridDB to Apache Avro
The note of the usable mapping between GridDB data types and Apache Avro data types is as followed.
- The time series type of GridDB (TIMESTAMP) is mapped to Apache Avro's "long".
- All the integer types of GridDB (BYTE, SHORT, INTEGER) are mapped to Apache Avro's "int".
- The element types of GridDB array are followed to the mapping of the basic types.
-
Mapping for GridDB basic types
GridDB data type Avro data type in fields/logicalType in fields/type STRING string BOOL boolean BYTE int SHORT int INTEGER int LONG long FLOAT float DOUBLE double TIMESTAMP long GEOMETRY string BLOB bytes -
Mapping for GridDB composite types (array types)
GridDB data type Avro data type Avro data type for the elements GridDB data type for the elements in fields/type/type in fields/type/items/type in fields/type/items/logicalType STRING_ARRAY array string STRING BOOL_ARRAY array boolean BOOL BYTE_ARRAY array int BYTE SHORT_ARRAY array int SHORT INTEGER_ARRAY array int INTEGER LONG_ARRAY array long LONG FLOAT_ARRAY array float FLOAT DOUBLE_ARRAY array double DOUBLE TIMESTAMP_ARRAY array long TIMESTAMP
8.6.2 Metadata file
A metadata file has information required to import the row data file. The content is followed to the format of metadata files used for gs_export / gs_import. The overlapped parameters of both metadata files are the same format.
The followings are written for information not to be restored. When it is required to restore the following information, move the description to a right position of the file.
- Trigger settings
- Expiry release settings
- Column compression
Information used by the archive engine is also written in this file.
| Tag name | Value | Note |
|---|---|---|
| Auxiliary information | ||
| schemaInformation | ||
| expirationType | Type of expiry release function | PARTITION / ROW (omissible when specifying ROW) |
| expirationTime | Length of expiration | Integer (written when PARTITION is specified) |
| expirationTimeUnit | Unit of the above length | DAY / HOUR / MINUTE / SECOND / MILLISECOND (written when PARTITION is specified) |
| triggerInfoSet | Trigger settings | Written only when any information is set |
| eventName | Trigger name | Trigger name |
| notificationType | Notification method | JMS / REST |
| targetEvents | Operation on monitoring target | PUT / DELETE |
| targetColumnNames | Column name | |
| notificationURI | Destination URI of notification | |
| JmsDestinationType | Type of destination | topic / queue |
| JmsDestinationName | Name of destination | |
| JmsUser | User name | |
| JmsPassword | Password | |
| timeSeriesProperties | Information about time series container | Written only for a time series container |
| compressionMethod | NO / SS / HI | |
| compressionWindowSize | Maximum window size of a row | Integer |
| compressionWindowSizeUnit | Unit of the window size | DAY / HOUR / MINUTE / SECOND / MILLISECOND |
| expirationDivisionCount | The number of division for expiry release function | The number of division for expiration management |
| rowExpirationElapsedTime | Elapsed time for expiration | Integer |
| rowExpirationTimeUnit | Unit of the elapsed time | DAY / HOUR / MINUTE / SECOND / MILLISECOND |
| compressionInfoSet | Compression setting on each column | Written only when any information is set |
| columnName | Column name | |
| compressionType | Absolute value / relative value | RELATIVE / ABSOLUTE |
| width | A decimated parameter for absolute errors | Floating point number |
| rate | A decimated parameter for absolute errors | Floating point number |
| span | A decimated parameter for relative errors | Floating point number |
| Detailed information of expired data | ||
| archiveInfo | ||
| nodeAddr | Node address where the data are acquired | String |
| nodePort | REST port of the above node | Integer |
| databaseId | Database ID | Integer |
| containerId | Container ID | Integer |
| dataPartitionId | Data partition ID | Integer |
| rowIndexOID | Information used by the GridDB archive engine | Integer |
| mvccIndexOID | Information used by the GridDB archive engine | Integer |
| initSchemaStatus | Information used by the GridDB archive engine | Integer |
| schemaVersion | Schema version | Integer |
| expirationType | Type of expiry release function | PARTITION / ROW |
| startTime | Start time of the data range | String |
| endTime | End time of the data range | String |
| expiredTime | The time when the data was expired | String |
| erasableTime | The time when the data became disable | String |
8.6.3 Catalog file
Information about row data files and metadata files included by archive files are written in this file.
| Tag name | Value | Note |
|---|---|---|
| rootDirectory | Directory where archive files have been placed | The directory specified in "store" command when saving archive files is written. The default of the directory is /var/lib/gridstore/archive/data and it is changed by "archiveDataPath" property in the setting file. |
| files | A list of cold data | |
| database | Database name | |
| container | Container name | |
| startTime | Start time of the cold data | The combination of start time (startTime) and end time (endTime) of key column value set for the expiry release function represents the data range which became disable simultaneously and are stored in one row data file. It shows only the range, the value at either the start time or the end time does not always exist. |
| endTime | End time of the cold data | |
| archiveFile | Archive file name | The name of the tar format archive file including the row data file of the data range and the corresponding metadata file is written. |
| subdirectory | Relative directory path in the archive file | The relative directory path where the row data file and the metadata file are placed in the above file is written. |
| metaFile | Metadata file name | The name of the metadata file is written. |
| rowDataFiles | Row data file name | The name of the row data file is written. It is written in an array corresponding multiple names for the future expansion, but only one name is written in this version. |
| startTime | Start time of all data in this file | The earliest start time (startTime) in this file is written. |
| endTime | End time of all data in this file | The latest end time (endTime) in this file is written. |
9 Cluster configuration method other than multicast method
When multicast is not supported, the fixed list method or the provider method can be used instead to enable cluster configuration and client connection.
9.1 Fixed list method
When a fixed address list is given to start a node, the list is used to compose the cluster. When composing a cluster using the fixed list method, configure the parameters in the cluster definition file.
Cluster definition file
| Parameter | Data type | Description |
|---|---|---|
| /cluster/notificationMember | string | Specify the address list when using the fixed list method as the cluster configuration method. |
A configuration example of a cluster definition file is shown below.
{
                             :
                             :
    "cluster":{
        "clusterName":"yourClusterName",
        "replicationNum":2,
        "heartbeatInterval":"5s",
        "loadbalanceCheckInterval":"180s",
        "notificationMember": [
            {
                "cluster": {"address":"172.17.0.44", "port":10010},
                "sync": {"address":"172.17.0.44", "port":10020},
                "system": {"address":"172.17.0.44", "port":10040},
                "transaction": {"address":"172.17.0.44", "port":10001},
                "sql": {"address":"172.17.0.44", "port":20001}
            },
            {
                "cluster": {"address":"172.17.0.45", "port":10010},
                "sync": {"address":"172.17.0.45", "port":10020},
                "system": {"address":"172.17.0.45", "port":10040},
                "transaction": {"address":"172.17.0.45", "port":10001},
                "sql": {"address":"172.17.0.45", "port":20001}
            },
            {
                "cluster": {"address":"172.17.0.46", "port":10010},
                "sync": {"address":"172.17.0.46", "port":10020},
                "system": {"address":"172.17.0.46", "port":10040},
                "transaction": {"address":"172.17.0.46", "port":10001},
                "sql": {"address":"172.17.0.46", "port":20001}
            }
        ]
    },
                             :
                             :
}
9.2 Provider method
Get the address list supplied by the address provider to perform cluster configuration. When composing a cluster using the provider method, configure the parameters in the cluster definition file.
Cluster definition file
| Parameter | Data type | Description |
|---|---|---|
| /cluster/notificationProvider/url | string | Specify the URL of the address provider when using the provider method as the cluster configuration method. |
| /cluster/notificationProvider/updateInterval | string | Specify the interval to get the list from the address provider. Specify a value that is 1s or higher and less than 231s. |
A configuration example of a cluster definition file is shown below.
{
                             :
                             :
    "cluster":{
        "clusterName":"yourClusterName",
        "replicationNum":2,
        "heartbeatInterval":"5s",
        "loadbalanceCheckInterval":"180s",
        "notificationProvider":{
            "url":"http://example.com/notification/provider",
            "updateInterval":"30s"
        }
    },
                             :
                             :
}
The address provider can be configured as a Web service or as a static content. The specifications below need to be satisfied.
- Compatible with the GET method.
-
When accessing the URL, the node address list of the cluster containing the cluster definition file in which the URL is written is returned as a response.
- Response body: Same JSON as the contents of the node list specified in the fixed list method
- Response header: Including Content-Type:application/json
An example of a response sent from the address provider is as follows.
$ curl http://example.com/notification/provider
[
    {
        "cluster": {"address":"172.17.0.44", "port":10010},
        "sync": {"address":"172.17.0.44", "port":10020},
        "system": {"address":"172.17.0.44", "port":10040},
        "transaction": {"address":"172.17.0.44", "port":10001},
        "sql": {"address":"172.17.0.44", "port":20001}
    },
    {
        "cluster": {"address":"172.17.0.45", "port":10010},
        "sync": {"address":"172.17.0.45", "port":10020},
        "system": {"address":"172.17.0.45", "port":10040},
        "transaction": {"address":"172.17.0.45", "port":10001},
        "sql": {"address":"172.17.0.45", "port":20001}
    },
    {
        "cluster": {"address":"172.17.0.46", "port":10010},
        "sync": {"address":"172.17.0.46", "port":10020},
        "system": {"address":"172.17.0.46", "port":10040},
        "transaction": {"address":"172.17.0.46", "port":10001},
        "sql": {"address":"172.17.0.46", "port":20001}
    }
]
[Memo]
- Specify the serviceAddress and servicePort of the node definition file in each module (cluster,sync etc.) for each address and port.
- Module sql is needed only in GridDB Advanced Edition.
- Set either the /cluster/notificationAddress, /cluster/notificationMember, /cluster/notificationProvider in the cluster definition file to match the cluster configuration method used.
- See the GridDB technical reference (GridDB_TechnicalReference.html) for details of the cluster configuration methods.
10 Annexes
X.X.X below indicates the GridDB version.
10.1 Directory configuration
The directory configuration after the GridDB server and client are installed is shown below.
(Machine installed with a server/client)
/usr/griddb-xx-X.X.X/                                    installation directory
                     Fixlist.pdf
                     Readme.txt
                     bin/
                         gs_xxx                          various commands
                         gsserver                        server module
                     conf/
                     etc/
                     lib/
                     license/
                     prop/

/usr/griddb-xx-X.X.X/                                    installation directory
                     lib/
                         gridstore-tools-X.X.X.jar
                         XXX.jar                         free software

/usr/share/java/gridstore-tools.jar -> /usr/griddb-xx-X.X.X/lib/gridstore-tools-X.X.X.jar

/var/lib/gridstore/                                      GridDB home directory (working directory)
                   admin/                                integrated operation control GUI home directory (adminHome)
                   backup/                               backup file directory
                   conf/                                 definition file directory
                        gs_cluster.json                  cluster definition file
                        gs_node.json                     node definition file
                        password                         user definition file
                   data/                                 database file directory
                   log/                                  event log directory

/usr/bin/
         gs_xxx -> /usr/griddb-xx-X.X.X/bin/gs_xxx       link to various commands
         gsserver -> /usr/griddb-xx-X.X.X/bin/gsserver   link to server module

/etc/init.d/
            gridstore -> /usr/griddb-xx-X.X.X/etc/init.d/gridstore  rc script

(Machine installed with the library)
/usr/griddb-xx-X.X.X/                                    installation directory
                     lib/
                         gridstore-X.X.X.jar
                         gridstore.h
                         libgridstore.so.0.0.0
                         python/

/usr/share/java/gridstore.jar -> /usr/griddb-xx-X.X.X/lib/gridstore-X.X.X.jar

/usr/include/gridstore.h -> /usr/griddb-xx-X.X.X/lib/gridstore.h

/usr/lib64/
           libgridstore.so -> libgridstore.so.0
           libgridstore.so.0 -> libgridstore.so.0.0.0
           libgridstore.so.0.0.0 -> /usr/griddb-xx-X.X.X/lib/libgridstore.so.0.0.0

(Machine installed with the document)
/usr/griddb-xx-X.X.X/                                    installation directory
                     docs/
                          griddb-documents-X.X.X.zip
                          griddb-documents-en-X.X.X.zip
10.2 Parameter list
The list of parameters in the node definition file and cluster definition file in GridDB is shown below.
10.2.1 Node definition file (gs_node.json)
| Parameter | Data type | Meaning | Default |
|---|---|---|---|
| /dataStore/dbPath | string | Database file directory | "data" |
| /dataStore/backupPath | string | Backup file directory | "backup" |
| /dataStore/syncTempPath | string | Long-term sync temporary file directory | "sync" |
| /dataStore/storeMemoryLimit | int | Memory buffer size | "1024MB" |
| /dataStore/storeWarmStart | boolean | Warm start during restart (false: invalid, true: valid) | false |
| /dataStore/concurrency | int | Processing parallelism | 4 |
| /dataStore/logWriteMode | int | Log write mode | 1 |
| /dataStore/persistencyMode | string | Persistency mode | "NORMAL" |
| /dataStore/affinityGroupSize | int | Number of affinity groups | 4 |
| /dataStore/storeCompressionMode | string | Data block compression mode | "NO_COMPRESSION" |
| /dataStore/autoExpire | boolean | Automatic deletion of expired data (false: invalid, true: valid) | false |
| /checkpoint/checkpointInterval | string | Checkpoint execution interval | "60s" |
| /checkpoint/checkpointMemoryLimit | string | Checkpoint memory buffer size | "1024MB" |
| /checkpoint/useParallelMode | boolean | Checkpoint parallel operation (false: invalid, true: valid) | false |
| /cluster/serviceAddress | string | Reception address used for cluster administration | "127.0.0.1" |
| /cluster/servicePort | int | Reception port used for cluster administration | 10010 |
| /sync/serviceAddress | string | Reception address used in data synchronization | "127.0.0.1" |
| /sync/servicePort | int | Reception port used in data synchronization | 10020 |
| /system/serviceAddress | string | Connection address of operation command | "127.0.0.1" |
| /system/servicePort | int | Connection port of operation command | 10040 |
| /system/eventLogPath | string | Output directory of event log file | "log" |
| /transaction/serviceAddress | string | Reception address of transaction process | "127.0.0.1" |
| /transaction/servicePort | int | Reception port of transaction process | 10001 |
| /transaction/connectionLimit | int | No. of connections upper limit value | 5000 |
| /trace/default | string | Event log output level | "LEVEL_ERROR" |
| /trace/dataStore | string | "LEVEL_ERROR" | |
| /trace/collection | string | "LEVEL_ERROR" | |
| /trace/timeSeries | string | "LEVEL_ERROR" | |
| /trace/chunkManager | string | "LEVEL_ERROR" | |
| /trace/checkpointFile | string | "LEVEL_ERROR" | |
| /trace/checkpointService | string | "LEVEL_INFO" | |
| /trace/checkpointServiceDetail | string | "LEVEL_ERROR" | |
| /trace/logManager | string | "LEVEL_WARNING" | |
| /trace/clusterOperation | string | "LEVEL_INFO" | |
| /trace/clusterService | string | "LEVEL_ERROR" | |
| /trace/syncService | string | "LEVEL_ERROR" | |
| /trace/systemService | string | "LEVEL_INFO" | |
| /trace/systemServiceDetail | string | "LEVEL_ERROR" | |
| /trace/transactionManager | string | "LEVEL_ERROR" | |
| /trace/sessionDetail | string | "LEVEL_ERROR" | |
| /trace/transactionDetail | string | "LEVEL_ERROR" | |
| /trace/timeoutDetail | string | "LEVEL_ERROR" | |
| /trace/transactionService | string | "LEVEL_ERROR" | |
| /trace/transactionTimeout | string | "LEVEL_WARNING" | |
| /trace/sessionTimeout | string | "LEVEL_WARNING" | |
| /trace/replicationTimeout | string | "LEVEL_WARNING" | |
| /trace/recoveryManager | string | "LEVEL_INFO" | |
| /trace/recoveryManagerDetail | string | "LEVEL_ERROR" | |
| /trace/eventEngine | string | "LEVEL_WARNING" | |
| /trace/triggerService | string | "LEVEL_ERROR" |
In addition to those mentioned above, the parameters used in the GridDB Advanced Edition are as follows.
| Parameter | Data type | Meaning | Default |
|---|---|---|---|
| /sql/serviceAddress | string | Reception address for SQL client connection | "127.0.0.1" |
| /sql/servicePort | int | Reception port for SQL client connection | 20001 |
| /sql/storeSwapFilePath | string | SQL intermediate store swap file directory | "swap" |
| /sql/storeSwapSyncSize | string | SQL intermediate store swap file and cache size | "1024MB" |
| /sql/storeMemoryLimit | string | SQL intermediate store memory buffer size | "1024MB" |
| /sql/workMemoryLimit | string | SQL work area memory buffer size | "128MB" |
| /sql/workCacheMemory | string | SQL work area memory cache size | "128MB" |
| /sql/connectionLimit | int | No. of connections upper limit value | 5000 |
| /sql/concurrency | int | Processing parallelism | 4 |
| /trace/sqlService | string | Event log output level | "LEVEL_WARNING" |
10.2.2 Cluster definition file (gs_cluster.json)
| Parameter | Data type | Meaning | Default |
|---|---|---|---|
| /dataStore/partitionNum | int | Number of partitions | 128 |
| /dataStore/storeBlockSize | string | Block size ("64KB", "1MB") | "64KB" |
| /cluster/clusterName | string | Cluster name | "" |
| /cluster/replicationNum | int | No. of replicas | 2 |
| /cluster/notificationAddress | string | Multicast address for cluster administration | "239.0.0.1" |
| /cluster/notificationPort | int | Multicast port for cluster administration | 20000 |
| /cluster/notificationInterval | string | Interval of multicast for cluster administration | "5s" |
| /cluster/heartbeatInterval | string | Heartbeat interval | "5s" |
| /cluster/loadbalanceCheckInterval | string | Load balance check interval | "180s" |
| /cluster/notificationMember | array | Address list used in the fixed list method | |
| /cluster/notificationProvider/url | string | URL of address provider used in the provider method | |
| /cluster/notificationProvider/updateInterval | int | Interval to get list from address provider | "5s" |
| /sync/timeoutInterval | string | Short-term synchronization timeout time | "30s" |
| /transaction/notificationAddress | string | Address for multi-cast distribution to client | "239.0.0.1" |
| /transaction/notificationPort | int | Port for multi-cast distribution to client | 31999 |
| /transaction/notificationInterval | string | Interval of multicast distribution to client | "5s" |
| /transaction/replicationTimeoutInterval | string | Replication/timeout time | "10s" |
| /transaction/replicationMode | string | Replication method (0: asynchronous, 1: semi-synchronous) | 0 |
| /transaction/authenticationTimeoutInterval | string | Authentication timeout time | "5s" |
In addition to those mentioned above, the parameters used in the GridDB Advanced Edition are as follows.
| Parameter | Data type | Meaning | Default |
|---|---|---|---|
| /sql/notificationAddress | string | Address for multi-cast distribution to JDBC/ODBC client | "239.0.0.1" |
| /sql/notificationPort | int | Multicast port to JDBC/ODBC client | 41999 |
| /sql/notificationInterval | string | Interval of multicast distribution to JDBC/ODBC client | "5s" |