GridDB backup guide
Revision: 2197
Table of Contents
- 1 Introduction
- 2 Online backup and recovery operations
- 3 File system level backup and recovery operations
- 4 Annexes
1 Introduction
1.1 Aim & composition of this manual
This manual describes the backup procedure and recovery method in the event of a data or node failure in GridDB database.
It is written for administrators responsible for GridDB's operating system design and operation control.
The following subjects are covered in this manual.
-
Backup operations
- This section explains the different types of backup available and how to use them.
-
Recovery from a failure
- This section explains failure detection and how to recover from one.
1.2 Backup methods of GridDB
Regular data backup needs to be performed in case of data corruption caused by database failures and malfunctions of the application. The type and interval of the backup operation needs to be determined based on the available disk capacity, duration of backup, and the recovery requirements in case of failure (e.g. point of recovery). The resolution method needs to be selected according to the system resources and the request from the service level of the recovery warranty.
Backup methods of GridDB are shown below.
| Backup method | Recovery point | Features |
|---|---|---|
| Offline backup | Stopping the cluster | Clusters must keep stopping until copying the backup completes. The recovery point is not different from node to node. |
| Online backup (baseline with differential/incremental) | Completing the backup | Use the GridDB backup command. There is a possibility that the recovery point is different from node to node depending on the timing when obtaining the backup completes. |
| Online backup (automatic log) | Immediately before the failure | Use the GridDB backup command. There is a possibility that the start-up time gets longer because the data is recovered to the latest with transaction logs. |
| File system level online backup (snapshot, etc.) | Taking the snapshot | The backup is obtained collaborating with the snapshot of an OS and a storage. Even if snapshots for each node are executed simultaneously, there is a possibility that there is an about 1 second difference from node to node if the log write mode is default DELAYED_SYNC 1 sec. |
| File system level online backup (OS command, etc. with automatic log) | Immediately before the failure | The backup is obtained collaborating with backup solutions, etc. There is a possibility that the start-up time gets longer because the data is recovered to the latest with transaction logs. |
To know about the GridDB online backup functions, please refer to Online backup.
To perform an online backup of file system level instead of using the GridDB online backup functions, please refer to File system level backup.
To perform an offline backup, stop the cluster by using gs_stopcluster command first, and stop all the nodes constituting the cluster. Next, backup the data under the database file directory of each node (directory indicated by /dataStore/dbPath in gs_node.json). All data related to the cluster database will be stored under the dbPath directory.
[Points to note]
- When an online backup is performed, please stop the related updating among multiple containers. Then, it is possible to prevent creating the logically inconsistent backup for the entire cluster.
- When a node failure occurs during online backup, perform the backup again starting with the first node. Then, it is possible to prevent not backing up necessary data caused by re-arrangement of partitions (rebalancing). The re-arrangement occurs when the cluster configuration is changed.
1.3 Backup definition files
In backup operation, in addition to a regular backup of the database files, backup of the definition files is also needed.
Use an OS command to perform a backup of the node definition file (gs_node.json), cluster definition file (gs_cluster.json), user definition file (password) in the $GS_HOME/conf directory (/var/lib/gridstore/conf by default) in addition to a regular backup of the database files.
Be sure to backup the definition file if there are configuration changes or when a user is registered or changed.
1.4 Explanation of terms
This section explains the terms used in this manual.
| Term | Meaning |
|---|---|
| Partition | Data management unit to arrange a container. Smallest data arrangement unit among clusters, and data movement and replication unit for adjusting the load balance between nodes (rebalancing) and for managing data replicas in case of failure. |
| Partition group | A collection of multiple partitions, which acts as a data unit in the file system when data is perpetuated into a disk. 1 checkpoint file corresponds to 1 partition group. Partition groups are created according to concurrency (/dataStore/concurrency) figure in the node definition file. |
| Checkpoint file | A file written into a disk by a partition group. Updated information is reflected in the memory by a cycle of the node definition file (/checkpoint/checkpointInterval). |
| Transaction log file | Update information of the transaction is saved sequentially as a log. |
| LSN (Log Sequence Number) | Assigned to each partition, the LSN shows the update log sequence number during transaction update. The master node of a cluster configuration maintains the maximum number of LSN (MAXLSN) of all the partitions maintained by each node. |
| Replica | Replication is the process of creating an exact copy of the original data. In this case, one or more replica are created and stored on multiple nodes, which results to the creation of partition across the nodes. There are 2 forms of replica, master and backup. The former one refers to the original or master data, whereas the latter one is used in case of failure as a reference. |
2 Online backup and recovery operations
2.1 Backup operations
This section explains the GridDB backup operations in the event of failure.
2.1.1 Types of backup
In GridDB, backup of node units can be carried out online. A backup of the entire cluster can be carried out online while maintaining the services by performing a backup of all the nodes constituting the GridDB cluster in sequence. The types of online backup provided by GridDB are as follows.
| Backup type | Backup actions | Recovery point |
|---|---|---|
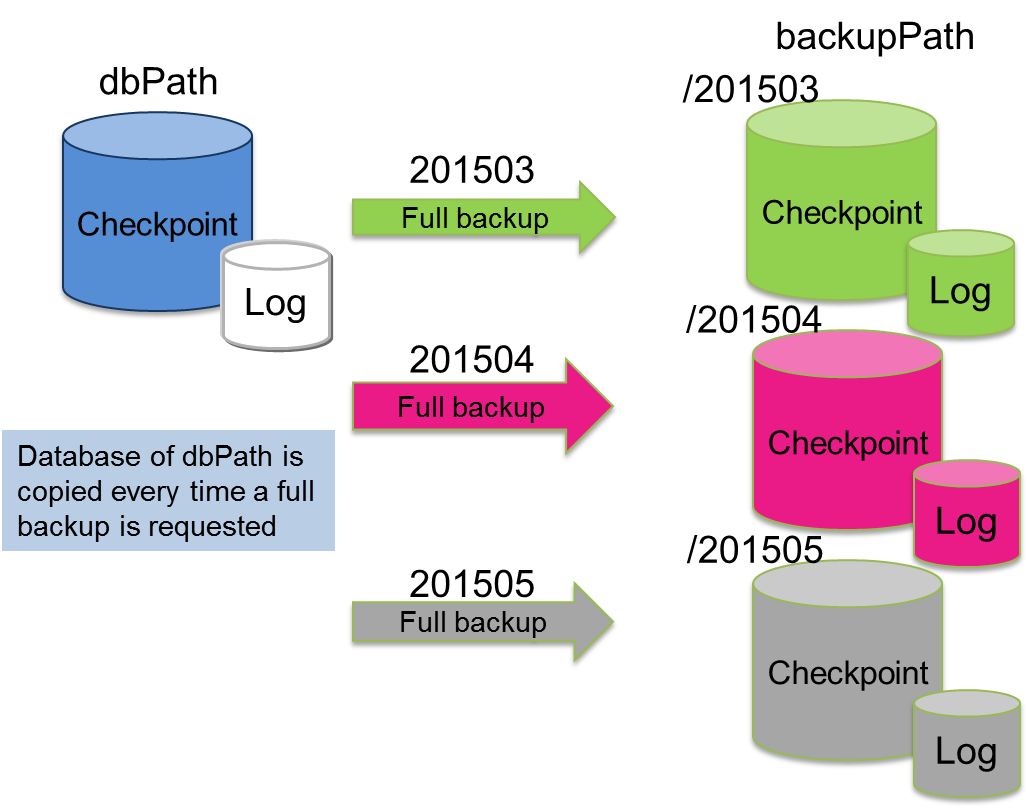
| Full backup | A backup of the cluster database currently in use is stored online in node units in the backup directory specified in the node definition file. | Full backup collection point |
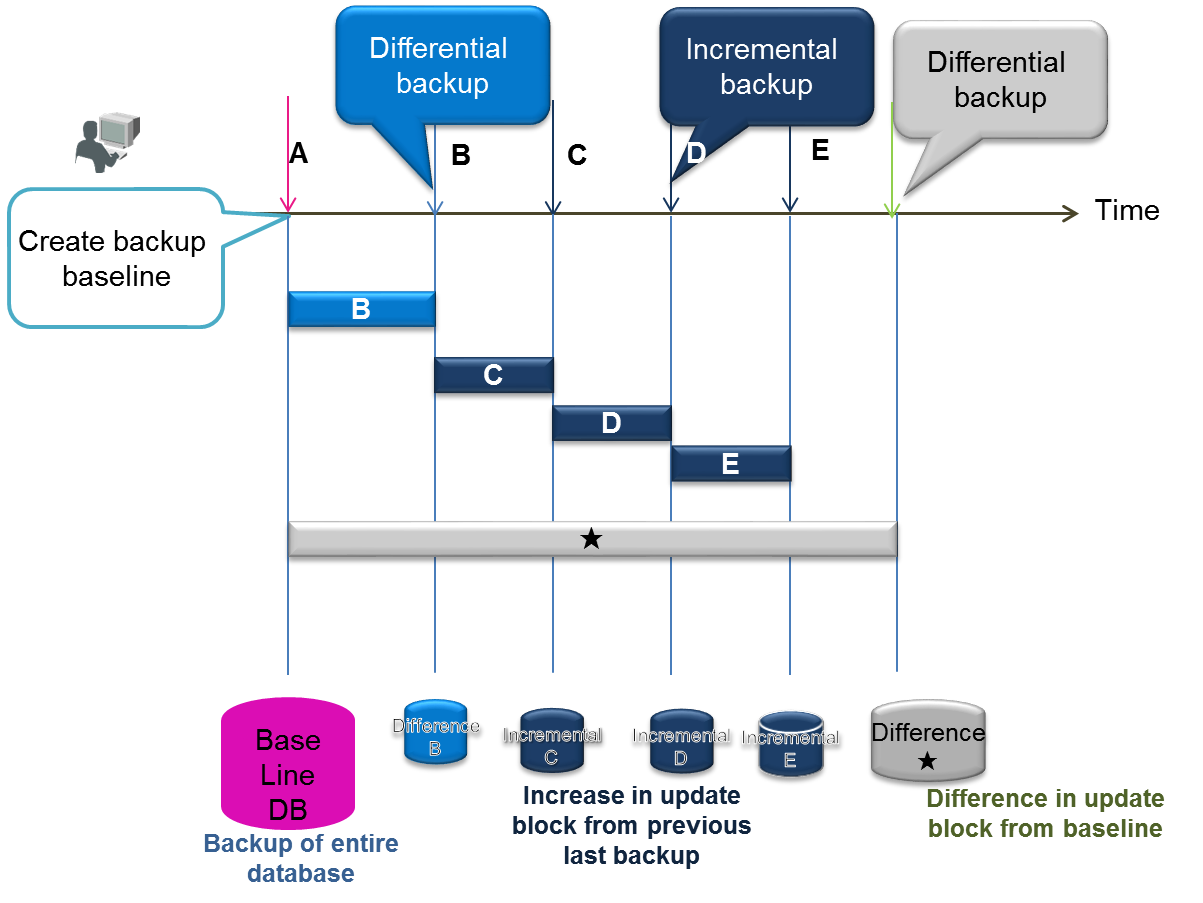
| Differential/incremental backup | A backup of the cluster database currently in use is stored online in node units in the backup directory specified in the node definition file. In subsequent backups, only the difference in the update block after the backup is backed up. | Differential/incremental backup collection point |
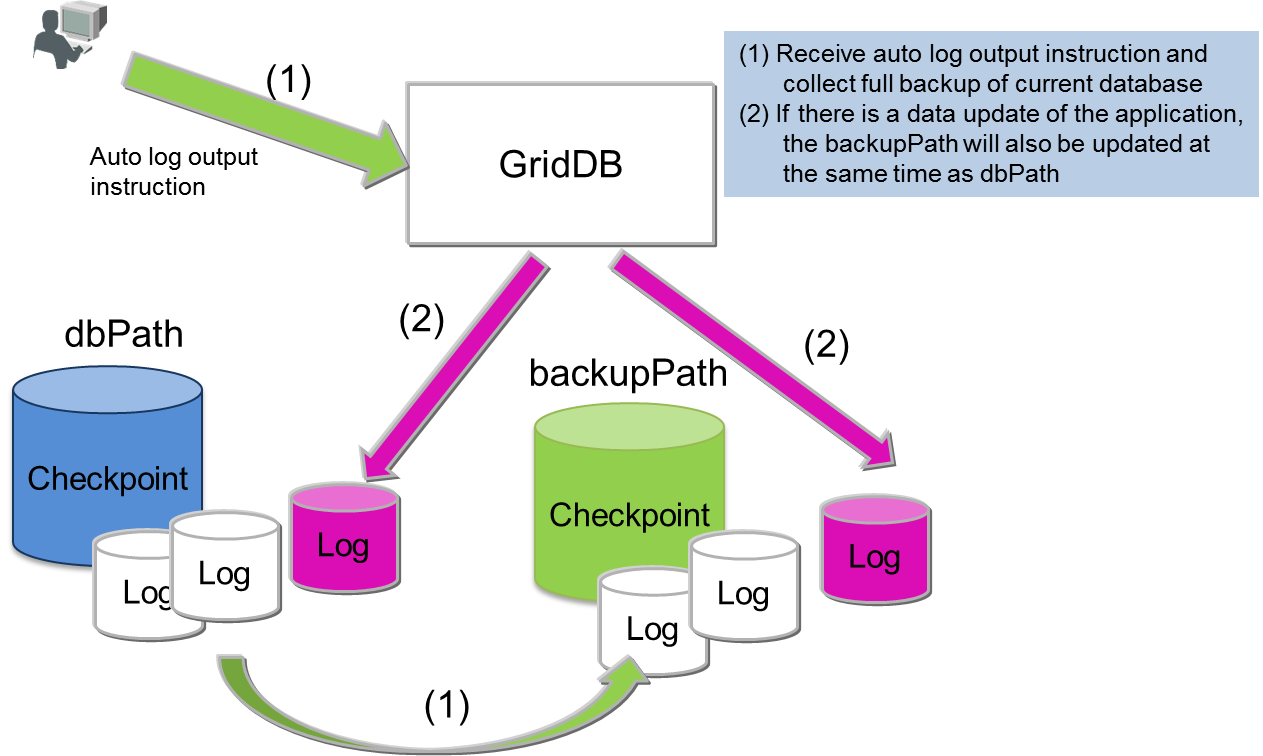
| Automatic log backup | In addition to backing up the cluster database currently in use which is stored online in node units in the backup directory specified in the node definition file, the transaction log is also automatically picked up at the same timing as the transaction log file writing. The write timing of the transaction log file follows the value of /dataStore/logWriteMode in the node definition file. | Latest transaction update point |
The recovery point differs depending on the type of backup used.
The various backup operations and systems recommendation provided by GridDB are shown below.
-
Full backup
A full backup is acquired after an overnight batch process to update data in a reference system. A full backup will take a while to complete as data in all the database files will be copied. In addition, the data capacity at the backup collection destination needs to be the same as the database file.
The backup disk capacity needs to be multiplied by the actual database size according to how many backup generations to retain.
Full backup
-
Differential/incremental backup
In differential/incremental backup, once a full backup of the entire databases have been performed, only the differences between the current and the updated data will be backed up. This type of backup is suitable for systems which needs to be backed up quickly, and systems which perform systematic operations such as automatic backup of batch operations during the night, monthly full backup (baseline creation), differential (since) backup once a week, incremental backup (incremental) once a day, etc. As an incremental backup uses only updated data, it can be carried out faster compared to a full backup or differential backup. However, recovery when a failure occurs may take a while as the update block needs to be rolled forward for the data of the full backup. A differential backup using a regular Baseline or Since command is required.
Differential/incremental backup
-
Automatic log backup
After performing a full backup with an automatic log backup command (baseline creation), the updated log will be collected in the backup directory. Backup operation is not required as a transaction log will be taken automatically. This command is used when you want to simplify the operation or when you do not wish to impose a load on the system due to the backup. However, if the baseline is not updated regularly, recovery will take a while as the number of transaction log files used in recovery when a failure occurs increases. In a differential/incremental backup, data of the same block will be backed up as a single data when updated, but in an automatic log backup, a log is recorded every time there is an update, so recovery during a failure takes more time than a differential/incremental backup.
Automatic log backup
[Note]
- To shorten the recovery time when failure occurs during a differential/incremental backup or automatic log backup, a full backup that will serve as the baseline needs to be performed regularly.
The type of backup is specified in the command option.
2.1.2 Checking backup-related parameters
Specify /dataStore/backupPath in the node definition file as the backup destination. Take into consideration physical failure of the disk, and be sure to set up the backup destination and database file (/dataStore/dbPath) so that the file is stored in a different physical disk.
There are 2 log persistency modes for transactions. Default is NORMAL.
- NORMAL: A transaction log file which is no longer required will be deleted by a checkpoint.
- KEEP_ALL_LOGS: All transaction log files are retained.
KEEP_ALL_LOGS is specified only for special operations. e.g. when issuing instructions to delete a log file in conjunction with the backup software of other companies, etc., but normally this is not used.
A specified example of a node definition file is shown below.
$ cat /var/lib/gridstore/conf/gs_node.json         # example of configuration check
{
        "dataStore":{
                "dbPath":"/var/lib/gridstore/data",
                "backupPath":"/mnt/gridstore/backup",      # backup directory
                "storeMemoryLimit":"1024",
                "concurrency":2,
                "logWriteMode":1,
                "persistencyMode":"NORMAL"                 # persistency mode
            :
            :
}
2.1.3 Backup execution
This section explains how to use a full backup, differential/incremental backup, and automatic log backup.
Specify the backup name (BACKUPNAME) when executing any type of backup. Data created in a backup will be stored in a directory created with the BACKUPNAME under the directory specified in the backupPath of the node definition file.
Up to 12 alphanumeric characters can be specified in the BACKUPNAME.
2.1.4 Full backup
When a failure occurs, the system can be recovered up to the point where the full backup was completed. Implement a full backup of all the nodes constituting the cluster. Backup data is stored in the directory indicated by the BACKUPNAME of the command. It is recommended to specify the date in the BACKUPNAME in order to make it easier to understand and manage the backup data gathered.
Execute the following command on all the nodes inside the cluster.
$ gs_backup -u admin/admin 20141025
In this example,
- a directory called “20141025” will be created under the backup directory,
- and a checkpoint file (gs_cp_n_p.dat), transaction log file (gs_log_n_m.log), backup data file (gs_backup_info.json, gs_backup_info_digest.json), and LSN data file will be created in the backup directory.
Checkpoint files and transaction log files are created according to the concurrency (/dataStore/concurrency) figure in the node definition file.
$ cd /mnt/gridstore/backup
$ ls -l 20141025
-bash-4.1$ ls -l 20141025
Total 13502036
-rw-r--r-- 1 gsadm gridstore        731 Oct 25 06:39 2015 gs_backup_info.json
-rw-r--r-- 1 gsadm gridstore         82 Oct 25 06:39 2015 gs_backup_info_digest.json
-rw-r--r-- 1 gsadm gridstore 6759120896 Oct 25 06:37 2015 gs_cp_0_1.dat
-rw-r--r-- 1 gsadm gridstore 7064846336 Oct 25 06:38 2015 gs_cp_1_1.dat
-rw-r--r-- 1 gsadm gridstore    1048576 Oct 25 06:38 2015 gs_log_0_161.log
-rw-r--r-- 1 gsadm gridstore    1048576 Oct 25 06:39 2015 gs_log_1_161.log
-rw-r--r-- 1 gsadm gridstore        706 Oct 25 06:39 2015 gs_lsn_info.json
A backup command will only notify the server of the backup instructions and will not wait for the process to end.
Check the completion of the backup process by the status of the gs_stat command.
$ gs_backup -u admin/admin 20141025
$ gs_stat -u admin/admin --type backup
BackupStatus: Processing
-
The backup status (BackupStatus) will be one of the following.
- Processing: Under execution
- -: Completed or not in operation
The status of the command below can be used to check whether the backup has been performed correctly.
$ gs_backuplist -u admin/admin

BackupName   Status   StartTime                EndTime
------------------------------------------------------------------------
 20141025NO2     P   2014-10-25T06:37:10+0900 -
 20141025        NG  2014-10-25T02:13:34+0900 -
 20140925        OK  2014-09-25T05:30:02+0900 2014-09-25T05:59:03+0900
 20140825        OK  2014-08-25T04:35:02+0900 2014-08-25T04:55:03+0900
The status symbol of the backup list indicates the following.
- P: Backup execution in progress
- NG: An error has occurred during backup execution, backup data is abnormal
- OK: Backup has been carried out normally
2.1.5 Differential/incremental block backup
When a failure occurs, data can be recovered until the last differential/incremental backup was performed by using the full backup serving as the baseline (reference point) and the differential/incremental backup after the baseline. Get the full backup as a baseline for the differential/incremental backup and specify differential/incremental backup thereafter.
The backup interval needs to be studied in accordance with the service targets for the data update capacity and the time taken for recovery, but use the following as a guide.
- Full backup of baseline (Baseline): monthly
- Differential backup of updated blocks after creation of the baseline (Since): weekly
- Incremental backup (Incremental) of updated blocks after a baseline or differential backup: daily
Creation of baseline for full backup is specified below.
$ gs_backup -u admin/admin --mode baseline 201504
$ gs_stat -u admin/admin --type backup
BackupStatus: Processing (Baseline)
Database file in the data directory is copied under the backup directory as a baseline for the backup.
Specify incremental or since as the mode of the backup command when performing a regular backup of the differential/incremental block after creating a baseline (backup of data block updated after a full backup of the baseline). Specify the same BACKUPNAME as when the baseline was created.
# For incremental backup
$ gs_backup -u admin/admin --mode incremental 201504
$ gs_stat -u admin/admin --type backup
BackupStatus: Processing (Incremental)

# For differential backup
$ gs_backup -u admin/admin --mode since 201504
$ gs_stat -u admin/admin --type backup
BackupStatus: Processing (Since)
The command below can be used to check whether the backup has been performed correctly. As a differential/incremental backup will become a single recovery unit in a multiple backup, it will be treated as a single backup in the list of BACKUPNAME. Therefore, specify the backup name and check the details to see the detailed status.
A differential/incremental backup can be confirmed by checking that an asterisk "*" is appended at the beginning of the BACKUPNAME. The status of a differential/incremental backup is always "--".
The status of differential/incremental backup can be checked by specifying the BACKUPNAME in the argument of the gs_backuplist command.
# Display a list of BACKUPNAME
$ gs_backuplist -u admin/admin

BackupName   Status   StartTime                EndTime
------------------------------------------------------------------------
*201504          --  2015-04-01T05:20:00+0900 2015-04-24T06:10:55+0900
*201503          --  2015-03-01T05:20:00+0900 2015-04-24T06:05:32+0900
  :
 20141025NO2     OK   2014-10-25T06:37:10+0900 2014-10-25T06:37:10+0900

# Specify the individual BACKUPNAME and display the detailed information
$ gs_backuplist -u admin/admin 201504

BackupName : 201504

BackupData            Status   StartTime                EndTime
--------------------------------------------------------------------------------
201504_lv0                OK  2015-04-01T05:20:00+0900 2015-04-01T06:10:55+0900
201504_lv1_000_001        OK  2015-04-02T05:20:00+0900 2015-04-01T05:20:52+0900
201504_lv1_000_002        OK  2015-04-03T05:20:00+0900 2015-04-01T05:20:25+0900
201504_lv1_000_003        OK  2015-04-04T05:20:00+0900 2015-04-01T05:20:33+0900
201504_lv1_000_004        OK  2015-04-05T05:20:00+0900 2015-04-01T05:21:15+0900
201504_lv1_000_005        OK  2015-04-06T05:20:00+0900 2015-04-01T05:21:05+0900
201504_lv1_001_000        OK  2015-04-07T05:20:00+0900 2015-04-01T05:22:11+0900
201504_lv1_001_001        OK  2015-04-07T05:20:00+0900 2015-04-01T05:20:55+0900
A directory will be created in the backup directory according to the following rules to store the differential/incremental backup data.
- BACKUPNAME_lv0: Baseline backup data of the differential/incremental backup is stored. lv0 fixed.
-
BACKUPNAME_lv1_NNN_MMM: Differential (Since) and incremental (Incremental) backup data of the differential/incremental backup is stored.
- NNN count is increased during a differential backup.
- MMM count is cleared to 000 during a differential backup and increased during an incremental backup.
The status symbol of the backup list indicates the following.
- P: Backup execution in progress
- NG: An error has occurred during backup execution, backup data is abnormal
- OK: Backup has been carried out normally
A log of the updated block with the name gs_log_n_m_incremental.log is output under the directory shown in BackupData during a differential/incremental backup.
Differential/incremental backup can be compared to a full backup and backup time can be reduced. However, recovery when a failure occurs may take a while as the update block is rolled forward for the data of the full backup. Get the baseline regularly or execute a differential backup from the baseline by specifying since .
[Points to note]
-
Partitions are automatically arranged (rebalanced) according to the cluster configuration changes and system load. When a differential log backup is specified after the arrangement of the partitions is changed, a message error “Log backup cannot be performed due to a change in the partition status” will appear. In this case, be sure to back up all the nodes constituting the cluster (baseline). Re-arrangement of partitions (rebalancing) occurs when the cluster configuration is changed as shown below.
- Increase the number of nodes constituting a cluster by adding nodes
- Decrease the number of nodes constituting a cluster by detaching nodes
2.1.6 Automatic log backup
GridDB automatically outputs a transaction log to the backup directory. Therefore, the system can always be recovered to the latest condition. As backup is carried out automatically, it is not possible to perform systematic backups according to the system operating state such as a “backup process scheduled in advance during low peak periods”. In addition, due to the automatic log backup, a system load will be imposed more or less during normal operation as well. Therefore, use of this indication is recommended only when there are surplus system resources.
Specify as follows when using an automatic log backup.
$ gs_backup -u admin/admin --mode auto 201411252100
$ gs_stat -u admin/admin --type backup
Execute the command to get the backup data in the directory indicated in BACKUPNAME.
-
During an automatic log backup, operational settings for errors which occur during backup can be set in the option mode.
- auto: When a backup error occurs, the node will become ABNORMAL and stop.
- auto_nostop: Backup will be incomplete when a backup error occurs but the node will continue to operate.
In this example,
- a directory with the name “201411252100” will be created under the backup directory.
- A checkpoint file (gs_cp_n_p.dat), transaction log file (gs_log_n_m.log), backup data file (gs_backup_info.json, gs_backup_info_digest.json), and LSN data file will be created in the backup directory just like a full backup. Checkpoint files and transaction log files are created according to the concurrency (/dataStore/concurrency) figure in the node definition file.
- A transaction log file (gs_log_n_m.log) is created under the “201411252100” directory when execution of the transaction is completed.
When operating with an automatic log backup, the transaction log file (gs_log_n_m.log) in 3) is rolled forward for the full backup data in 2) during recovery when a failure occurs. Therefore, specify the --mode auto to perform a full backup regularly as the recovery time will increase when the number of log files used during recovery increases.
2.1.7 Checking backup operation
The mode of the backup currently being executed and the detailed execution status can also be checked in data that can be obtained from the gs_stat command.
$ gs_stat -u admin/admin

    "checkpoint": {
        "archiveLog": 0,
        "backupOperation": 3,
        "duplicateLog": 0,
        "endTime": 0,
        "mode": "INCREMENTAL_BACKUP_LEVEL_0",
        "normalCheckpointOperation": 139,
        "pendingPartition": 1,
        "requestedCheckpointOperation": 0,
        "startTime": 1429756253260
    },
        :
        :
The meaning of each parameter related to the backup output in gs_stat is as follows.
- archiveLog: Cannot be used in the current version Item for compatibility purposes.
- backupOperation: Number of backups performed after system start-up.
-
duplicateLog: Automatic log backup is performed to indicate whether a redundant log output has been carried out.
- 0: Automatic log backup off
- 1: Automatic log backup on
- endtime: "0" when backup or checkpoint is being performed. The time is set when the process ends.
-
mode: Name of the backup or checkpoint process is displayed. Name of the backup process last performed or currently under execution is displayed.
- BACKUP: Perform a full backup with an automatic log backup or full backup
- INCREMENTAL_BACKUP_LEVEL_0: Create baseline of differential/incremental backup
- INCREMENTAL_BACKUP_LEVEL_1_CUMULATIVE: Differential backup from the baseline
- INCREMENTAL_BACKUP_LEVEL_1_DIFFERENTIAL: Incremental backup from the last backup
2.1.8 Collecting container data
When a database failure occurs, it is necessary to understand which container needs to be recovered and how to contact the user of the container. To detect a container subject to recovery, the following data needs to be collected regularly.
-
List of containers arranged in a partition
- As containers are automatically created and arranged in the partitions according to the specifications of the application system, a list of containers and partition arrangements need to be output regularly using the gs_sh command.
Operating efforts can be cut down by creating a gs_sh command script to output the container list in advance.
In the example below, a gs_sh sub-command is created with the file name listContainer.gsh.
setnode node1 198.2.2.1  10040
setnode node2 198.2.2.2  10040
setnode node3 198.2.2.3  10040
setcluster cl1 clusterSeller 239.0.0.20 31999 $node1 $node2 $node3
setuser admin admin gstore
connect $cl1
showcontainer
connect $cl1 db0
showcontainer
 :
 :   (Repeat db for several minutes)
 :
quit
Change the node variables such as node 1, node 2, node 3 that constitute a cluster, and change the cluster variable such as cl1, user settings and database data where appropriate to suit the environment. See “GridDB operation control guide” (GridDB_OperationGuide.html) for the details of gs_sh.
Execute the gs_sh script file as shown below to collect a list of containers and partitions.
$ gs_sh listContainer.gsh>`date +%Y%m%d`Container.txt
Data is stored in 20141001Container.txt in the following format.
Database : public
Name                  Type         PartitionId
------------------------------------------------
container_7           TIME_SERIES            0
container_9           TIME_SERIES            7
container_2           TIME_SERIES           15
container_8           TIME_SERIES           17
container_6           TIME_SERIES           22
container_3           TIME_SERIES           25
container_0           TIME_SERIES           35
container_5           TIME_SERIES           44
container_1           TIME_SERIES           53
    :
 Total Count: 20

Database : db0
Name                  Type         PartitionId
---------------------------------------------
CO_ALL1              COLLECTION           32
COL1                 COLLECTION          125
 Total Count: 2
2.2 Recovery operation
An overview of the recovery operation when a failure occurs is given below.
- Failure recognition and checking of recovery range
- Recovery operation and node startup
- Incorporation of node in cluster
- Confirmation of recovery results and operation
2.2.1 Failure recognition and checking of recovery range
When a failure occurs in GridDB, in addition to the cause of the failure being output to the event log file of the node in which the error occurred, if it is deemed that node operation cannot continue, the node status will become ABNORMAL and the node will be detached from the cluster service.
Cluster service will not stop even if the node status becomes ABNORMAL as operations are carried out with multiple replicas in a cluster configuration. Data recovery is necessary when all partitions including the replicas were to fail.
Use gs_stat to check the status of the master node to see whether data recovery is necessary or not. Recovery is necessary if the value of /cluster/partitionStatus is "OWNER_LOSS".
$ gs_stat -u admin/admin -p 10041
{
    "checkpoint": {
        :
    },
    "cluster": {
        "activeCount": 2,
        "clusterName": "clusterSeller",
        "clusterStatus": "MASTER",
        "designatedCount": 3,
        "loadBalancer": "ACTIVE",
        "master": {
            "address": "192.168.0.1",
            "port": 10011
        },
        "nodeList": [
            {
                "address": "192.168.0.2",
                "port": 10011
            },
            {
                "address": "192.168.0.3",
                "port": 10010
            }
        ],
        "nodeStatus": "ACTIVE",
        "partitionStatus": "OWNER_LOSS",     //(*)
        "startupTime": "2014-10-07T15:22:59+0900",
        "syncCount": 4
          :
Use the gs_partition command to check for data to be recovered. Partitions with problems can be checked by specifying the --loss option and executing the command.
In the example below, an error has occurred in Partition 68 due to a problem with node 192.168.0.3.
$ gs_partition -u admin/admin -p 10041 --loss
[
 {
        "all": [
            {
                "address": "192.168.0.1",
                "lsn": 0,
                "port": 10011,
                "status": "ACTIVE"
            },
                :
                :
            ,
            {
                "address": "192.168.0.3",
                "lsn": 2004,
                "port": 10012,
                "status": "INACTIVE"   // <--- The status of this node is not ACTIVE
            }
        ],
        "backup": [],
        "catchup": [],
        "maxLsn": 2004,
        "owner": null,           // Partition owner is not present in the cluster
        "pId": "68",             // ID of partition which needs to be recovered
        "status": "OFF"
   },
   {
        :
   }
  ]
2.2.2 Recovery operation and node startup
2.2.2.1 Recovery from backup data
When a problem occurs in a database due to a problem in the system e.g. a disk failure, etc., the data will be recovered from the backup. The following needs to be noted during recovery.
[Points to note]
- Take note of the number of partitions and the parameter value of the processing parallelism in the cluster definition file. Set the configuration value of the node to restore to be the same as the configuration value of the backup node. The node cannot start correctly if it is not the same.
- When you want to recover a cluster database to a specific point, the backup and restoration processes need to be carried out for the entire cluster.
- When some of the nodes are restored in a cluster operation, the replicas maintained in other nodes will become valid (this occurs when LSN data is new) and it may not be possible to return to the status of the restored backup database.
- In particular, if the cluster configuration changes from the time the backup was created, there will be no restoration effect. As the data will be autonomously re-arranged if the node joins a cluster, the data will become invalid with a high probability even if restored.
- If data is missing in the backup data file, or if the contents have been revised, a GridDB node will not be able to start services.
Restore backup data to a GridDB node.
Follow the procedure below to restore a node from backup data.
-
Check that no node has been started.
- Check that the cluster definition file is the same as the other nodes in the cluster that the node is joining.
-
Check the backup name used in the recovery. This operation is executed on a node.
- Check the backup status and select one that has been backed up correctly.
-
Check whether past transaction log files and checkpoint files have been left behind in the database file directory (/var/lib/gridstore/data by default) of the node.
- Delete if unnecessary and move to another directory if required.
- Execute the restore command on the machine starting the node.
- Start node.
Use the command below to check the backup data.
- gs_backuplist -u user name/password
A specific example to display a list of the backup names is shown below. A list of the backup names can be displayed regardless of the startup status of the nodes. The status appears as “P” (abbreviation for Processing) if the backup process is in progress with the nodes started.
A list of the backup is displayed in sequence starting from the latest one. In the example below, the one with the 201504 BACKUPNAME is the latest backup.
$ gs_backuplist -u admin/admin
BackupName   Status   StartTime                EndTime
------------------------------------------------------------------------
*201504          --  2015-04-01T05:20:00+0900 2015-04-24T06:10:55+0900
*201503          --  2015-03-01T05:20:00+0900 2015-04-24T06:05:32+0900
  :
 20141025NO2     OK  2014-10-25T06:37:10+0900 2014-10-25T06:37:10+0900
 20141025        NG  2014-10-25T02:13:34+0900 -
 20140925        OK  2014-09-25T05:30:02+0900 2014-09-25T05:59:03+0900
 20140825        OK  2014-08-25T04:35:02+0900 2014-08-25T04:55:03+0900

$ gs_backuplist -u admin/admin 201504

BackupName : 201504

BackupData            Status   StartTime                EndTime
--------------------------------------------------------------------------------
201504_lv0                OK  2015-04-01T05:20:00+0900 2015-04-01T06:10:55+0900
201504_lv1_000_001        OK  2015-04-02T05:20:00+0900 2015-04-01T05:20:52+0900
201504_lv1_000_002        OK  2015-04-03T05:20:00+0900 2015-04-01T05:20:25+0900
201504_lv1_000_003        OK  2015-04-04T05:20:00+0900 2015-04-01T05:20:33+0900
201504_lv1_000_004        OK  2015-04-05T05:20:00+0900 2015-04-01T05:21:15+0900
201504_lv1_000_005        OK  2015-04-06T05:20:00+0900 2015-04-01T05:21:05+0900
201504_lv1_001_000        OK  2015-04-07T05:20:00+0900 2015-04-01T05:22:11+0900
201504_lv1_001_001        OK  2015-04-07T05:20:00+0900 2015-04-01T05:20:55+0900
[Points to note]
- If the status displayed is NG, the backup file may be damaged and so restoration is not possible.
Check the data among the 201504 backup data used in the recovery. Differential/incremental backup data used for recovery can be checked in the --test option of gs_restore. In the --test option, only data used for recovery is displayed and restoration of data will not be carried out. Use this in the preliminary checks.
The example above shows the use of the baseline data in the 201504_lv0 directory, differential data (Since) in the 201504_lv1_001_000 directory, and incremental data in the 201504_lv1_001_001 directory for recovery purposes in a recovery with the 201504 BACKUPNAME output.
$ gs_restore --test 20150424

BackupName : 20150424
BackupFolder : /var/lib/gridstore/data/backup

RestoreData           Status   StartTime                EndTime
--------------------------------------------------------------------------------
201504_lv0                OK  2015-04-01T05:20:00+0900 2015-04-01T06:10:55+0900
201504_lv1_001_000        OK  2015-04-07T05:20:00+0900 2015-04-01T05:22:11+0900
201504_lv1_001_001        OK  2015-04-07T05:20:00+0900 2015-04-01T05:20:55+0900
When a specific partition fails, there is a need to check where the latest data of the partition is being maintained.
Use the gs_backuplist command on all the nodes constituting the cluster, and specify the ID of the partition for which you wish to check the --partitionId option for execution. Use the node backup that contains the largest LSN number for recovery.
# Perform for each node constituting the cluster.

$ gs_backuplist -u admin/admin --partitionId=68
 BackupName      ID   LSN
---------------------------------------------------------------------------------
*201504          68   81512
*201503          68   2349
 20140925        68   0
"*" is assigned to BACKUPNAME for a differential/incremental backup.
An execution example to restore backup data is shown below. Restoration is executed with the nodes stopped.
$ mv ${GS_HOME}/data/*.{dat,log} ${GS_HOME}/temp    # Move the database file
$ gs_restore 201504                                 # restoration
The process below is performed by executing a gs_restore command.
- Copy the backup file group from the 201504_lv0 and 201504_lv1_001_001 directory under the backup directory (/dataStore/backupPath in the node definition file) to the data directory (/dataStore/dbPath in the node definition file).
Start the node after restoration. See Operations after node startup for the processing after startup.
$ gs_startnode -u admin/admin -w
2.2.2.2 Recovery from a node failure
When the status of node becomes ABNORMAL due to a node failure, or a node is terminated due to an error, the cause of the error needs to be identified in the event log file.
If there is no failure in the database file, the data in the database file can be recovered simply by removing the cause of the node failure and starting the node.
When the node status becomes ABNORMAL, force the node to terminate once and then investigate the cause of the error first before restarting the node.
Stop a node by force.
$ gs_stopnode -f -u admin/admin -w
Identify the cause of the error and start the node if it is deemed to be not a database failure. By starting the node, a roll forward of the transaction log will be carried out and the data will be recovered to the latest status.
$ gs_startnode -u admin/admin -w
See Operations after node startup for the processing after startup.
2.2.3 Operations after node startup
Perform the following operation after starting a node.
- Incorporation of node in cluster
- Data consistency check and failover operations
2.2.3.1 Join node into the cluster
After starting the node, execute a gs_joincluster command with waiting option (-w) to join the recovered node into the cluster.
$ gs_joincluster -u admin/admin -c clusterSeller -n 5 -w
2.2.3.2 Data consistency check and failover operations
After incorporating a node into a cluster, check the recovery status of the partition. When recovery of a database file is carried out from a backup for a cluster operating online, the LSN of the partition maintained online may not match. The command below can be used to investigate the detailed data of the partition and find out the container included in the lost data by comparing it to data gathered when collecting container data.
Use a gs_partition command to get missing data of a partition. If partition data is missing, only the partition with the missing data will be displayed. If not, no information displayed and there is no problem with data consistency.
$ gs_partition  -u admin/admin --loss
 [
      {
        "all": [
            {
                "address": "192.168.0.1",
                "lsn": 0,
                "port": 10040,
                "status": "ACTIVE"
            },
            {
                "address": "192.168.0.2",
                "lsn": 1207,
                "port": 10040,
                "status": "ACTIVE"
            },
            {
                "address": "192.168.0.3",
                "lsn": 0,
                "port": 10040,
                "status": "ACTIVE"
            },
        ],
        "backup": [],
        "catchup": [],
        "maxLsn": 1408,
        "owner": null,
        "pId": "1",
        "status": "OFF"
    },
        :
]
Partition data is deemed to be missing if the LSN is different from the MAXLSN maintained by the master node. The status of the nodes constituting the cluster is ACTIVE but the status of the partition is OFF. Execute a gs_failovercluster command to incorporate directly into the system.
$ gs_failovercluster -u admin/admin --repair
At the end of the failover, check that the /cluster/partitionStatus is NORMAL by executing a gs_stat command to the master node, and that there is no missing data in the partition by executing a gs_partition command.
2.2.4 Operations after completion of recovery
After recovery ends, perform a full backup of all the nodes constituting the cluster.
3 File system level backup and recovery operations
There is a way to perform an online backup for a file system as an alternative plan in which you don't use the online backup function of GridDB. It performs a backup of a data directory using the snapshot function of LVM and a storage or copying files directly.
The backup data is saved as a base line and it is possible to recover data to the latest version using the automatic log backup function of GridDB.
3.1 Online backup by snapshot
It is possible to back up online using the snapshot function of LVM or a storage. It can reduce significant time for backing up, and can align the recovery point of each node on a cluster accurately.
The procedure is as follows.
- Disable the periodic checkpoint function.
-
(Optional) If you use the automatic log backup simultaneously, start the automatic log backup.
- By using option, please omit the baseline backup process.
- Execute the manual checkpoint and wait to complete.
-
Take the snapshot including a database file directory.
- Start this operation at the same time if you want to align the recovery point of all nodes of a cluster accurately.
- Copy the database file directory from the snapshot.
- (Optional) Remove the unnecessary snapshot.
- Re-enable the periodic checkpoint function.
The recovery point of the backup is almost same as the point at taking the snapshot.
[Points to note]
- If you back up only by snapshot, the recovered data is crash recovery. If a system requires high consistency, use the automatic log backup simultaneously.
- If the log write mode is DELAYED_SYNC (default value: 1 second) and the default value is set, there is an up to 1second difference in the recovery point.
- If you use snapshots, there is a possibility that performance decreases due to copy-on-write. Be sure to verify it before using.
[Memo]
- If you use the automatic log backup simultaneously, matching the directory name of the backup destination with a backup name gives you the easy understanding of correspondence.
3.2 Online backup by file copying
It is possible to perform online backup by file copying using OS commands or backup solutions.
The procedure is as follows.
- Disable the periodic checkpoint function.
-
(Optional) If you use the automatic log backup simultaneously, start the automatic log backup.
- By using option, please omit the baseline backup process.
- Execute the manual checkpoint and wait to complete.
-
Copy the transaction log files. Then, copy the checkpoint files.
- Start this operation at the same time if you want to align the recovery point of all nodes of a cluster accurately.
- Re-enable the periodic checkpoint function.
And the concrete procedure is as follows.
Execute the checkpoint control command to disable the periodic checkpoint function temporarily.
$ gs_checkpoint -u admin/admin --off
If you use the log backup simultaneously, execute the backup command to start the automatic log backup. Specify the option "--skipBaseline" to omit a baseline backup.
$ gs_backup -u admin/admin --mode auto --skipBaseline 201808010300
Execute the manual checkpoint with the wait option (-w).
$ gs_checkpoint -u admin/admin --manual -w
Copy the transaction log files. Then, copy the checkpoint files.
$ mkdir -p /mnt/backup/201808010300
$ cp -p ${GS_HOME}/data/*.log /mnt/backup/201808010300
$ cp -p ${GS_HOME}/data/*.dat /mnt/backup/201808010300
After the file copying, re-enable the periodic checkpoint function.
$ gs_checkpoint -u admin/admin --on
The recovery point of the backup is almost same as the latest transaction update point. And the recovery point of the backup with the log backup is almost same as the last updated date of the backup directory.
[Points to note]
- If you back up only by file copying, the recovered data is crash recovery. If a system requires high consistency, use the automatic log backup simultaneously.
[Memo]
- If you use the automatic log backup simultaneously, matching the directory name of the backup destination with a backup name gives you the easy understanding of correspondence.
3.3 Recovery operation and node startup
If you restore from the backup data by a snapshot and file copying, follow the below procedure.
-
Check that no node has been started.
- Check that the cluster definition file is the same as the other nodes in the cluster that the node is joining.
-
Check whether past transaction log files and checkpoint files have been left behind in the database file directory (/var/lib/gridstore/data by default) of the node.
- Delete if unnecessary and move to another directory if required.
-
Copy the back up data for restoration to the database file directory.
- If you recover the database to the updated point using the log backup simultaneously, restore the corresponding log backup data with the restore command specifying the updateLogs option.
- Start node.
And the concrete procedure from 3 is as follows.
Copy the backup data for restoration to the database file directory.
$ cp -p /mnt/backup/201808010300/* ${GS_HOME}/data
If you recover the database to the updated point using the log backup simultaneously, restore the corresponding log backup data with the restore command specifying the updateLogs option.
Confirm the backup status is OK using the gs_restore command with the --test option.
$ gs_restore --test 201808010300
BackupName : 201808010300
BackupFolder : /var/lib/gridstore/backup
RestoreData           Status   StartTime                EndTime
--------------------------------------------------------------------------------
201808010300              OK  2018-08-01T03:00:01+0900 2018-08-01T03:00:15+0900
The recovery point of the log backup is almost same as the last updated date of the backup directory.
$ ls -l /mnt/backup | grep 201808010300
drwx------ 2 gsadm gridstore 4096  Aug  4 14:06 2018 201808010300
After confirming whether that there are no errors, execute the gs_restore command with the --updateLogs option.
$ gs_restore --updateLogs 201808010300
Start the node after restoration. See Operations after node startup for the processing after startup.
4 Annexes
4.1 Files stored in the backup directory
A directory with the name specified in BACKUPNAME of the backup command will be created under the directory indicated by /dataStore/backupPath in the node definition file to store the following files. In the case of differential/incremental backup, the BACKUPNAME_lv0 (baseline) BACKUPNAME_lv1_NNN_MMM (differential/incremental backup) directory is created under the backup directory to similarly store the following files.
-
Checkpoint file (gs_cp_n_p.dat)
- The number of files is equal to /dataStore/concurrency in the node definition file.
-
Transaction log file (gs_log_n_m.log)
- A new transaction log file is added according to the operation during a full backup or an automatic log backup.
-
Differential/incremental block log file (gs_log_n_m_incremental.log)
- Maintain a transaction log file of the update block in the differential/incremental backup.
-
Backup data file (gs_backup_info.json,gs_backup_info_digest.json)
- Data such as the backup start time, end time and backup file size, etc., is maintained in gs_backup_info.json as backup time data while digest data is maintained in gs_backup_info_digest.json. Data is output to gs_backuplist based on this file.
-
Sequence number (gs_lsn_info.json)
- LSN (Log Sequence Number) indicating the sequence number of the partition update is output. The LSN maintained by the partition at the point the backup is performed is output.
4.2 Deleting unnecessary backup data
Unnecessary backup data can be deleted from directories that are no longer required in the BACKUPNAME unit. Since all management information of the backup data is located under the BACKUPNAME directory, there is no need to delete other registry data and so on. During a differential/incremental backup, delete all the BACKUPNAME_lv0, BACKUPNAME_lv1_NNN_MMM directory groups.