Telegraf 出力プラグインガイド
Revision: 2.1.0-12973-a96d5d04
1 概要
Telegraf用GridDB出力プラグインはHTTP/HTTPSメソッドを使ってGridDBデータベースにデータを挿入します。
2 インストール
2.1 システム要件
本プラグインのビルドと実行は以下の環境で実施済みです。
- OS: CentOS 7以上
- Go バージョン 1.20以上
- NodeJS v18.16.0もしくは他のLTSバージョン
- Telegraf 1.26
- InfluxDB v2
- Web API バージョン: GridDB V5.3.0
2.2 Goのインストール
Goをセットアップし、インストールするには https://linuxize.com/post/how-to-install-go-on-centos-8/ または https://golang.org/doc/install を参照。
または、yumを使ってCentOS上でGoをインストールすることもできます。 https://www.cyberithub.com/install-go-on-centos/ を参照。
$ yum install golang
コマンドプロンプトを開き次のコマンドを打ち、Goがインストールされたことを確認します。
$ go version
2.3 Telegraf用GridDB出力プラグインをインストール
2.3.1 ビルド方法
ステップ 1: Telegraf用GridDB出力プラグインのソースコードをダウンロードします。
ステップ 2: 下記のコマンドを利用して、GO111MODULE パラメータを編集します。
$ export GO111MODULE=auto
$ go env -w GO111MODULE=auto
ステップ 3: ワーキングディレクトリをgoフォルダに変更し、telegrafのソースコードを下記のコマンドでダウンロードします。
$ go get -d "github.com/influxdata/telegraf"
ステップ 4: GridDB Telegraf出力プラグインのソースをtelegrafのルートディレクトリにコピーします。
ステップ 5: 次のコマンドを実行し、Telegrafをビルドします。
$ cd ~/go/src/github.com/influxdata/telegraf
$ make telegraf
2.3.2 Telegrafの実行
下記の手順を実行し、InfluxDB v2のデータをGridDBに転送します:
準備:
サンプルディレクトリはTelegrafの設定ファイル(
griddb.conf)と、InfluxDB v2のレスポンスを解析するためのjavascriptファイル(parseInfluxDBResponse.js)を含みます。 InfluxDBのCSV形式のレスポンスを解析するため、csv-parse v4.16.3のインストールが必要です:./node_modules/csv-parseがカレントディレクトリに追加されます:sample/ ├── griddb.conf ├── parseInfluxDBResponse.js └── node_modules/ └── csv-parse/Telegrafの実行ファイルを
~/go/src/github.com/influxdata/telegraf/telegrafから./sampleディレクトリにコピーします:最終的なディレクトリ構造は下記のようになります:
sample/
├── telegraf
├── griddb.conf
├── parseInfluxDBResponse.js
└── node_modules/
    └── csv-parse/
コマンド実行後のsampleフォルダ Telegrafを設定ファイルを引数に指定して実行します:

Telegrafのビルド成功 ビルドが成功すると、telegrafという名前のファイルが生成されます。
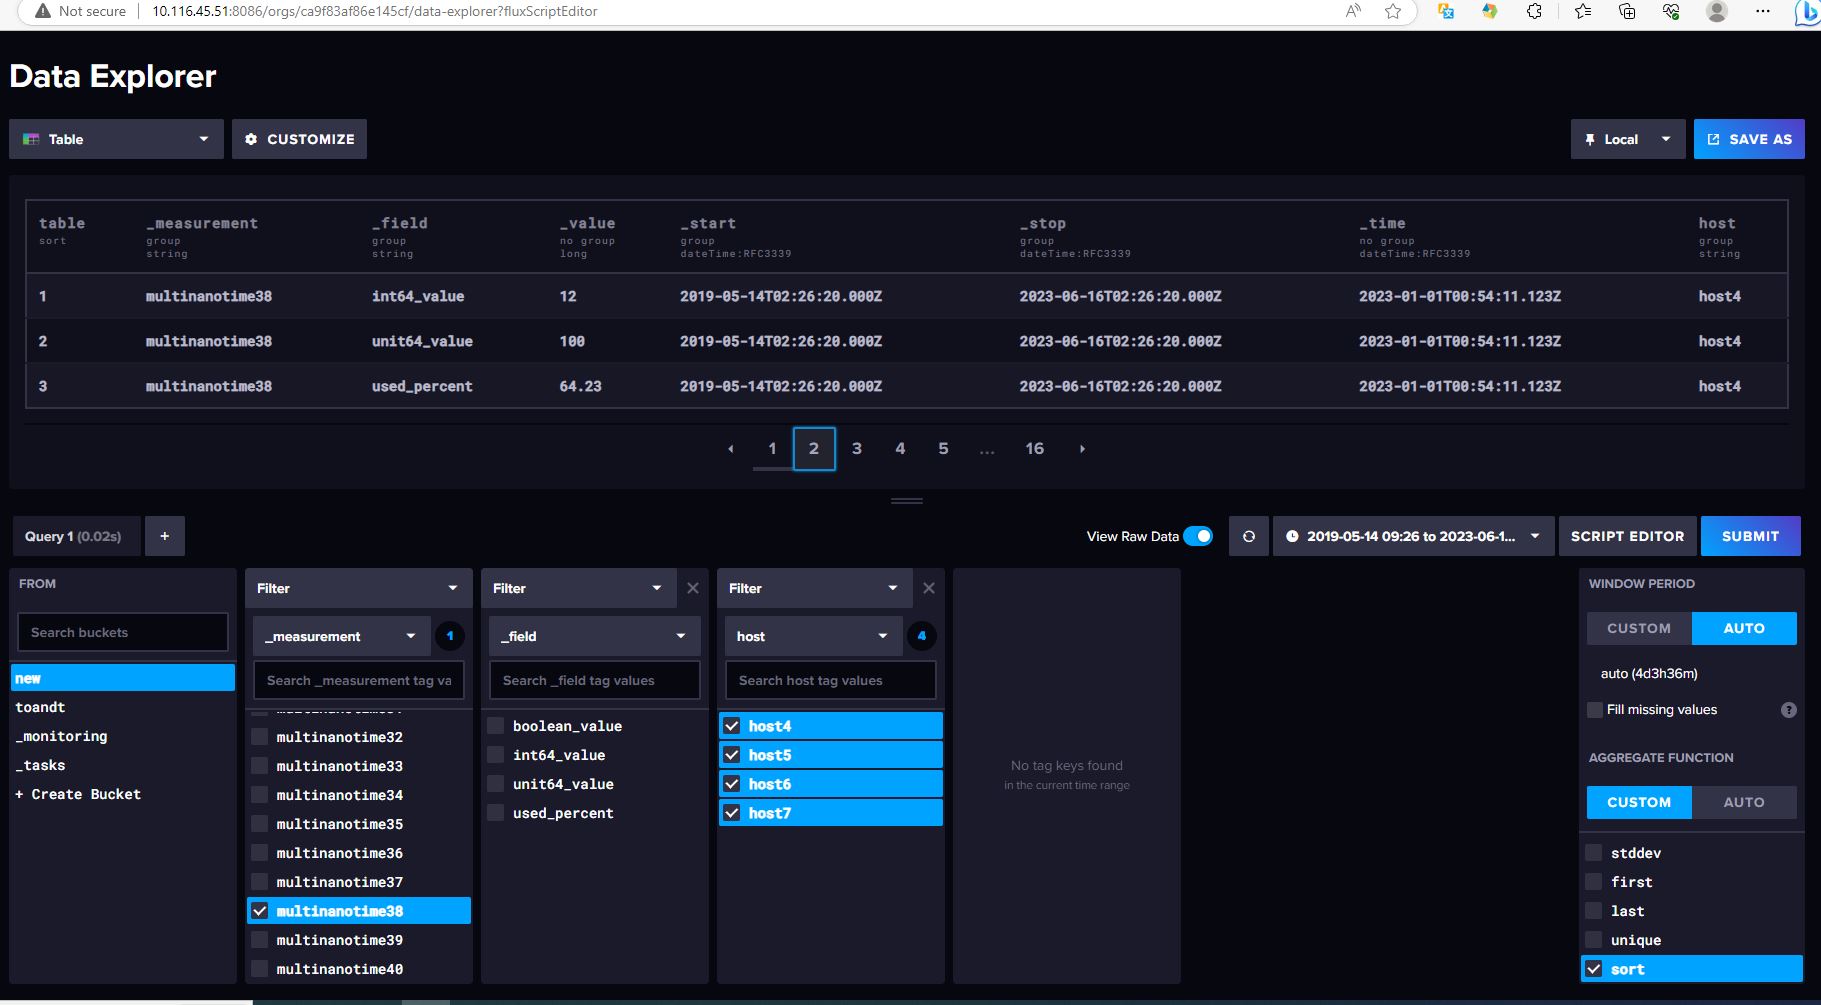
2.3.3 InfluxDBにデータ登録
1: data.csvというファイルを準備します。このファイルの例を下記に示します。

- 'm' カラム: InfluxDBに登録するうテーブル名
2: data.csvの編集後、このファイルを/rootフォルダにコピーし、下記のコマンドを実行します。
- 'bucket_name': InfluxDBに登録するバケット名。例: new
- 'org_id': InfluxDBの組織名。例: ca9f83af86e145cf
- 'token': InfluxDBのログインに利用するAPIトークン。例: 'YQQlztmlUUuRam6W5DMtyQ5lgr0bB6sDlkR_V9XbevbQ2PvX-9Mtzy0vQ1zZTdjoOJ00XoKZgyAtVSZ1Lw2P2g=='
- 'influxdb_address': InfluxDBのサーバアドレス。例: http://10.116.45.51:8086
これらのデータがInfluxDBに登録されているか確認をします。

[注意]: マシンがプロキシサーバの背後に配置されている場合、次の環境編集を使ってプロキシを構成する必要があります。
export https_proxy=http://username:password@host:port
export http_proxy=http://username:password@host:port
export no_proxy="host1,host2"
プロキシ設定を /etc/environmentファイルに追加し、次のコマンドを実行します。source /etc/environment.
3 使用方法
3.1 入力プラグインの構成
入力プラグインは本ガイドラインの対象外です。詳細は https://docs.influxdata.com/telegraf/v1.19/plugins/ を参照。
実際に使える例を次の2つの項に示します。
3.1.1 Exec入力プラグイン
Exec入力プラグインは1つまたは複数のLinuxコマンドを実行するために用います。下記の例では、InfluxDBからデータをクエリするコマンドを使います。
[注意]:
- 詳細はhttps://github.com/influxdata/telegraf/blob/release-1.19/plugins/inputs/exec/README.mdを参照。
csv-parse v4.16.3をインストールする必要があります (本マニュアル執筆時、これより新しいバージョンでは動作しませんでした):
パラメータ
| パラメータ | 説明 |
|---|---|
| commands | InfluxDBからデータをクエリするために用いるコマンド一覧 (必須) |
| timeout | 各コマンド完了のタイムアウト |
| data_format | コマンドパラメータに指定したコマンドを実行後の出力形式 (必須) |
例
./griddb.confの構成
- InfluxDBからデータをクエリするためにExec入力プラグインを構成します。
# Use FluxDB v2
[[inputs.exec]]
    commands = [
        '''
            bash -c 'curl -sS --location \
                --request POST "{your_influxdb_host:port}/api/v2/query/?orgID={your_influxdb_orgID}" \
                --header "Accept: application/json" \
                --header "Content-type: application/vnd.flux" \
                --header "Authorization: Token {influxdb_authentication_token}" \
                --data-raw '"'"'
                    from(bucket:"bucketname")
                    |>range(start:-10y, stop: 10y)
                    |> filter(fn:(r) => r._measurement == "tablename")
                    '"'"' \
                | node parseInfluxDBResponse.js
         '
        ''' ]

    timeout = "10s"
    data_format = "influx"
あるいは
InfluxDBからデータをクエリするコマンドを含むrun.shファイルを作成することもできます。- 以下のように
run.shファイルを作成します。
curl -sS --location \ --request POST "{your_influxdb_host:port}/api/v2/query/?orgID={your_influxdb_orgID}" \ --header "Accept: application/json" \ --header "Content-type: application/vnd.flux" \ --header "Authorization: Token {influxdb_authentication_token}" \ --data-raw ' from(bucket:"bucketname") |>range(start:-10y, stop: 10y) |> filter(fn:(r) => r._measurement == "tablename") ' \ | node parseInfluxDBResponse.js- 以下のように入力プラグインを構成します。
# Use FluxDB v2 [[inputs.exec]] commands = ["sh /path/to/file/run.sh"] timeout = "10s" data_format = "influx"- 以下のように
InfluxDBからデータをクエリするために用いるコマンドを複数実行する場合、そのコマンド数と同じ数の入力を作成できます(例えば異なるバケットに対してクエリを発行するコマンドや異なる時間範囲に対してクエリを発行するコマンド)。
コマンドを複数実行するため、新しい
.shファイルを作成します。run2.shの例curl -sS --location \ --request POST "{your_influxdb_host:port}/api/v2/query/?orgID={your_influxdb_orgID}" \ --header "Accept: application/json" \ --header "Content-type: application/vnd.flux" \ --header "Authorization: Token {influxdb_authentication_token}" \ --data-raw ' from(bucket:"bucketname2") |>range(start:-1y, stop: 1y) |> filter(fn:(r) => r._measurement == "tablename2") ' \ | node parseInfluxDBResponse.js新しい
shファイルは、入力プラグインの設定[[inputs.exec]]として追加します。複数入力の例
# input 1
[[inputs.exec]]
    commands = ["sh /path/to/file/run.sh"]
    timeout = "10s"
    data_format = "influx"

# input 2
[[inputs.exec]]
    commands = ["sh /path/to/file/run2.sh"]
    timeout = "10s"
    data_format = "influx"
3.1.2 データをクエリするコマンドの構成
[注意]: 詳細はhttps://docs.influxdata.com/influxdb/v1.8/guides/query_data/ を参照。
パラメータ
| パラメータ | 説明 |
|---|---|
| orgID | InfluxDBの組織ID (必須) |
| Authorization | InfluxDBからデータを取得するための認証トークン (必須) |
| bucket | InfluxDBのバケット名 (必須) |
| r._measurement | データの取得元のバケットのテーブル。全テーブルからデータを取得する場合、 "//" でコメントアウトするか、行ごと削除します。 |
| range | InfluxDBからデータを取得する時間範囲 |
Examples
バケット内の1つのテーブルをクエリするコマンドの例
curl -sS --location \
                --request POST "{your_influxdb_host:port}/api/v2/query/?orgID={your_influxdb_orgID}" \
                --header "Accept: application/json" \
                --header "Content-type: application/vnd.flux" \
                --header "Authorization: Token {influxdb_authentication_token}" \
                --data-raw '
                    from(bucket:"bucketname")
                    |>range(start:-10y, stop: 10y)
                    |> filter(fn:(r) => r._measurement == "tablename")
                   ' \
                | node parseInfluxDBResponse.js
バケット内の全テーブルをクエリするコマンドの例
curl -sS --location \
                --request POST "{your_influxdb_host:port}/api/v2/query/?orgID={your_influxdb_orgID}" \
                --header "Accept: application/json" \
                --header "Content-type: application/vnd.flux" \
                --header "Authorization: Token {influxdb_authentication_token}" \
                --data-raw '
                    from(bucket:"bucketname")
                    |>range(start:-10y, stop: 10y)
                   ' \
                | node parseInfluxDBResponse.js
[注意]: Telegraf用GridDB出力プラグインのソースコードに含まれるparseInfluxDBResponse.jsはInfluxDBのレスポンスを解析するために使用します。
3.2 出力プラグインの構成
3.2.1 パラメータ
| パラメータ | 説明 |
|---|---|
| api_url | GridDB Web APIのURL (必須) 有効なURLの例: https://127.0.0.1:8080/griddb/v2/ |
| cluster_name | GridDBのクラスタ名 (必須) |
| database | データの挿入先であるGridDBのデータベース名。デフォルトは publicです。 |
| username | GridDBユーザ。GridDBユーザは"database"パラメータに指定したデータベースに対し書き込み権限を有している必要があります。 (必須) |
| password | GridDBユーザのパスワード (必須) |
| update_mode | 挿入モードオプション: 'replace'または'append'。デフォルトは'append'です。 |
| containers | GridDBに転送したいテーブルを配列形式で指定します。空の場合は全テーブルが出力されます。 |
| timestamp_column | GridDBの時系列コンテナ内のタイムスタンプカラム(第一カラム)の名称。このカラムは常にロウキーを持ちます。本パラメータが未指定の場合、ロウキーを持たないコレクションコンテナが作成されます。 |
| is_timeseries | コンテナのタイプ。trueの場合コンテナタイプはTimeseries型となり、falseの場合Collection型となります。デフォルト値はfalseです。 |
- データの挿入に
appendモードを使用し、コンテナが存在しない場合、新規にコンテナを作成し、データを挿入します。コンテナがすでに存在している場合、そのコンテナを保持し、データを挿入します。 - データの挿入に
replaceモードを使用し、コンテナが存在しない場合、新規に作成されたコンテナにデータを挿入します。コンテナがすでに存在している場合、現在のコンテナを削除の上、コンテナを新規に作成しデータを挿入します。
3.2.2 例
以下にGridDB出力プラグインを使用した詳細な例を示します。
# GridDB plugin for Telegraf to transfer non-GridDB resources to GridDB
[[outputs.griddb]]
    ## GridDB WebAPI URL.
    api_url = "https://127.0.0.1:8080/griddb/v2/"

    ## Database name
    ## # Optional; the default is public.
    database = "database"

    ## Cluster name
    cluster_name = "clustername"

    ## GridDB username
    username = "username"

    ## GridDB password
    password = "password"

    ## Delete the existing container if it exists.
    ## # Optional; the default is append.
    ## # Accepted values: replace, append
    ##     - replace: Override the existing container.
    ##     - append:  Append new rows to the existing container.
    update_mode = "append"

    ## A list of tables to be transferred to GridDB
    ## # Example: ["cpu", "ram", "product"]
    ## # An empty list [] means ALL containers.
    ## # Optional; the default is [].
    containers = []
    timestamp_column = "timestamp"

    ## The type of a container. If it is true, the container type becomes TimeSeries. If it is false, the container type becomes Collection. The default value is false
    is_timeseries= true
3.3 入出力プラグインの完全な構成の例
例: Influx入力プラグインとGridDB出力プラグインを使用した完全な構成
# Telegraf Configuration
###############################################################################
#                            OUTPUT PLUGINS                                   #
###############################################################################
# GridDB plugin for Telegraf to transfer non-GridDB resources to GridDB
[[outputs.griddb]]
    ## GridDB WebAPI URL
    api_url = "https://{please_fill_full_uri}"
    ## Database name
    database = "database"
    ## Cluster name
    cluster_name = "clustername"
    ## GridDB username
    username = "username"
    ## GridDB password
    password = "password"
    ## Delete the existing container if it exists.
    update_mode = "append"
    ## A list of tables to be transferred to GridDB
    containers = []
    ## Name of the timestamp column. If timestampColumn is empty, a timestamp column is not added to the first column of the container.
    timestamp_column = "timestamp"
    ## The type of a container. If it is true, the container type becomes TimeSeries. If it is false, the container type becomes Collection. The default value is false
    is_timeseries= true

###############################################################################
#                            INPUT PLUGINS                                    #
###############################################################################

# Use FluxDB v2
[[inputs.exec]]
    commands = [
        '''
            bash -c 'curl -sS --location \
                --request POST "{your_influxdb_host:port}/api/v2/query/?orgID={your_influxdb_orgID}" \
                --header "Accept: application/json" \
                --header "Content-type: application/vnd.flux" \
                --header "Authorization: Token {influxdb_authentication_token}" \
                --data-raw '"'"'
                    from(bucket:"bucketname")
                    |>range(start:-10y, stop: 10y)
                    |> filter(fn:(r) => r._measurement == "tablename")
                    '"'"' \
                | node parseInfluxDBResponse.js
         '
        ''' ]

    timeout = "10s"
    data_format = "influx"
[注意]:
InfluxDB内にあるデータが多すぎる場合、移行失敗を防ぐためにエージェントの構成ファイル
griddb.confのintervalの値を変更します。
例:# Configuration for the telegraf agent [agent] ## Data collection interval for all inputs ## To migrate data from InfluxDB to GridDB, the interval is set to a large enough number. ## After all data is migrated, the telegraf process can be terminated. interval = "99999999s"詳細は、Telegraf用GridDB出力プラグインのソースコード内にある完全な設定ファイル
griddb.confを参照。


