GridDB Cloud Quick Start Guide
Revision: 2.5.0-13372-ad2ab4f6
1 Introduction
This Guide provides an overview of GridDB Cloud and its simple usage for first-time users. Specifically, it describes a series of steps to be followed after the delivery of services, starting with logging in to the management console (henceforth called Management GUI) through registering data in GridDB and verifying the registered data.
GridDB Cloud has the two following plans:
- Dedicated environment plan: The paid plan for a dedicated environment such as "Standard configuration (3 nodes) standard plan" and "Single node configuration (1 node) professional plan"
- Collaboration environment plan: The plan that allows users to use shared environments such as "Free collaboration environment plan" and "Paid collaboration environment plan."
GridDB Cloud supports two methods to connect a database. Users who have signed up for the dedicated environment plan can use both the client API and Web API. Users who have signed up for the collaboration environment plan can use only Web API.
- Client API (Only for dedicated environment plan)
- Applications using the client API need to be located in the Azure private network 'VNet'. If you have not created it yet, please create it in advance.
- If you cannot use the VNet, please use Web API instead.
- Web API (For the dedicated and collaboration environment plans)
1.1 Organization of this Guide
Each chapter deals with the following topics. Some chapters are only for dedicated environment plan users.
Introduction (For the dedicated and collaboration environment plans)
Chapter 1 gives an overview of GridDB Cloud.Health check (For the dedicated and collaboration environment plans)
Chapter 2 describes how to log in to the Management GUI and check that GridDB is running properly.Connection settings for VNet (Only for the dedicated environment plan)
Chapter 3 describes how to connect the VNet where an application is deployed and the VNet where GridDB is deployed.Execution of a sample program (Only for the dedicated environment plan)
Chapter 4 presents an example of a method to build and run a sample program to create a container in GridDB and register data in GridDB.Data registration using Web API (For the dedicated and collaboration environment plans)
Chapter 5 describes how to register data using GridDB WebAPI.Verification of registered data (For the dedicated and collaboration environment plans)
Chapter 6 explains how to verify the data registered using the sample program above or WebAPI.Obtaining of development tools (For the dedicated and collaboration environment plans)
Chapter 7 descries how to obtain client libraries and others needed to register data from an application.
1.2 What is GridDB Cloud?
GridDB Cloud is a cloud service offered by GridDB.
GridDB is a scaleout, timeseries database targeting big data and IoT systems. For details on GridDB, see the "GridDB Features Reference" (GridDB_FeaturesReference.html).
Compared with GridDB, used alone GridDB Cloud has the following advantages:
- Reduced time for the initial introduction of GridDB
- Reduced operational efforts
- Simplified resources improvement to handle an increase in data and processing
- Easy collaboration with cloud-native applications
1.3 Explanation of terms
Explanation of terms used in this guide.
| Terms | Definitions |
|---|---|
| Management GUI | Web application for managing GridDB Cloud. |
| Web API | Web API for registering data in GridDB to be used when an Azure Virtual Network (VNet) environment is not available. |
| Node | A server process to perform data management in GridDB. |
| Cluster | A single node or a set of multiple nodes to perform data management together. |
| Container | A container to manage a set of rows. There are two types: collections and timeseries containers. |
| Collection | A type of container that manages rows containing a general key. |
| Timeseries container | A type of container that manages rows containing a time-series key. It has a special function to handle time-series data. |
| Row | A chunk of data managed in Grid DB, which consists of a key and multiple values. |
2 Health check (For the dedicated and collaboration environment plans)
First, log in to the Management GUI and check the health of the cluster. The settings for GridDB Cloud have been provided in the file attached to your mail. Access the login URL for the Management GUI provided in the attached file and enter your contract ID, login ID, and password.
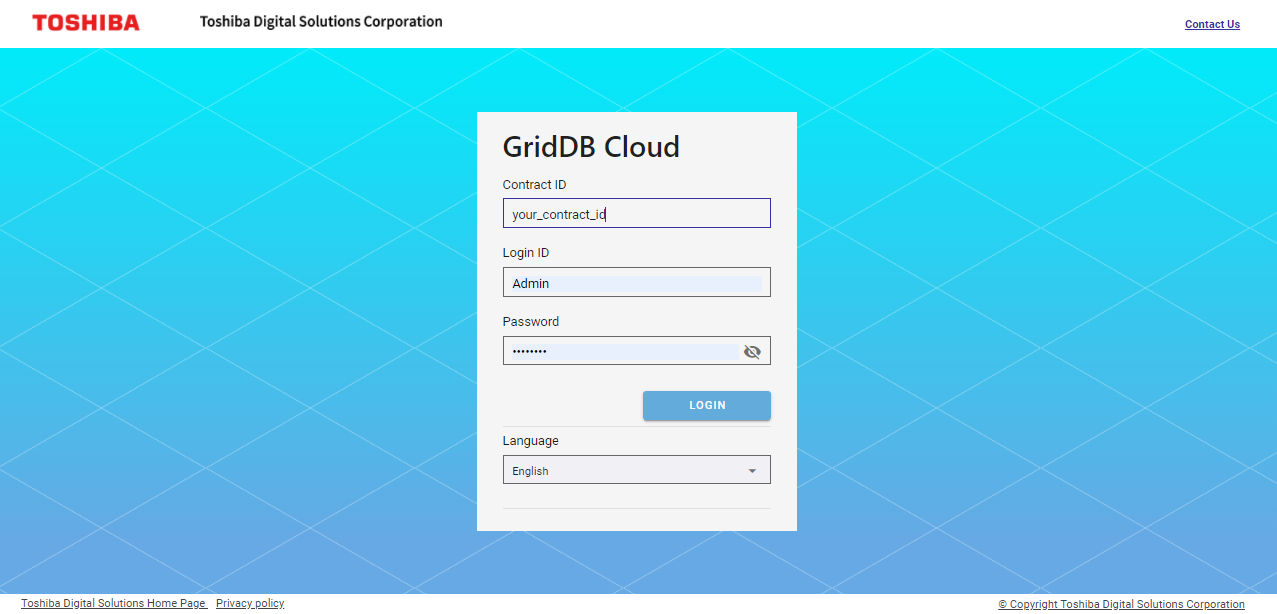
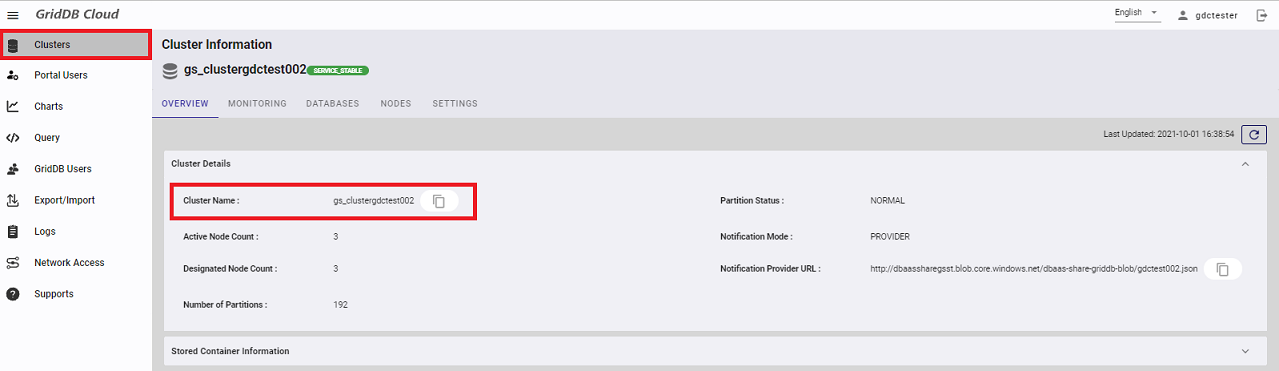
Upon a successful login, the page below will be shown.
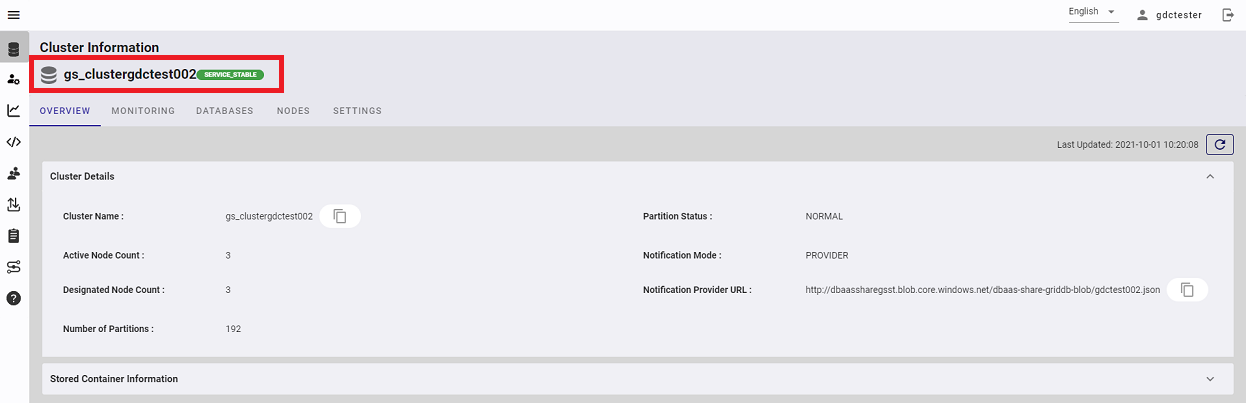
In this page you can check the health of the cluster.
On the upper left-hand side of this page is shown the name of the cluster (in this particular example, "gs_clustergdctest002") and to its right is the health of the cluster. In this example, the health state value is "SERVICE STABLE", which indicates that the cluster is running properly. Possible values for health state include:
- SERVICE_UNSTABLE
- the state in which some of the nodes configuring the cluster are stopped, but still it is possible to continue the service.
- STOP
- the state in which all nodes are stopped and as such it is not possible to continue the service.
There are other values for heath state than the above. For details, see the "GridDB Operation Tools Reference" (GridDB_FeaturesReference.html).
3 Connection settings for VNet (Only for the dedicated environment plan)
This chapter explains connection settings required to register data in GridDB from an application.
3.1 Overview
GridDB Cloud connects the VNet where an application is deployed and the VNet where GridDB operates using VNet peering. It is one of Azure capabilities that enables private communication. After establishing VNet peering, you will be able to communicate by specifying a private IP address. VNet peering is offered as a pay-as-you-go service. For the detailed specifications including usage charges, refer to Microsoft's official documents.
For security reasons, it is recommended to perform communication with GridDB via VNet peering. If, however, a VNet environment is unavailable due to not having an Azure account or for other reasons, use Web API to perform communication. In that case, skip the procedure in this chapter; proceed to Chapter 5 "Data registration using Web API" and complete the steps in the procedure that follows.
3.2 Selecting a cloud provider
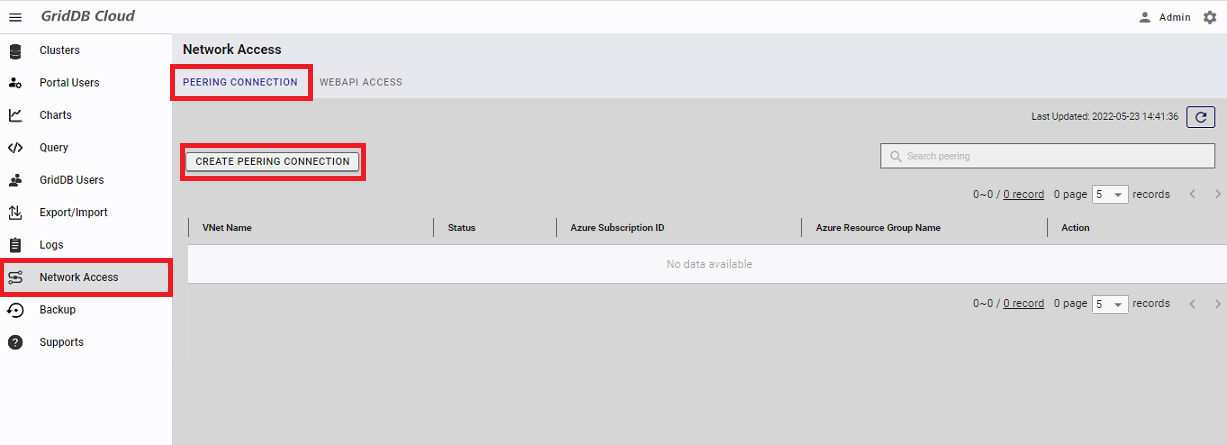
To establish VNet peering, select "Network Access" from the navigation menu on the left. Then, press the "CREATE PEERING CONNECTION" button.
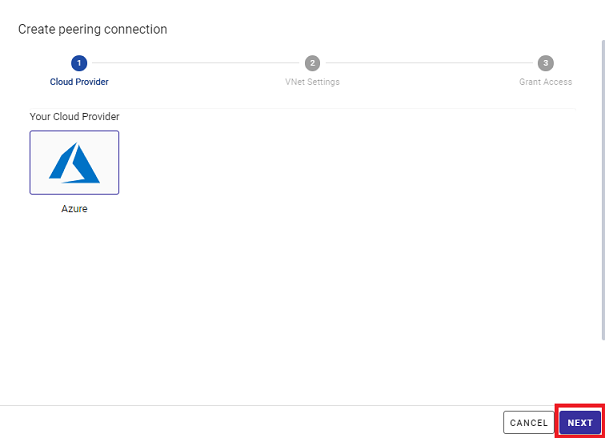
A dialog to select a cloud provider will appear. Leave the settings unchanged and press the "NEXT" button.
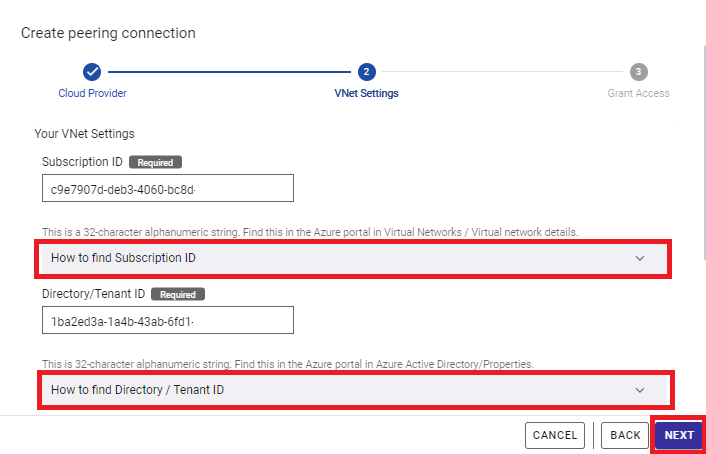
3.3 Entering VNet information
Now, the VNet Settings screen will be displayed. On this screen, enter information about the VNet where the applications are deployed. More specifically, enter the following information. If you do not know how to obtain the information to be entered, click the hint below each item to display how to obtain it.
- subscription ID
- tenant ID
- resource group name
- VNet name
Press the "NEXT" button after entering all necessary information.
3.4 Establishing VNet peering
Next, run the command for establishing VNet peering. This command can be run in either of the following environments:
- Azure Cloud Shell which can be run from the Azure portal
- Click the icon on the upper right of the portal and open the portal to run the command displayed on the dialog. This is recommended for reasons of simple operations.
- The Azure command-line interface (Azure CLI) which can be run within an Azure virtual machine
- If Azure CLI has not been installed, installation is required. Before running the command in this dialog, login is required using the "az login" command or some other methods.
Run the commands shown on the screen in the environment above one by one. This requires no changes because the commands are created based on the information entered in the previous screen. Note that some of the commands require execute permissions on Azure. To learn about the details, hover the mouse cursor over the tooltip to the right of each step and read the explanation.
Upon completion of all commands, press the "VALIDATE" button and verify the connection status. In some cases, it may take some time to reflect the information on the Azure side. If an error occurs, wait a minute or so and then press the button again. After having verified the connection, press the "CREATE PEERING" button to establish VNet peering.
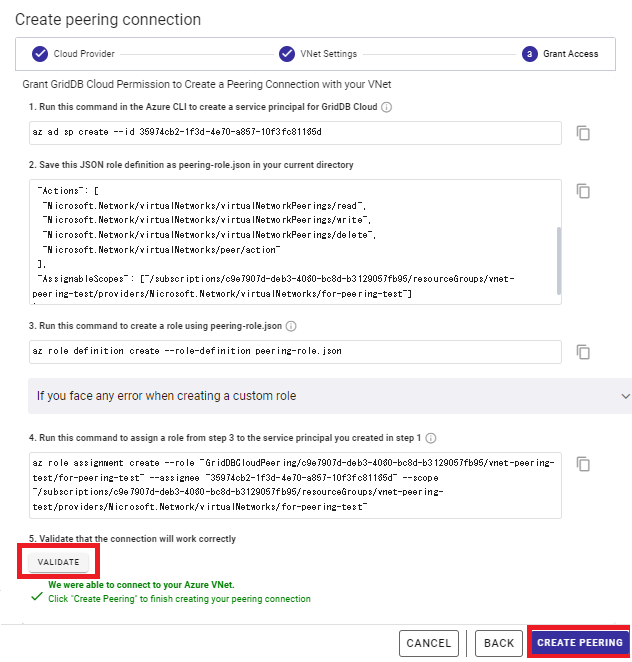
If the operation of the "VALIDATE" or "CREATE PEERING" button generates an error even after all commands are successfully completed, contact the support center.
3.5 Verifying the connection status for VNet peering
On the VNet peering list screen, you can verify the connection status. Verify that the "Status" of the VNet peering created previously is Connected. From here on, it is now possible to communicate using a private IP address for GridDB.
Note that after the VNet peering is removed from the Azure portal, the "Status" changes to Disconnected. To enable communication again, establish a new VNet peering.

3.6 Requirements and constraints
- If GridDB conflicts with the network address of the application, then VNet peering cannot be established. In this case, change the network address of the VNet where the application is deployed.
4 Running a sample program (Only for the dedicated environment plan)
This chapter describes how to register data in Grid DB from the application. The prerequisite for data registration is the successful establishment of VNet peering explained in the previous chapter. If it is not established yet, make sure to complete the steps in the previous chapter to establish VNet peering before performing the steps in this chapter.
4.1 Creating a sample program
4.1.1 Sample program overview
GridDB supports client APIs in various languages. Of those, this guide provides explanations for Java and C as examples.
In either case, the connection information is received through arguments, and data registration and display are performed in the following order. The sample data to register is the same in Java and C.
Set the connection parameters.
Create a connection instance.
Connect and create a container with the container name point01.
Configure a container with three columns: TIMESTAMP, BOOL, and DOUBLE.
Register rows.
Register the current time, false, and 100.0, respectively.
Display the rows registered within the past six hours.
4.1.2 Obtaining the library for the client API
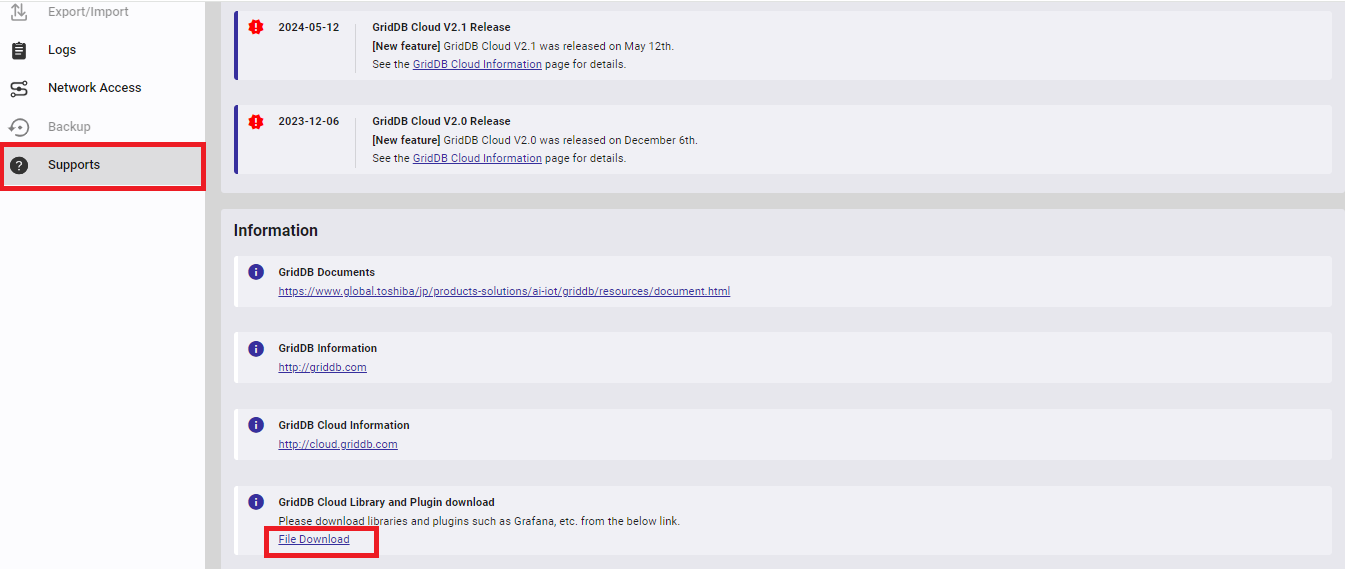
The library for the client API used in this guide is provided in rpm format. See the Supports page for the URLs where rpm and a set of other tools are distributed. Download the library from the URL link for "File Download."
4.1.3 Creating a sample program (Java)
Install the client API for Java to be used by the sample program via rpm.
rpm -Uvh griddb-ee-java_lib-5.6.0-linux.x86_64.rpm
Verifying...                          ################################# [100%]
Preparing...                          ################################# [100%]
Updating / installing...
   1:griddb-ee-java_lib-5.6.0-linux
################################# [100%]
The following warning may appear, but it is of no concern. Proceed to the next step.
- warning: user gsadm does not exist - using root
- warning: group gridstore does not exist - using root
The next step is to create a sample program. Copy the following and save it with the file name cloud_sample.java in any directory.
import java.util.Date;
import java.util.Properties;

import com.toshiba.mwcloud.gs.GSException;
import com.toshiba.mwcloud.gs.GridStore;
import com.toshiba.mwcloud.gs.GridStoreFactory;
import com.toshiba.mwcloud.gs.RowKey;
import com.toshiba.mwcloud.gs.RowSet;
import com.toshiba.mwcloud.gs.TimeSeries;
import com.toshiba.mwcloud.gs.TimestampUtils;
import com.toshiba.mwcloud.gs.TimeUnit;


// Storage and extraction of a specific range of time-series data
public class cloud_sample {

    static class Point {
        @RowKey Date timestamp;
        boolean active;
        double voltage;
    }

    public static void main(String[] args) throws GSException {

        // Acquiring a GridStore instance
        Properties props = new Properties();
        props.setProperty("notificationProvider", args[0]);
        props.setProperty("clusterName", args[1]);
        props.setProperty("user", args[2]);
        props.setProperty("password", args[3]);
        GridStore store = GridStoreFactory.getInstance().getGridStore(props);

        // Creating a TimeSeries (Only obtain the specified TimeSeries if it already exists)
        TimeSeries<Point> ts = store.putTimeSeries("point01", Point.class);

        // Preparing time-series element data
        Point point = new Point();
        point.active = false;
        point.voltage = 100;

        // Store the time-series element (GridStore sets its timestamp)
        ts.append(point);

        // Extract the specified range of time-series elements: last six hours
        Date now = TimestampUtils.current();
        Date before = TimestampUtils.add(now, -6, TimeUnit.HOUR);

        RowSet<Point> rs = ts.query(before, now).fetch();

        while (rs.hasNext()) {
            point = rs.next();

            System.out.println(
                    "Time=" + TimestampUtils.format(point.timestamp) +
                    " Active=" + point.active +
                    " Voltage=" + point.voltage);
        }

        // Releasing resource
        store.close();
    }
}
The library installed via rpm is saved under /usr/share/java. First, set a path. Then compile the sample program.
export CLASSPATH=${CLASSPATH}:/usr/share/java/gridstore.jar
javac cloud_sample.java
This completes the creation of the program. Proceed to the section Verifying the connection information to perform the steps that follow and run the program.
4.1.4 Creating a sample program (language C)
First, install the client API for C to be used by the sample program via rpm.
rpm -Uvh griddb-ee-c_lib-5.6.0-linux.x86_64.rpm
Verifying...                          ################################# [100%]
Preparing...                          ################################# [100%]
Updating / installing...
   1:griddb-ee-c_lib-5.6.0-linux
################################# [100%]
The following warning may appear, but it is of no concern. Proceed to the next step.
- warning: user gsadm does not exist - using root
- warning: group gridstore does not exist - using root
The next step is to create a sample program. Copy the following and save it with the file name cloud_sample.c in any directory.
#include "gridstore.h"
#include <stdlib.h>
#include <stdio.h>

typedef struct {
    GSTimestamp timestamp;
    GSBool active;
    double voltage;
} Point;

GS_STRUCT_BINDING(Point,
    GS_STRUCT_BINDING_KEY(timestamp, GS_TYPE_TIMESTAMP)
    GS_STRUCT_BINDING_ELEMENT(active, GS_TYPE_BOOL)
    GS_STRUCT_BINDING_ELEMENT(voltage, GS_TYPE_DOUBLE));

// Storage and extraction of a specific range of time-series data
int sample(const char * addr, const char *clusterName,
            const char *user, const char *password) {
    GSGridStore *store;
    GSTimeSeries *ts;
    Point point;
    GSTimestamp now;
    GSTimestamp before;
    GSQuery *query;
    GSRowSet *rs;
    GSResult ret = !GS_RESULT_OK;

    const GSPropertyEntry props[] = {
            { "notificationProvider", addr },
            { "clusterName", clusterName },
            { "user", user },
            { "password", password } };
    const size_t propCount = sizeof(props) / sizeof(*props);

    // Acquiring a GridStore instance
    gsGetGridStore(gsGetDefaultFactory(), props, propCount, &store);

    // Creating a TimeSeries (Only obtain the specified TimeSeries if it already exists)
    gsPutTimeSeries(store, "point01",
            GS_GET_STRUCT_BINDING(Point), NULL, GS_FALSE, &ts);

    // Preparing time-series element data
    point.active = GS_FALSE;
    point.voltage = 100;

    // Store the time-series element (GridStore sets its timestamp)
    gsAppendTimeSeriesRow(ts, &point, NULL);

    // Extract the specified range of time-series elements: last six hours
    now = gsCurrentTime();
    before = gsAddTime(now, -6, GS_TIME_UNIT_HOUR);

    gsQueryByTimeSeriesRange(ts, before, now, &query);
    ret = gsFetch(query, GS_FALSE, &rs);
    while (gsHasNextRow(rs)) {
        GSChar timeStr[GS_TIME_STRING_SIZE_MAX];

        ret = gsGetNextRow(rs, &point);
        if (!GS_SUCCEEDED(ret)) break;

        gsFormatTime(point.timestamp, timeStr, sizeof(timeStr));
        printf("Time=%s", timeStr);
        printf(" Active=%s", point.active ? "true" : "false");
        printf(" Voltage=%.1lf\n", point.voltage);
    }

    // Releasing resource
    gsCloseGridStore(&store, GS_TRUE);

    return (GS_SUCCEEDED(ret) ? EXIT_SUCCESS : EXIT_FAILURE);
}

void main(int argc,char *argv[]){ sample(argv[1],argv[2],argv[3],argv[4]);}
Next, compile the sample program. The following is an example for CentOS.
gcc cloud_sample.c -lgridstore
This completes the creation of the program. Proceed to the section Verifying the connection information to perform the steps that follow and run the program.
4.1.5 Other sample programs
GridDB provides other sample programs for each feature. For details, see the "GridDB Programming Guide" (GridDB_ProgrammingGuide.html).
As for the API specifications, the following guides are made available. Refer to them as need be.
- "GridDB Java API Reference" (GridDB_Java_API_Reference.html)
- "GridDB C API Reference" (GridDB_C_API_Reference.html)
- "GridDB ODBC Driver Guide" (GridDB_ODBC_Driver_UserGuide.html)
As will be mentioned in Requirements and constraints, GridDB Cloud currently supports only the provider method as a connection method. Keep this in mind when running a sample program.
4.2 Verifying the connection information
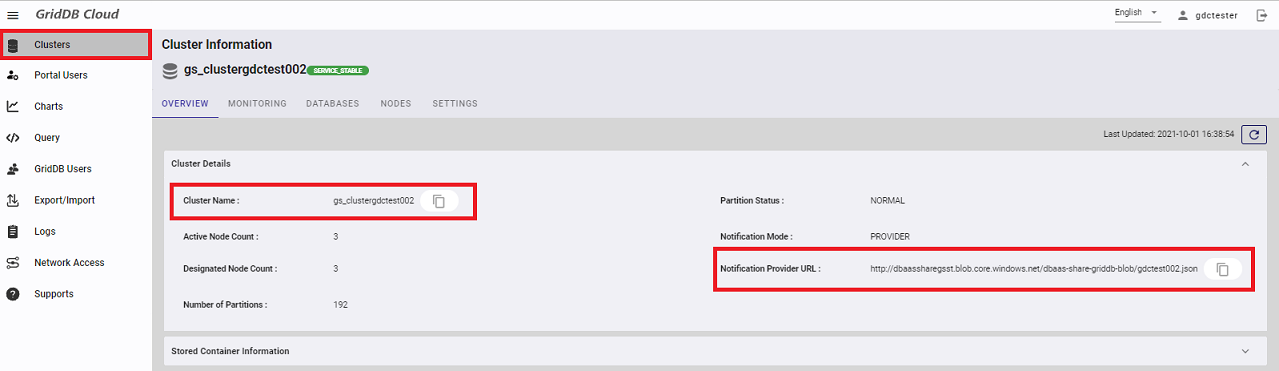
Before running the program created, verify the connection information and create a database user. Move to the "Clusters" screen and note down the following information:
- Cluster Name
- Notification provider URL
4.3 Creating a database user
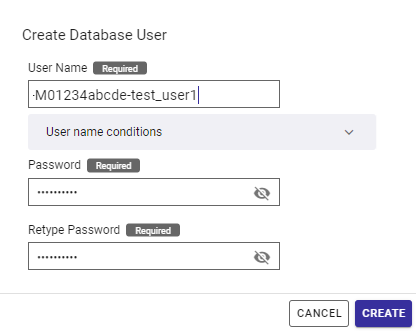
Next create a database user. Move to the "GridDB Users" screen and press the "CREATE DATABASE USER" button.
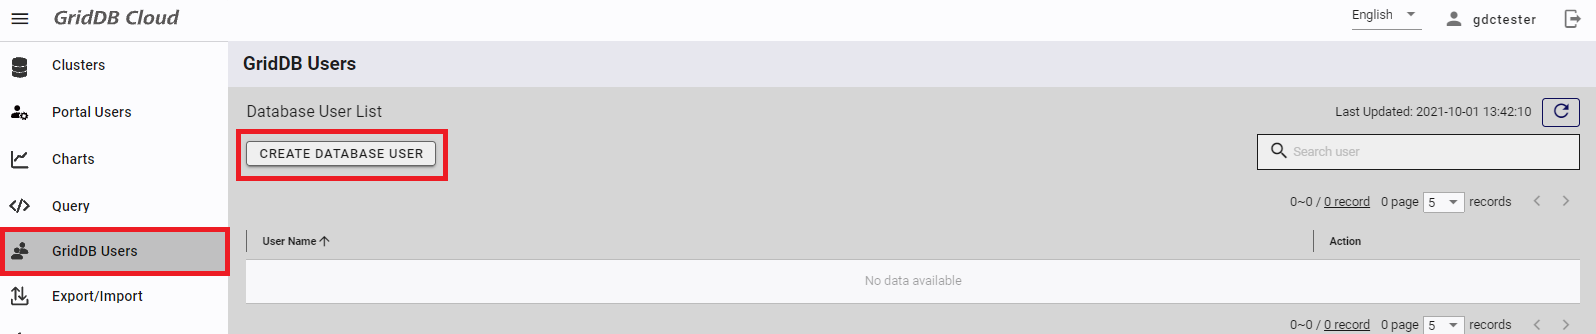
Set any desired user name and password, and press the "CREATE" button. For the example in this guide, the following settings are specified:
- User Name
- M01234abcde-test_user1
- Password
- test_user1
4.4 Running a sample program
Pass the connection information verified in the preceding chapters along with the user database name and the password as arguments and run the sample program.
<For Java>
java cloud_sample <Notification Provider URL> <cluster name> <database user name> <database user password>

<For C>
./a.out <Notification Provider URL><cluster name> <database user name> <database user password>
If the registration results as below appear, the program has been successfully completed.
Time=2021-03-31T07:52:58.770Z Active=false Voltage=100.0
This ends the explanation about the running of the sample program. For further details about the programming methods for GridDB, see Other sample programs.
4.5 Requirements and constraints
GridDB offers the following three connection methods:
- Multicast method
- Fixed-list method
- Provider method
In GridDB Cloud, the provider method specified in the sample program is the only method available. The provider method is a method in which the Notification Provider URL is specified as a connection destination. Note that the rest of the methods are not available.
For more details about the connection methods, see the "GridDB Features Reference" (GridDB_FeaturesReference.html).
5 Data registration using Web API (For the dedicated and collaboration environment plans)
This chapter describes how to register data using the GridDB Web API. If you have signed up for the dedicated environment plan and you can use an Azure VNet environment, we recommend that you use the client API as a connection method. In that case, see Connection settings for Vnet instead of this chapter.
5.1 Preparation prior to connection
5.1.1 Specifying where the connection originates
Initially all access to WebAPI is denied. The following procedure for allowing an IP address access to Web API enables you to register data using Web API.
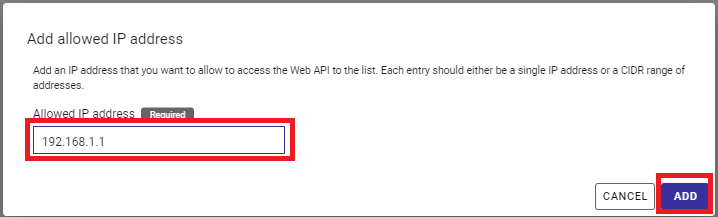
From the navigation panel on the left, choose "Network Access." Then, move to the "WEBAPI ACCESS" tab, click the "ADD ALLOWED IP ADDRESS" button.
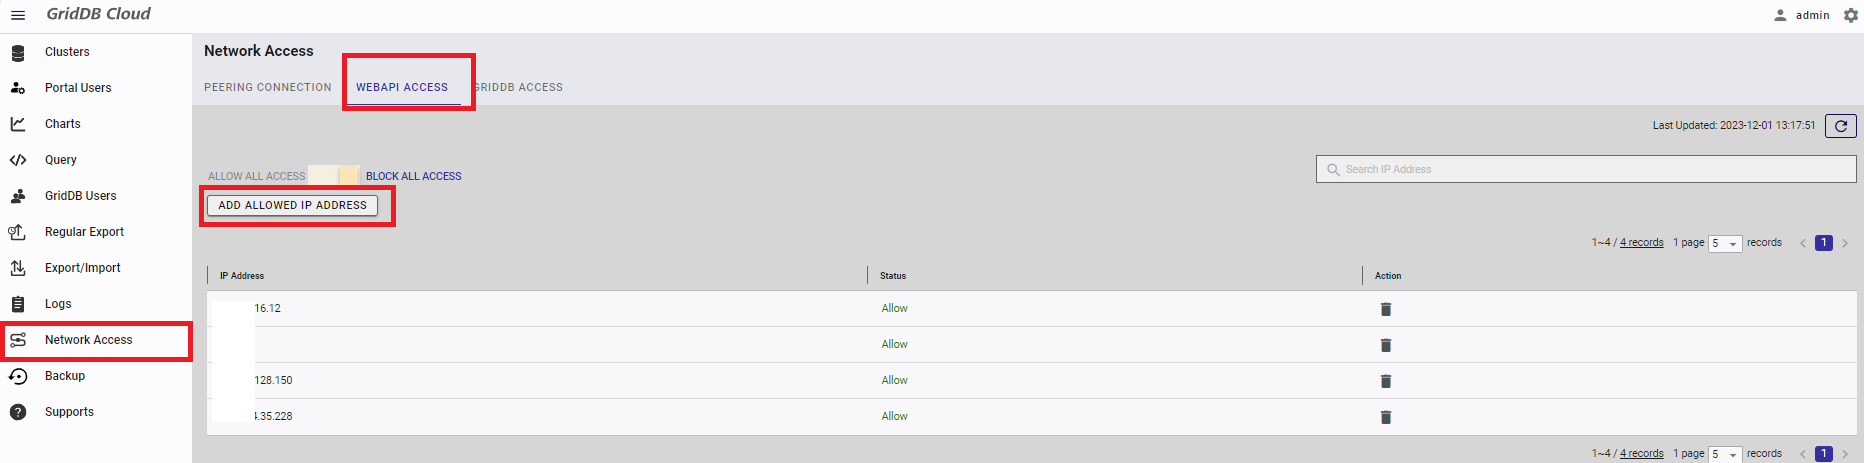
Input an IP address that you want to allow access in the dialog. Click the "ADD" button.
5.1.2 Checking where a connection is established
Check the URL for the Web API, which has been provided in the file attached to your mail, and note it down. The URL is also found in the screen showing the cluster health.
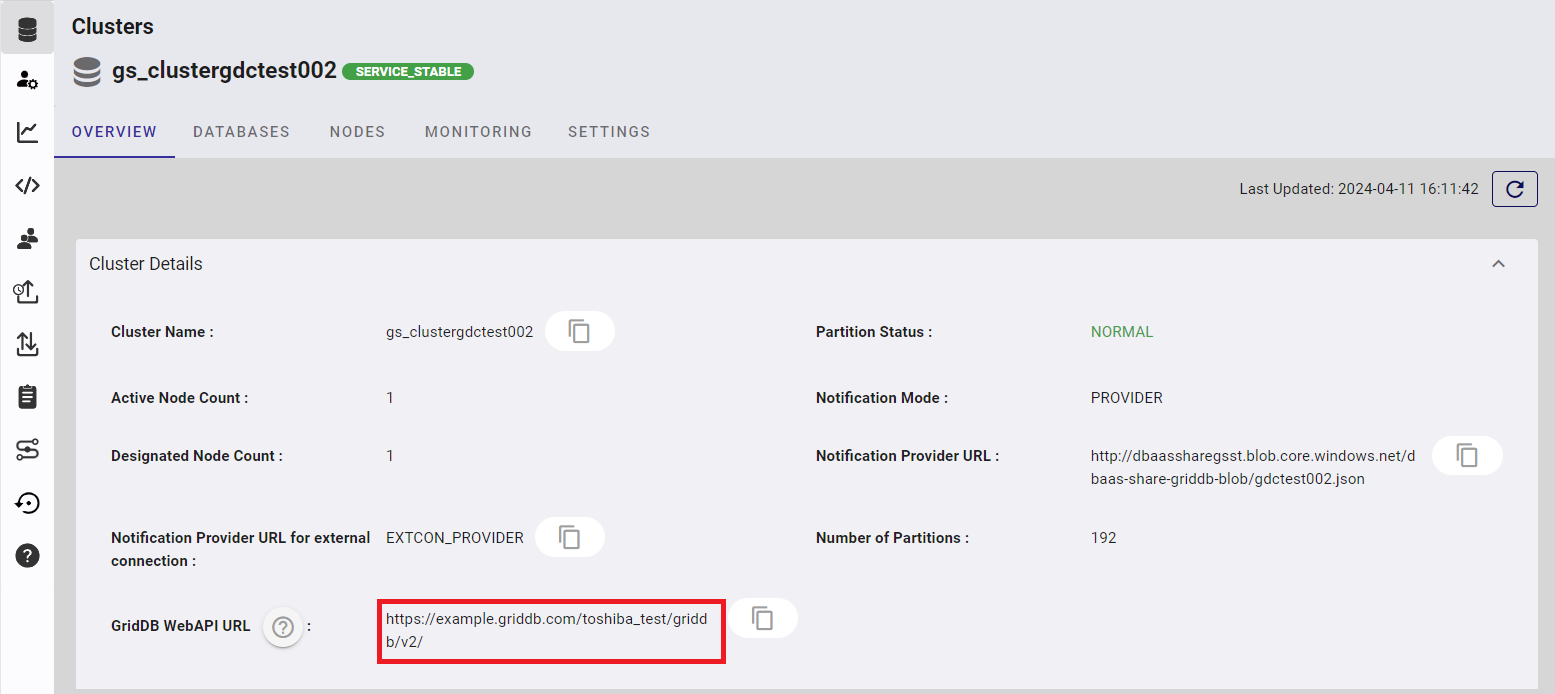
format for the dedicated environment plan:
https://{base URL}

dedicated environment plan example
https://example.griddb.com/toshiba_test/griddb/v2/

format for the collaboration environment plan:
https://{base URL}/{cluster name}/dbs/{database name}

collaboration environment plan example
https://example.griddb.com/toshiba_test/griddb/v2/gs_clustergdctest002/dbs/1a2b3c4d/
To use the API, not only the base URL but also a cluster name and a database name are required that will be checked subsequently. For the collaboration environment plan, you can skip the sections on checking cluster and database names; in the collaboration environment plan, those names are included in the URL.
5.1.3 Checking the cluster name
Check the cluster name that the URL for the Web API requires. Move to the "Clusters" screen and note down the following information:
- Cluster Name
5.1.4 Checking a database name
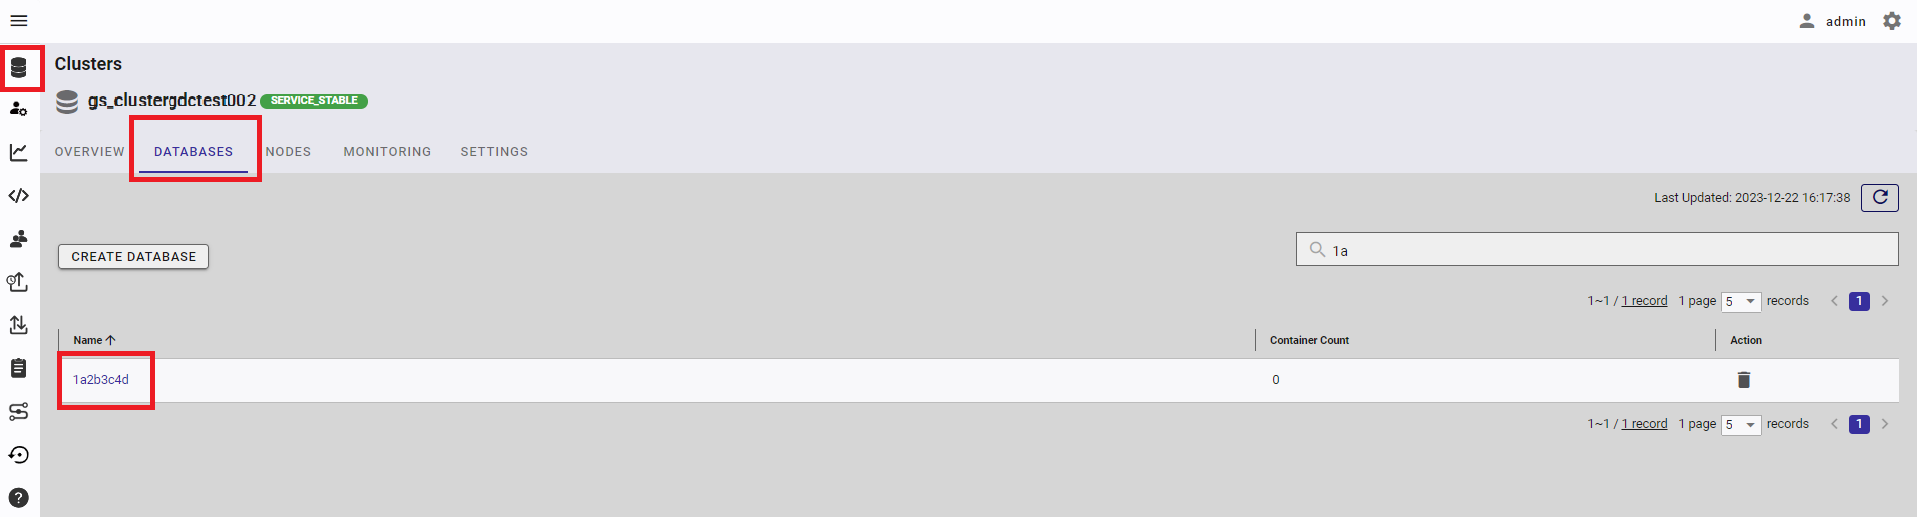
Check the database name that the URL for the Web API requires. Move to the "Databases" screen and note down the displayed database name.
[Note]: If you have signed up for the dedicated environment plan, "public" is displayed in the screen. If you have signed up for the collaboration environment plan, you can use only one database with a name consisting of random alphanumeric characters (e.g., 1a2b3c4d).
5.1.5 Creating a database user
Create a database user. Move to the "GridDB Users" screen and press the "CREATE DATABASE USER" button.
Set any desired user name and password, and press the "CREATE" button. For the example in this guide, the following settings are specified.
[Note]: Your contract id (e.g., M01234abcde) is automatically added at the beginning of the database user name if you have signed up for the collaboration environment plan.
- User Name
- M01234abcde-test_user1
- Password
- test_user1
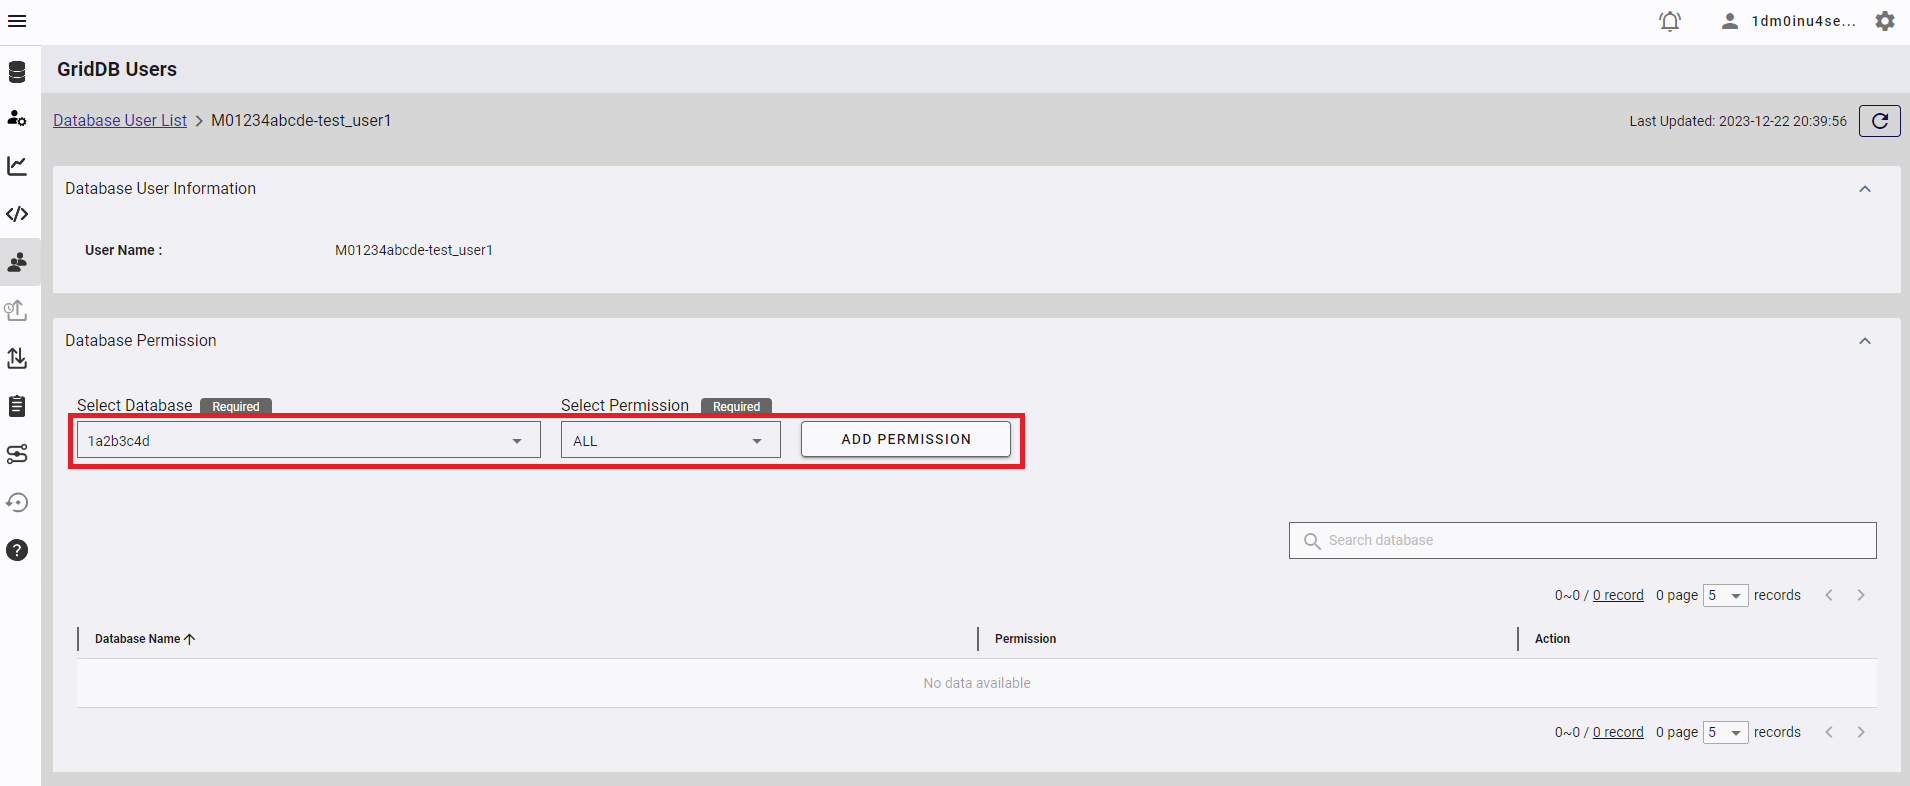
If you use a database other than "public", you need to add write permission to the database user you have created. First, click the database name you have created to display the database user setting screen.

Then, select the database to which you want to add permission, select the "ALL" permission, and press the "ADD PERMISSION" button.
5.1.6 Setting headers
To connect to the Web API, the following headers are required. Attach them to all requests.
| Header | Description | Required |
|---|---|---|
| Content-Type | application/json; charset=UTF-8 | ✓ |
| Authorization | This specifies the user accessing GridDB and its password in the Basic authentication format. For example, if the user name is "M01234abcde-test_user1" and the password is "test_user1", then the header will be "Basic TTAxMjM0YWJjZGUtdGVzdF91c2VyMTp0ZXN0X3VzZXIx". | ✓ |
5.2 Creating a container
In this step, the timeseries container point01 consisting of three columns: TIMESTAMP, BOOL, and DOUBLE columns.
The following is the URL to send a request to:
POST https://{base URL}/{cluster name}/dbs/{database name}/containers

Example:
POST https://example.griddb.com/toshiba_test/griddb/v2/gs_clustergdctest002/dbs/1a2b3c4d/containers
The following is the request body to send:
{
  "container_name" : "point01",
  "container_type" : "TIME_SERIES",
  "rowkey" : true,
  "columns" : [
    {"name": "timestamp", "type": "TIMESTAMP"},
    {"name": "active", "type": "BOOL"},
    {"name": "voltage", "type": "DOUBLE"}
  ]
}
If the HTTP response status is 201 (Created), then the container is successfully created.
5.3 Registering a row
The next step is to register a row in the container point01 created previously.
The following is the URL to send a request to:
PUT https://{base URL}/{cluster name}/dbs/{database name}/containers/{container name}/rows

Example:
PUT https://example.griddb.com/toshiba_test/griddb/v2/gs_clustergdctest002/dbs/1a2b3c4d/containers/point01/rows
The following is the request body to send:
[["2021-06-28T10:30:00.000Z", false, "100"]]
If the HTTP response status is 200 (OK) and the following response body is generated, the row is successfully registered.
{
    "count": 1
}
5.4 Obtaining a row
Next obtain the row registered in the container point01.
The following is the URL to send a request to:
POST https://{base URL}/{cluster name}/dbs/{database name}/containers/{container name}/rows

Example:
POST https://example.griddb.com/toshiba_test/griddb/v2/gs_clustergdctest002/dbs/1a2b3c4d/containers/point01/rows
The following is the request body to send. This shows that a maximum of 100 rows of data are obtained with the condition that the data with a timestamp at 4:30 on June 28, 2021 and after are obtained.
{
  "limit"  : 100,
  "condition" : "timestamp >= TIMESTAMP('2021-06-28T04:30:00.000Z')"
}
If the HTTP response status is 200 (OK) and the following response body is generated, the rows are successfully registered.
{
    "columns": [
        {
            "name": "timestamp",
            "type": "TIMESTAMP"
        },
        {
            "name": "active",
            "type": "BOOL"
        },
        {
            "name": "voltage",
            "type": "DOUBLE"
        }
    ],
    "rows": [
        [
            "2021-06-28T10:30:00.000Z",
            false,
            100.0
        ]
    ],
    "offset": 0,
    "limit": 100,
    "total": 1
}
This is the end of the tutorial for data registration and retrieval using WebAPI. To learn about other APIs, see the section for each API in the Web API reference. Obtaining of development tools describes how to obtain the Web API reference.
6 Verification of registered data (For the dedicated and collaboration environment plans)
This chapter describes how to verify the registered data using SQL. To verify the data registered using the sample program in the previous chapter or the WebAPI, register the data, if not registered yet.
First, open the "Query" screen. Check that on the right is the container "point01" created previously.
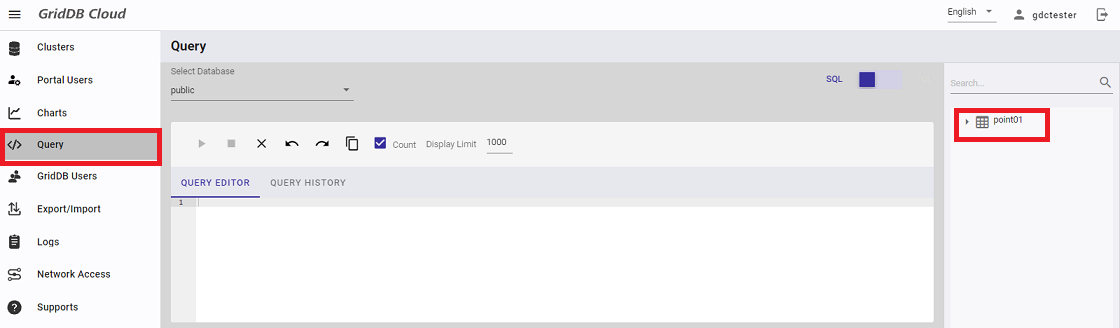
Next, enter the following SQL statement for obtaining all the data in point01. If you cannot input the SQL into the editor, please press the F5 key to reload this page.
SELECT * FROM point01
If the following execution results are displayed, then verification is successful.

7 Obtaining of development tools (For the dedicated and collaboration environment plans)
This chapter descries how to obtain development tools needed to register data from an application.
See the Supports page for the URL where a set of tools including rpm for client APIs and plugins for data integration tools is distributed. Download a set of tools from the URL link for "File Download."
The organization of the file differs between the dedicated environment plan and the collaboration environment plan. The file of the dedicated environment plan is organized as follows:
| Directory name/filename | Summary |
|---|---|
| embulk-output-griddb | Output plugin for the data integration tool "Embulk". |
| fluent-plugin-griddb | Output plugin for the data integration tool "Fluentd". |
| grafana-input-plugin | Input plugin for the data visualization tool "Grafana". |
| JDBC | a set of JDBC driver modules. |
| logstash-output-plugin | Output plugin for the data integration tool "Logstash". |
| ODBC | a set of ODBC driver modules. |
| telegraf-output-plugin | Output plugin for the data integration tool "Telegraf". |
| gdbConnectSample.zip | a sample program for working with the Azure Functions. |
| griddb-ee-c_lib-5.6.0-linux.x86_64.rpm | rpm file for the C client API. |
| griddb-ee-java_lib-5.6.0-linux.x86_64.rpm | rpm file for the Java client API. |
| griddb-ee-webapi-5.6.0-linux.x86_64.rpm | rpm file for the GridDB API. |
| griddbCloudDataExport.zip | a tool to export GridDB Cloud data. |
The file of the collaboration environment plan is organized as follows:
| Directory name/filename | Summary |
|---|---|
| fluent-plugin-griddb | Output plugin for the data integration tool "Fluentd". |
| grafana-input-plugin | Input plugin for the data visualization tool "Grafana". |
| logstash-output-plugin | Output plugin for the data integration tool "Logstash". |
| telegraf-output-plugin | Output plugin for the data integration tool "Telegraf". |
| griddbCloudDataExport.zip | a tool to export GridDB Cloud data. |

