Data export tool guide
Revision: 2.0.0-12154-62531f11
1 Introduction
1.1 Purpose and organization of this document
This document explains the data export tool provided by GridDB Cloud specifically for GridDB Cloud users. The following is a summary of each chapter.
- How to use: This Chapter explains how to use the data export tool.
1.2 Operating environment
The data export tool operates in the following environment:
- Support OS
- Windows (Windows10, Windows 11)
- Linux (RHEL8)
2 How to use
2.1 Prerequisites
2.1.1 Obtaining the tool
【for both Windows and Linux】
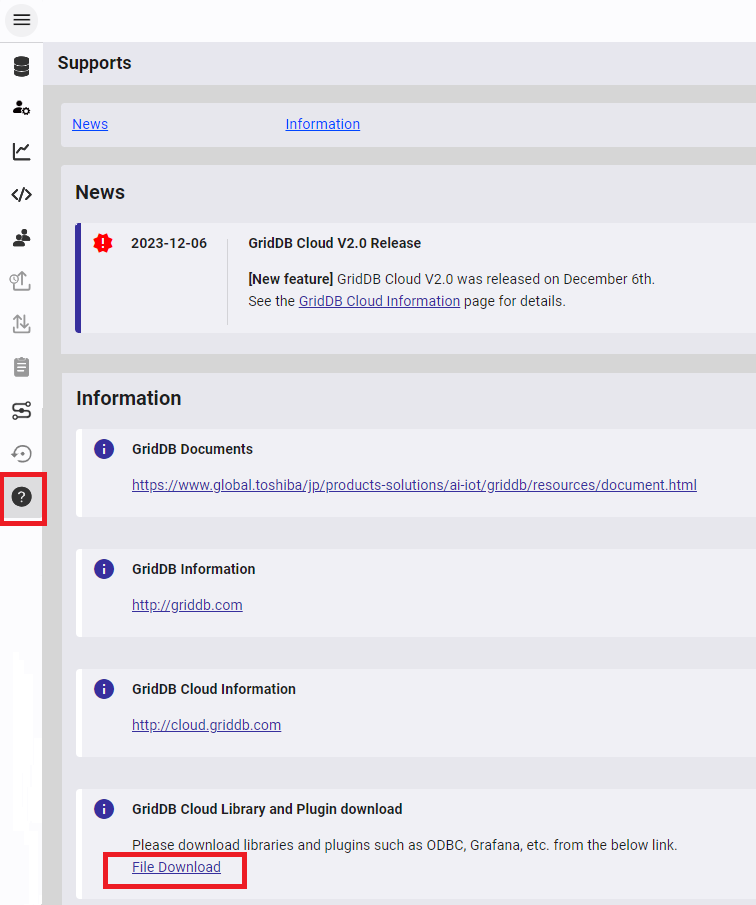
To use the tool, download it from GridDB Cloud by moving to Management GUI's Supports page and clicking the link FileDownload. The tool is found in the downloaded file, namely, griddbCloudDataExport.zip.
【for Windows only】
Obtain a tool required to operate the tool.
- jq command
Download a file from the site (https://jqlang.github.io/jq/); then, save and extract the file in any location on the PC where the tool is saved. After extraction, add the folder where jq.exe is saved to an environment variable.
- cURL (If this does not work on the Windows standard Curl command, use the cURL tool on OSS.)
Download a file from the site (https://curl.se/); then, save and extract the file in any location on the PC where the tool is saved. 【for Linux only】
Obtain a tool required to operate the tool.
- jq command
The jq command must be introduced using dnf or yum beforehand.(yum install jq)
2.1.2 Deploying the tool
Save and extract the tool obtained in any folder.
2.1.3 Setting parameters
Open the following extracted file in a text editor.
- for Windows: griddbCloudDataExport.bat
- for Linux: griddbCloudDataExport.sh
See the following lines in the opened file:
- for Windows: lines 39 to 43
- for Linux: lines 38 to 42
Then set a value to each parameter in the lines above, according to the following list, where ◎ denotes required settings and ○, optional settings.
- ◎WEBAPI_URL: Set a URL of WebAPI this tool connects to. Information about tool can be found in the email reply sent from the system when you subscribe to GridDB Cloud.
- ◎GRIDDB_USER: Set a GridDB user to be used when the tool connects to GridDB Cloud.
- ◎GRIDDB_PASS: Set a GridDB user's password to be used when the tool connects to GridDB Cloud.
- ○STATIC_SQL: The SQL statement(s) to be executed by GridDB is set up by executing the tool. This tool only allows to execute a SELECT SQL statement. See the two specific examples of SELECT SQL statements below. If you do not set up SQL statements at this stage, you will need to specify SQL statements with arguments during tool execution.
- Example 1 select * from testtable (for retrieving all data stored in the database)
- Example 2 select * from testtable limit 100 (for retrieving 100 pieces of data among data stored in the database)
- ○PROXY_SERVER: Set a value to this parameter if you use a proxy server to connect the tool to GridDB Cloud. Leave it blank if you do not use it.
Next see the following line in the opened file.
- for Windows: line 44
Then set a value to the parameter (CURL_PATH) in the line above, according to the following direction.
- CURL_PATH: Specify a full path to the folder where cURL curl.exe saved using Download tools is located. This is not needed if you use Windows standard curl.exe.
- Example: "CURL_PATH=C:\curl\bin" (when curl.exe exists in C:\curl\bin)
2.2 Execute the fool
【Windows】
- Start a command prompt.
- Move to the directory where the files deployed while Deploying the tool are stored.
> cd /{location where the tool is stored}
- Run one of the following commands that suits to your needs:
- If SQL statements are specified using parameters, run the following command:
> griddbCloudDataExport.bat
- If SQL statements are specified with arguments, run the following command:(The SQL statement below is just an example)
> griddbCloudDataExport.bat "select * from testtable
The command is successfully completed if the message "Processing ends" and a command prompt are shown on the console screen.
- Run the command below. If the two files, namely "{execution date}_sql_result_1.json" and "{execution date}_sql_result_1.csv," are generated, data registered in the database is stored in those files.
> dir
【Linux】
Start the terminal.
Move to the directory where the files deployed while Deploying the tool are stored. > cd /{location where the tool is stored}
Run one of the following commands that suits to your needs:
- If SQL statements are specified using parameters, run the following command:
$ ./griddbCloudDataExport.sh
- If SQL statements are specified with arguments, run the following command:(The SQL statement below is just an example)
$ ./griddbCloudDataExport.sh "select * from testtable"
The command is successfully completed if the message "Processing ends" and a command prompt are shown on the console screen.
- Run the command below. If the two files, namely "{execution date}_sql_result_1.json" and "{execution date}_sql_result_1.csv," are generated, data registered in the database is stored in those files.
$ ls -l
2.3 Verifying the exported data
You can view the data registered in the database by opening " {execution date}_sql_result_1.csv" in a text editor.
2.4 Registering data to new GridDB
You can register data using GridDB Cloud's import feature (available only to the paid plan). For details about how to use the import feature, see the "Management GUI Reference for GridDB Cloud."
3 Notices
If the following error occurs, reduce the number of hits either by specifying search conditions using the WHERE clause in an SQL statement, or by specifying the LIMIT clause in an SQL statement:
- Response Status : 400
- Response Body : {"version":"v2","errorCode":0,"errorMessage":"Too many result"}

