Azure IoT Edge collaboration guide
Revision: 1.5.0-9417-7fa03c1d
1 Introduction
This document describes how to register data generated by an IoT device in GridDB by using Azure IoT Edge or Azure Functions.
1.1 Organization of this document
The following is a summary of each chapter.
Introduction
Chapter 1 describes the organization of this document and terminology.System configuration
Chapter 2 explains the system configuration used in this document.Settings to send device data
Chapter 3 provides settings to send data generated by a device to Azure IoT Hub and a sample program.Settings to register device data
Chapter 4 provides settings to receive data from Azure IoT Hub to register it in GridDB and a sample program.Verification of registered data
Chapter 5 describes how to verify the data registered in a sample program using the operations management GUI.
1.2 Terminology
The following are terms and their descriptions used in this document.
| Term | Description |
|---|---|
| Azure IoT Edge | the execution environment for a custom code on an IoT device. In this document, it is used to send data to IoT Hub. The custom code is deployed as a Docker container. For details, see Microsoft documentation. |
| Azure Container Registry | an Azure service to store container images. Of the Docker containers that work with Azure IoT Edge, retrieve and use the ones that are registered in Container Registry. For details, see Microsoft documentation. |
| Azure IoT Hub | This hub operates as a message hub for IoT devices and manages connection devices. In the system configuration used in this document, Azure IoT Hub is the destination to send Azure IoT Edge data which is then received by Azure Functions. For details, see Microsoft documentation. |
| Azure Functions | a serverless architecture that allows users to provide functions simply by writing code and settings. Functions are set by each function app. In this document, a function app is created to receive Azure IoT Hub data and register it in GridDB. For details, see Microsoft documentation. |
| operations management GUI | a Web application managing GridDB Cloud. |
| cluster | a single node or a set of nodes that perform data management together in an integrated manner. |
| node | an individual server process to perform data management in GridDB. |
| container | a container to manage a set of rows. A container has two data types: collection and timeseries container. |
| collection | one type of container to manage rows having a general key. |
| row | one piece of data managed by GridDB. |
2 System configuration
The following figure shows the system configuration described in this document.

Below is the procedure to register data in GridDB.
- From a data sender application that operates on IoT Edge, send device data to IoT Hub.
- Azure Functions receives device data from IoT Hub.
- Azure Functions registers device data in GridDB.
The subsequent chapters describe the following two settings to perform the above steps.
- Settings to send device data using IoT Edge
- Settings to register device data using Azure Functions
Note that this document refers to Microsoft documentation a number of times. For various settings values, it is recommended to set the value specified in the page referred to unless otherwise stated.
3 Settings to send device data
The following steps are necessary to send device data to IoT hub.
- Create an IoT hub
- Register an IoT Edge device with an IoT hub
- Configure your IoT Edge device
- Deploy a data sender application to a virtual machine
Perform Steps 1, 2, and 3 by following the steps in Microsoft Quickstart. In that quickstart, the IoT Edge runtime is installed on a virtual machine, but it is also possible to install it on a real machine such as Raspberry Pi. For supported platforms, see Microsoft documentation.
The next section explains how to deploy a data sender application in Step 4.
3.1 Deploying a data sender application to a virtual machine
To deploy a data sender application to a virtual machine, the following steps are necessary.
- Install container engine
- Set up VS Code and tools
- Create a container registry
- Create a new module project
- Build and push a data sender application
- Deploy the data sender application
Perform Steps 1, 2, and 3 by following the steps in Microsoft Tutorial. The next section describes the rest of the steps (Steps 4, 5, and 6).
3.1.1 Creating a new module project
Create a module project on VS Code.
Before creating a project, install the elements required for development that are specified in Microsoft Tutorial under Prerequisites.
Press F1 to select "Azure IoT Edge: New IoT Edge Solution."

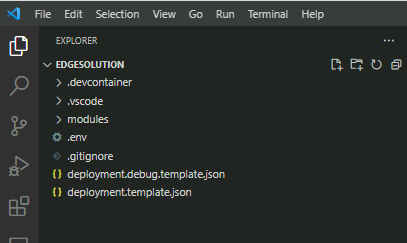
Specify any folder to create a solution. Once the command palette opens to specify a solution name, select the default "EdgeSolution."

Once the command palette opens to specify a programming language, select "Java Module."

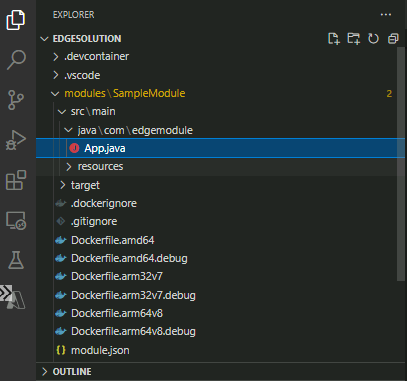
Once the command palette opens to specify a module name, select the default "SampleModule."

Once the command palette opens to specify a Docker image repository, specify the repository created in Step 3 above. Use the following format to specify the repository.
<login server name>/<repository name>

Once the command palette opens to specify a group ID, select the default "com.edgemodule."

A new solution is then created automatically.
3.1.2 Building and pushing a data sender application
From a file list in the solution, select and open "App.java."
Paste the following code and save.
package com.edgemodule;
import com.microsoft.azure.sdk.iot.device.*;
import java.io.IOException;
import java.text.SimpleDateFormat;
public class App {
private static EventCallback eventCallback = new EventCallback();
protected static class EventCallback implements IotHubEventCallback {
@Override
public void execute(IotHubStatusCode status, Object context) {
if (context instanceof Message) {
System.out.println("Send message with status: " + status.name());
} else {
System.out.println("Invalid context passed");
}
}
}
public static void main(String[] args) throws IOException {
System.out.println("The main function was invoked.");
DeviceClient client = null;
try {
client = new DeviceClient("<device connection strings>" , IotHubClientProtocol.HTTPS);
client.open();
for (int i=0; i<60; i++) {
String timestampStr = new SimpleDateFormat("yyyy-MM-dd'T'HH:mm:ss'Z'").format(new java.util.Date());
double temperature = 20 + Math.random() * 15;
String msgStr = timestampStr + "," + String.valueOf(temperature);
Message msg = new Message(msgStr);
System.out.println("msg: " + msgStr);
client.sendEventAsync(msg, eventCallback, msg);
Thread.sleep(60000);
}
client.closeNow();
} catch (Exception e) {
e.printStackTrace();
if (client != null) {
client.closeNow();
}
System.exit(1);
}
}
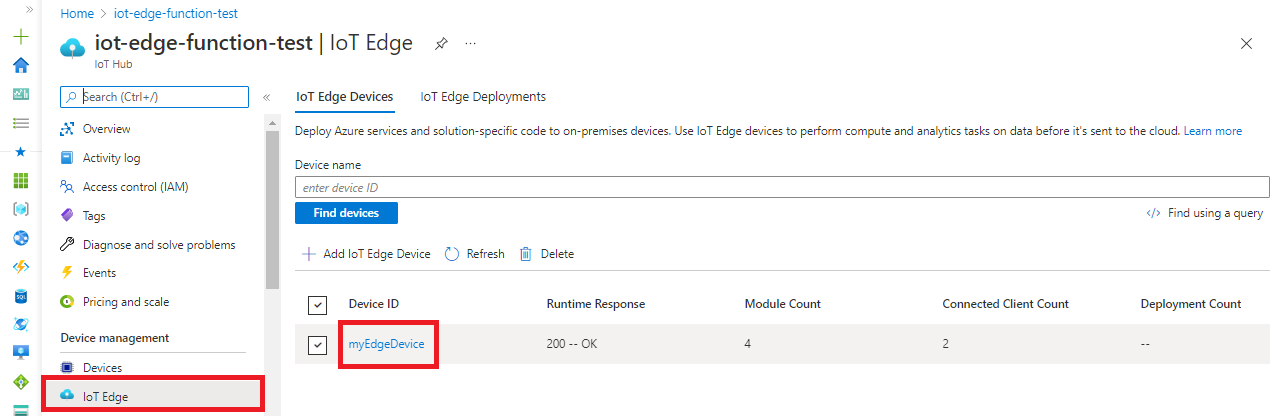
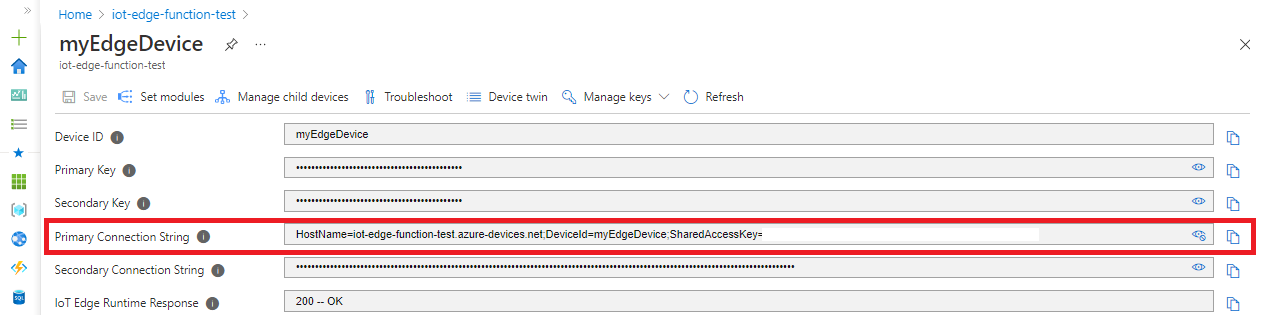
}For the "<device connection strings>" in the code above, enter the corresponding connection strings. They can be retrieved by selecting the registered device from "IoT Edge" under "IoT Hub" in the Azure portal.
This code performs the following processes.
- Connect to IoT Hub.
- Generate CSV strings consisting of the current time and the temperature data (a random value between 20.0 and 35.0 in Celsius).
- Send the CSV strings to IoT Hub.
- Stop for a minute.
- Repeat Steps 2 to 4 59 times.
- Disconnect from IoT Hub.
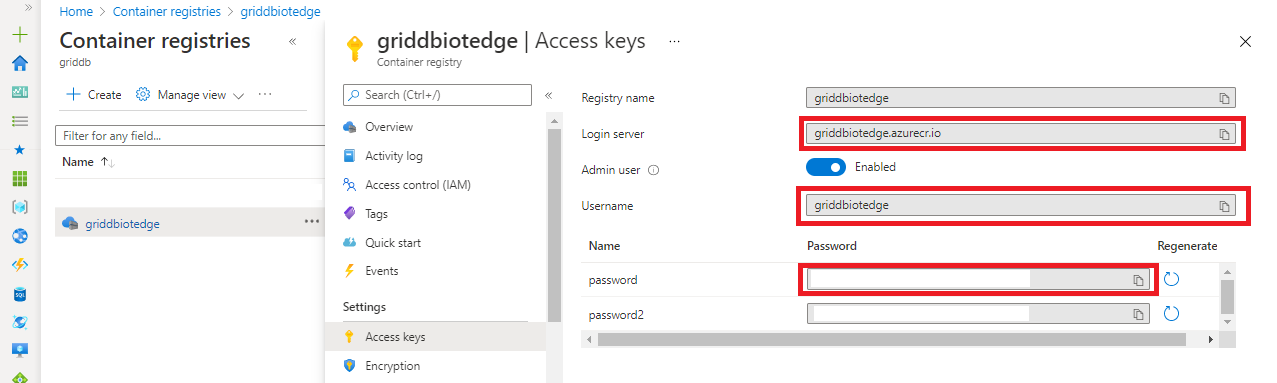
Build and containerize the above code and push it to a container registry. From the VS Code terminal, run the following command and log in to the container registry. The parameter for ACR (Azure Container Registry) can be obtained from your container registry in the Azure portal.
docker login -u <ACR username> -p <ACR password> <ACR login server>
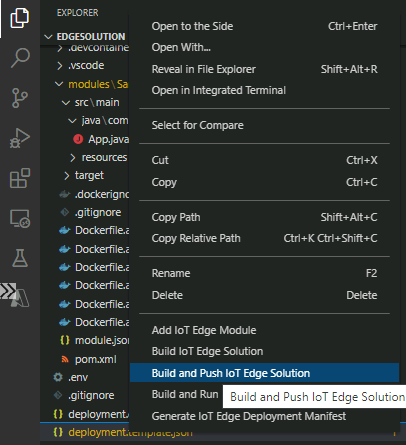
Right-click "deployment.template.json" and select "Build and Push IoT Edge Solution" to build and push a container image.
3.1.3 Deploying the data sender application
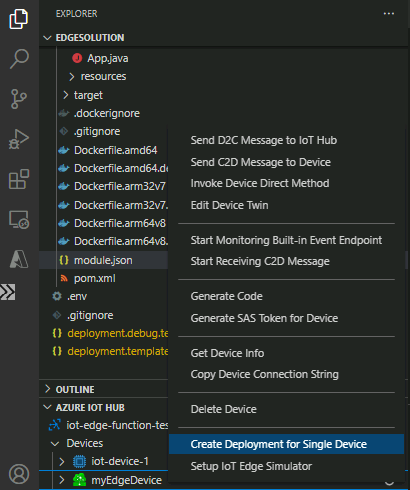
From "Devices" under "AZURE IOT HUB", right-click the registered device. Select "Create Deployment for Single Device."
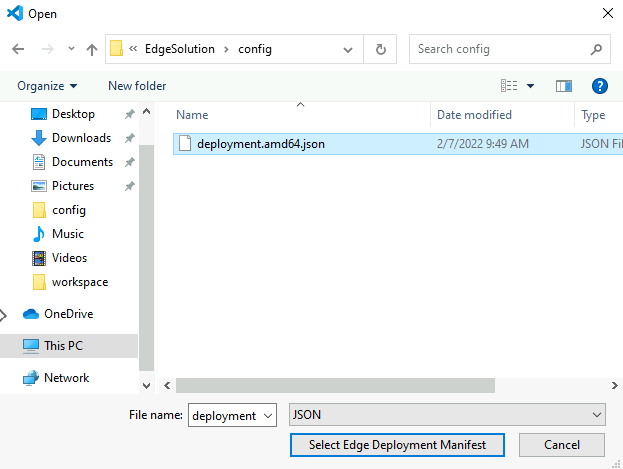
Select "deployment.amd64.json" in the "config" folder; deployment to a virtual machine is then performed.
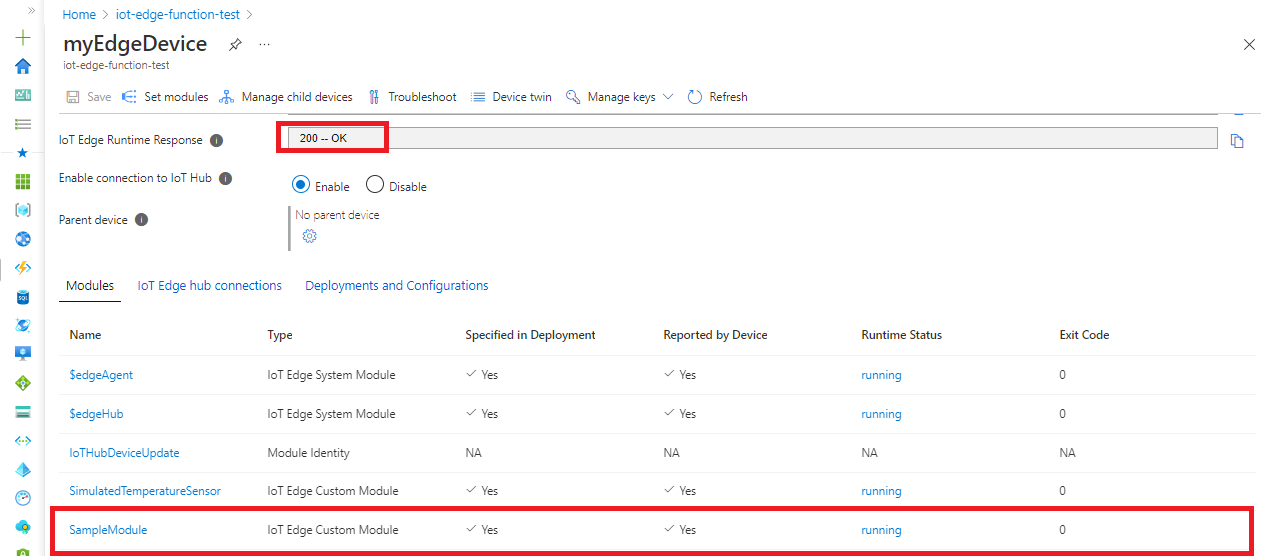
Open a page for registered devices in IoT Hub, check that IoT Edge Runtime Response is "200 -- OK" and the status of the registered module is "running", which means deployment is successfully performed.
4 Settings to register device data
To register device data in GridDB by using Azure Functions, the following steps are necessary.
- Create a function app
- Create a VNet
- Integrate a function app with a VNet
- Create VNet peering between the integrated VNet and the GridDB VNet
- Create a GridDB container
- Create a database user
- Deploy the function
GridDB Cloud provides the following two connection methods as of V1.3:
- Connection by a private IP address using VNet peering.
- Connection by a public IP address using Web API.
If the second method is used, Steps 2, 3, and 4 are not necessary. This document describes the first method which offers higher security.
VNet peering is required to allow function apps to connect using the private IP address of GridDB. VNet peering is a service to connect between VNets, whereas function apps do not belong to a VNet by default. For this reason, the existing VNet and a function app need to be integrated.
The following sections explain the procedures for these processes.
4.1 Creating a function app
Following Microsoft documentation, create a function app in the Azure portal.
Then, set the following settings. In particular, make sure to set "Functions Premium" for the "Plan", because it is the only one that supports VNet integration.
For other settings, enter the value suggested in the documentation or any value.
| Setting item | Setting value |
|---|---|
| Basics/Publish | Code |
| Basics/Runtime stack | Java |
| Basics/Version | 11.0 |
| Hosting/Plan | Functions Premium |
4.2 Creating a VNet
Create a VNet which will contain function apps. Skip this section if there is already a VNet available.
If not, follow Microsoft Tutorial to create a VNet.
4.3 Integrating a function app with a VNet
Integrate a function app with the VNet just created. For details about VNet integration, see Microsoft documentation.
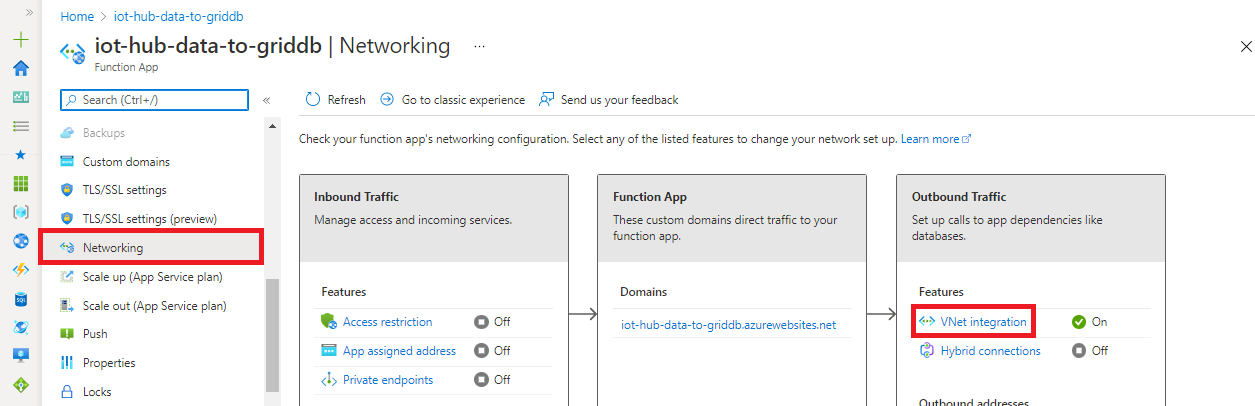
From the Azure portal, open the function app just created. Select "Networking" and then "VNet integration."
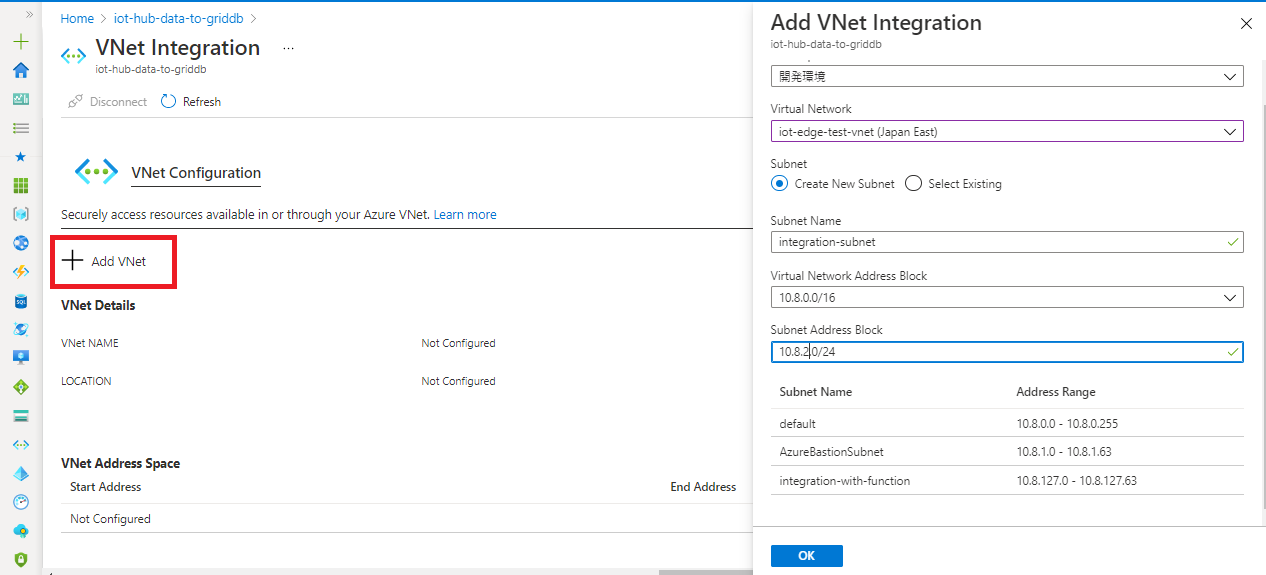
To perform VNet integration, an empty subnet needs to be created in the VNet to be integrated. Click "Add VNet" to create a new subnet.
4.4 Creating peering between the integrated VNet and the GridDB VNet
Following the steps in GridDB Cloud's Quickstart to create VNet peering between the integrated VNet and the GridDB VNet.
4.5 Creating a GridDB container
Create a container where function app data is registered.
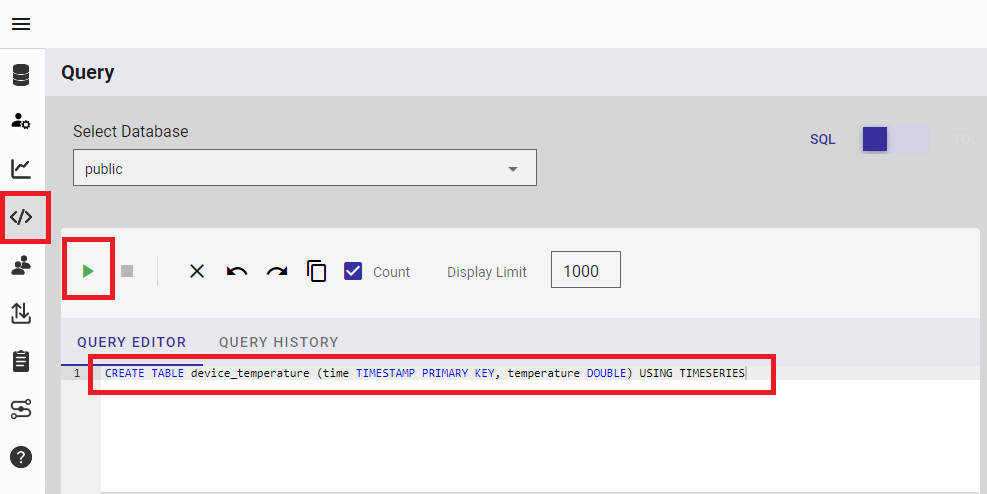
Log in to the operations management GUI and open the Query editor. Execute the following SQL statement to create a timeseries container consisting of a timestamp and a temperature in the public database.
CREATE TABLE device_temperature (time TIMESTAMP PRIMARY KEY, temperature DOUBLE) USING TIMESERIES
4.6 Creating a database user
Skip this section if you have already created a database user.
Following the steps in GridDB Cloud's Quickstart, create a database user.
4.7 Deploying a function
Retrieve device data from IoT Hub to deploy a function to be registered in GridDB.
Follow the Microsoft Quickstart to set a development environment and create a local project. For Java version, specify "Java 11." For other settings, specify the default value.
Then, press F1 to display a command palette to create a function. Select "Azure Functions: Create Function."

Select "EventHubTrigger." If it is not displayed, select "Change template filter" and then "All."

Continue to select the default value until a command palette for entering the name of the Event hub (Notice it is not "IoT Hub", but this is not a problem) is displayed. For the name of the Event hub, enter the name of the IoT Hub previously created.

Specify the default value to complete the creation of a function. If the following screen is displayed, select "Skip for now."

You can see function files have been added.
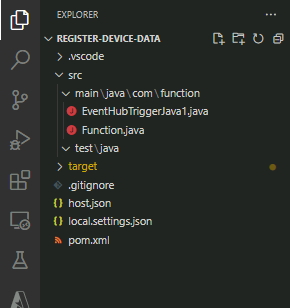
Open pom.xml and add the Java library for GridDB as a dependent library. Add the following in any place in <dependencies>.
        <!-- https://mvnrepository.com/artifact/com.github.griddb/gridstore -->
        <dependency>
            <groupId>com.github.griddb</groupId>
            <artifactId>gridstore</artifactId>
            <version>4.5.0</version>
        </dependency>
Open "host.json" to change the value of "extensionBundle/version" as below. The following code shows the version of the library the function app needs to use IoT Hub as trigger binding. As of February 2022, the function app has been tested with the following version (3.3 or later but earlier than 4.0), but if the required library version is upgraded, the value of "version" needs to be modified.
{
  "extensionBundle": {
    "version": "[3.3.0, 4.0.0)"
  }
}
Open "EventHubTriggerJava1.java" to overwrite with the following code:
package com.function;

import com.microsoft.azure.functions.annotation.*;
import com.microsoft.azure.functions.*;
import com.toshiba.mwcloud.gs.Container;
import com.toshiba.mwcloud.gs.GridStore;
import com.toshiba.mwcloud.gs.GridStoreFactory;
import com.toshiba.mwcloud.gs.Row;
import com.toshiba.mwcloud.gs.TimestampUtils;

import java.util.*;

/**
 * Azure Functions with Event Hub trigger.
 */
public class EventHubTriggerJava1 {
    /**
     * This function will be invoked when an event is received from Event Hub.
     */
    @FunctionName("EventHubTriggerJava1")
    public void run(
        @EventHubTrigger(name = "message", eventHubName = "<IoT Hub name>", connection = "AzureWebJobsEventHubSender", consumerGroup = "$Default", cardinality = Cardinality.ONE, dataType = "string") String message,
        final ExecutionContext context
    ) {
        context.getLogger().info("Java Event Hub trigger function executed.");
        context.getLogger().info(message);

        try {
            Properties prop = new Properties();
            prop.setProperty("notificationProvider", "<Notification Provier URL>");
            prop.setProperty("clusterName", "<cluster name>");
            prop.setProperty("database", "public");
            prop.setProperty("user", "<database user name>");
            prop.setProperty("password", "<database user's password>");

            GridStore store = GridStoreFactory.getInstance().getGridStore(prop);
            String containerName = "device_temperature";
            Container<?, Row> container = store.getContainer(containerName);
            if (container == null) {
                throw new Exception("Container not found.");

            }

            String[] messageElements = message.split(",");
            if (messageElements.length != 2) {
                throw new Exception("The message format is invalid.");
            }

            Row row = container.createRow();
            row.setTimestamp(0, TimestampUtils.parse(messageElements[0]));
            row.setDouble(1, Double.parseDouble(messageElements[1]));
            container.put(row);

            context.getLogger().info("Data transfer to the container " + containerName + " has been completed.");

            container.close();
            store.close();
        } catch (Exception e) {
            context.getLogger().info("error" + e.getMessage());
        }
    }
}
The code above receives CSV data for IoT Hub and registers it in the container "device_temperature." This code needs to be modified to suit your environment. The following is where modification is needed.
| where to modify | what to modify | example |
|---|---|---|
| IoT Hub name | Enter the name of the IoT Hub created. | iot-edge-function-test |
| Notification Provier URL | By referring to the Quick Start Guide, set the connection information. | http://dbaassharegsst.blob.core.windows.net/dbaas-share-griddb-blob/1234567890.json |
| cluster name | By referring to the Quick Start Guide, set the cluster name. | cluster1234 |
| database user name | Specify the database user name created in this document. | test_user1 |
| database user's password | Specify the database user's password created in this document. | test_user1 |
Next, set the IoT Hub connection information. Do not embed the connection information in the code, but set it as an environment variable of the function app from the Azure portal.
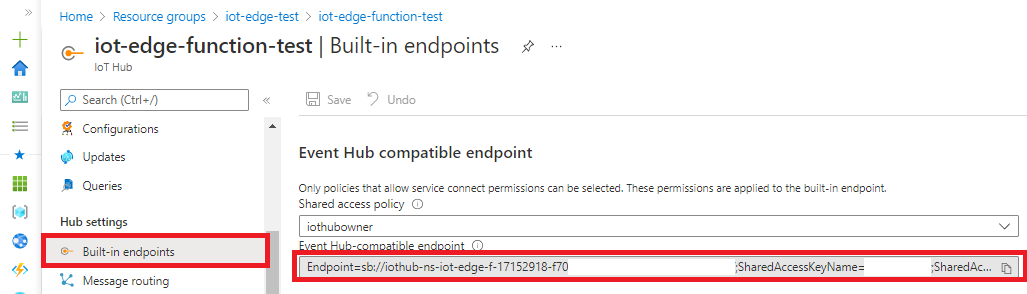
The IoT Hub connection information can be obtained from "Built-in endpoints" of the IoT Hub previously created. Copy the value of "Event Hub compatible endpoint."
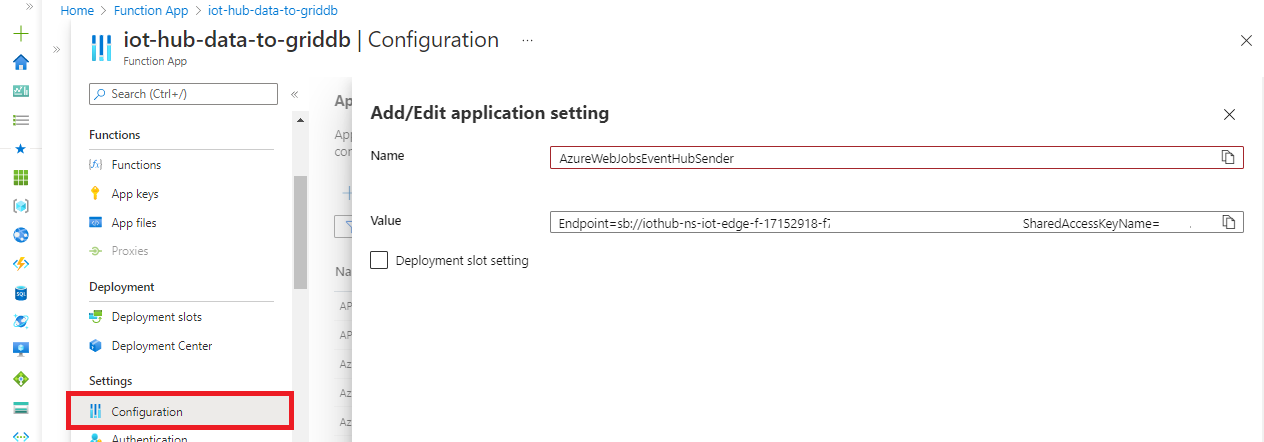
Open the "Configuration" of the function app previously created.Click "Add/Edit application setting" to set the copied value for the name "AzureWebJobsEventHubSender." This setting is automatically assigned to the following parameter.
connection = "AzureWebJobsEventHubSender"
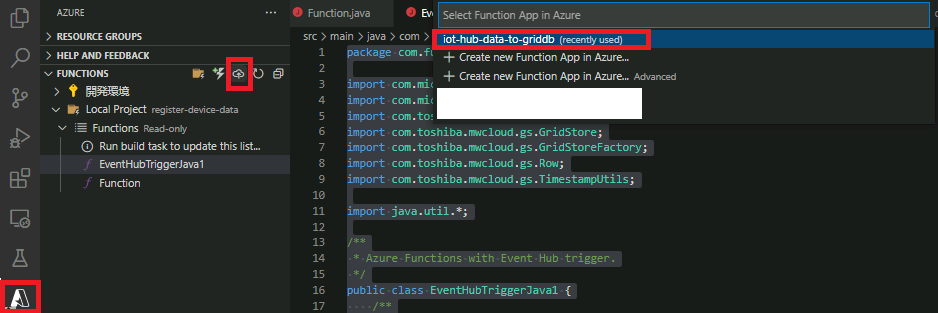
Open the Azure extension for VS Code and deploy "EventHubTriggerJava1." Once the deployment destination is displayed, specify the function app previously created.
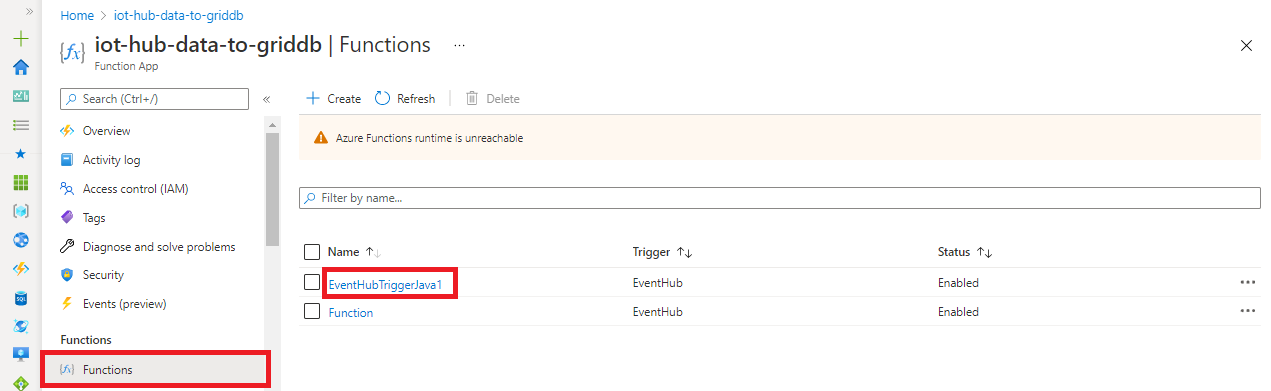
Open the "Functions" of the function app in the Azure portal and confirm that the deployed function exists.
5 Verification of registered data
If all the steps so far have been completed, the data generated by the IoT Edge device is continuously registered in a GridDB container via Azure Functions. This chapter describes how to verify the registered data using the operations management GUI.
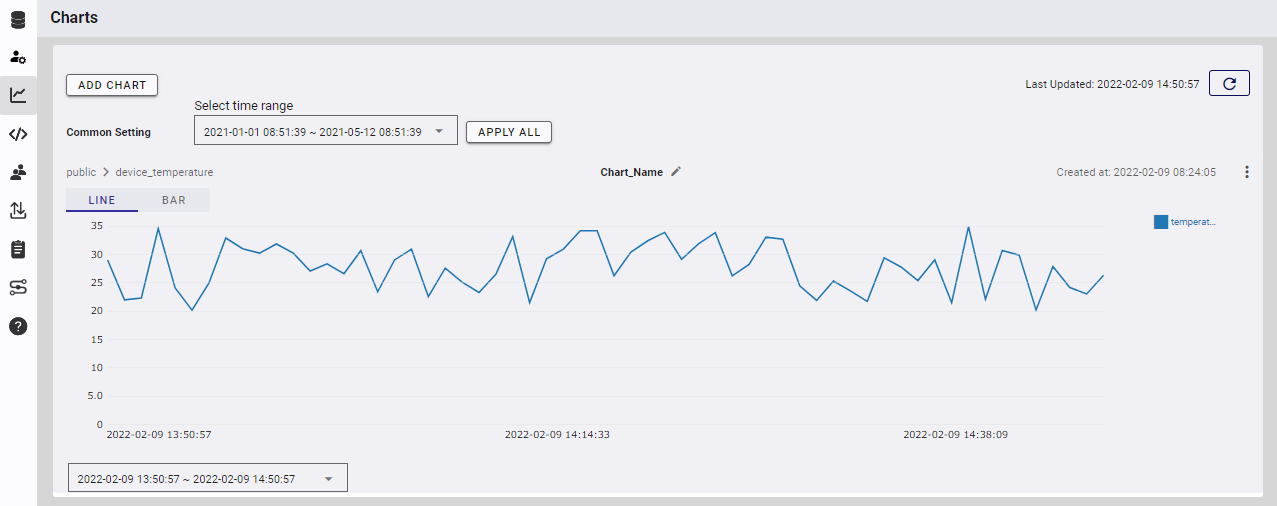
After logging in to the operations management GUI, open the "Charts" page and click "ADD CHART." Once a dialog is displayed, set the following and press "ADD."
| Setting name | Settings |
|---|---|
| Time Range | the past one hour |
| Database | public |
| Container | device_temperature |
| Column | Click the checkbox for "temperature". |

If the setting is successfully applied, the device temperature data is displayed in a chart as shown below.
This ends the description presented in this Guide. Delete the resources created in this document if they are not necessary. Note that the IoT Edge device continues sending data until it stops. Note also that some resources such as IoT Hub and function apps are charged.

