Azure Functions collaboration guide
Revision: 1.4.0-8326-74fbb17a
1 Introduction
1.1 Organization of this document
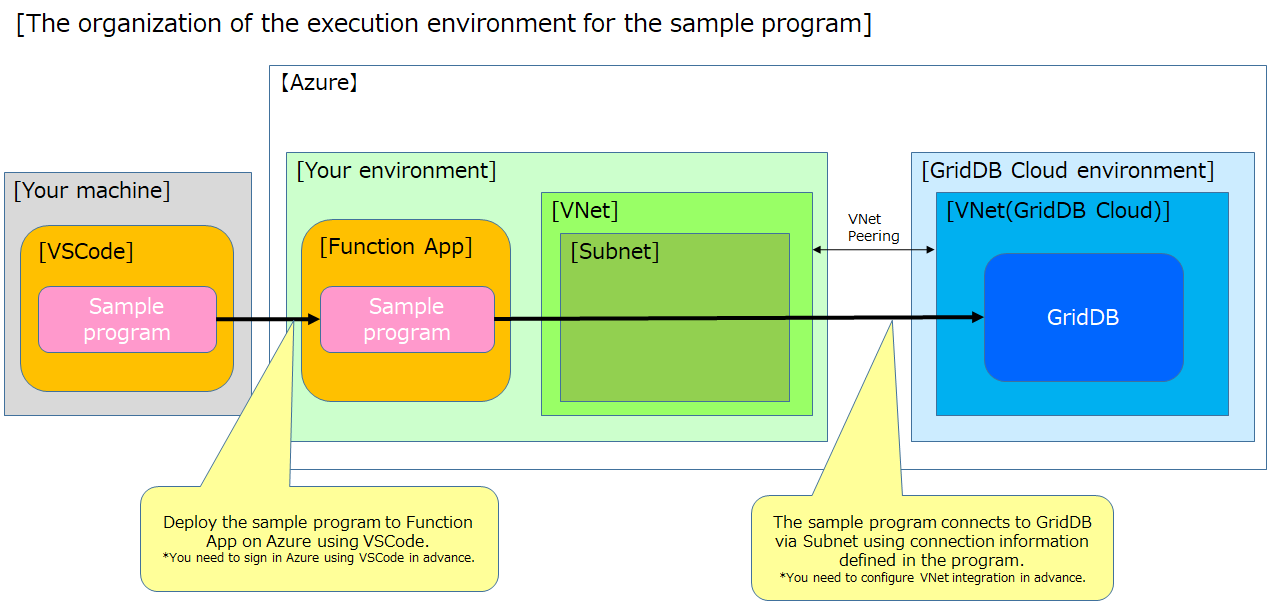
This document describes how to use GridDB Cloud and Azure Functions in combination. The following is a summary of each chapter.
Introduction
Chapter 1 describes the organization of this document and terminology.About Azure Functions
Chapter 2 explains Azure Functions.About the sample program
Chapter 3 introduces a sample program to send GridDB working in GridDB Cloud a request to create a container and register data.Running the sample program
Chapter 4 introduces an example for how to build and run the sample program.Verifying registration data
Chapter 5 introduces how to verify data registered using the sample program with SQL.
1.2 Terminology
The following are a list of terms and their description used in this document.
| Terms | Description |
|---|---|
| Management GUI | a Web application to manage GridDB Cloud. |
| Cluster | one or more nodes that perform data management together in an integrated manner. |
| Node | an individual server process to perform data management in GridDB. |
| Container | a container to manage a set of rows. A container has two data types: collection and timeseries container. |
| Collection | one type of container to manage rows having a general key. |
| Row | one row of data registered in a container or table. |
2 About Azure Functions
2.1 Overview
Azure Functions is a service that Azure provides for running the code created by a user on Azure.
One of the benefits is that it allows users to focus on application development without having to build and maintain a server.
By combining GridDB Cloud and Azure Functions, it is possible to create an application for registering data in GridDB and retrieving data from GridDB.
For details about Azure Functions, see the official Azure documentation.
2.2 Required resources
To use Azure Functions in GridDB Cloud, the following resource settings are required.
Note this document does not include the procedure for preparing each of the resources.
- Azure account Create an account on the official home page for Microsoft Azure.
- Azure Virtual Network (VNet)
After creating an Azure account, create a VNet on the [Virtual networks] screen in the Azure Portal. - Virtual Network peering (peering connection) Set Virtual Network peering using Management GUI by referring to the "GridDB Cloud Management GUI Reference" (GridDB_Cloud_ManagementGui_Reference.html).
- Function application
After creating an Azure account, create a function application on the [Function App] screen in the Azure Portal.
In creating a function application, its plan needs to be specified.
Select one of the following plans to enable the application to communicate with the resources on the virtual network through virtual network integration.- Azure Service plan (for Azure S1 or higher)
- Functions Premium plan (for Azure EP1 or higher)
- Azure Service plan (for Azure S1 or higher)
- VNet integration settings After creating a function application, go to the [Function App] window in the Azure Portal > [Networking] menu for the function application created > [VNet Integration] and set up virtual network integration.
As for the VNet to integrate with, specify the VNet you have prepared.
3 About the sample program
3.1 Overview
As mentioned on the "GridDB Documentation" page (document.html), GridDB supports client APIs for various languages including Java (GridDB_Java_API_Reference.html and C (GridDB_C_API_Reference.html).
Of those APIs, this sample program uses Java API to perform processing.
The following is a flow of processing.
- Set parameters
- Create a connection instance.
- Connect GridDB and Azure Functions and create a container (container name: point01).
- Register a row.
- Return the result of registration processing using the HTTP parameter.
Visual Studio Code (VSCode) is used for building and deploying the sample program.
3.2 Execution environments
The following are the execution environments for the sample program.
Create them in advance on the terminal on which to run the sample program.
- Visual Studio Code (VSCode)
- Extension function: Azure Functions
- Extension function: Java Extension Pack
- Apache Maven 3
- Open JDK 8
- Azure CLI
4 Running the sample program
This chapter describes how to register data from Azure Functions to GridDB Cloud using the sample program.
4.1 Placing the sample program
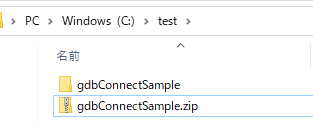
Extract the sample program and place it on the terminal.
The sample program contains a Maven project which means the extracted folder can be imported and edited as a whole.
Save gdbConnectSample.zip to any desired directory and unzip it.
Launch VSCode and select [Open Folder...] under the [File] tab in the menu on the upper left of the window.
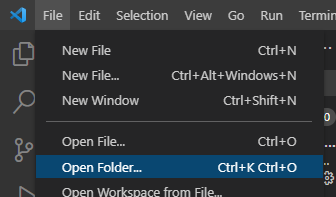
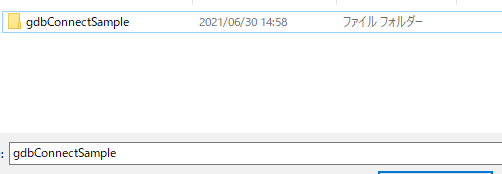
Select the extracted "gdbConnectSample" folder.
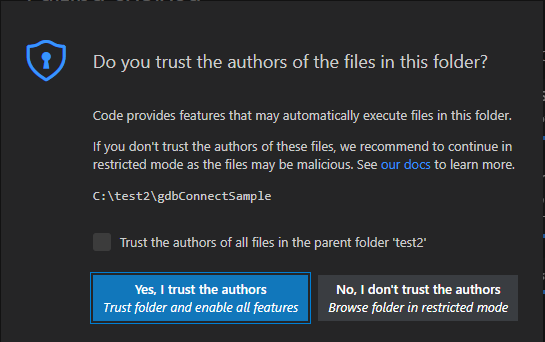
A dialog to confirm whether you trust the authors of the files will appear; select [Yes, I trust the authors].
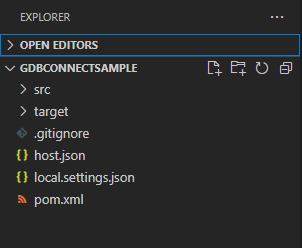
Check that files for the sample program are displayed in VS Code.
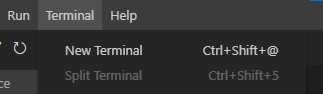
Select [New Terminal] from [Terminal] in the menu on the upper left of the VSCode window.
Run the following command on the terminal launched and get dependent libraries.
mvn dependency:copy-dependencies
If the retrieval of the dependent libraries finishes successfully, the deployment of the sample program is completed.
4.2 Setting the connection information
Set the connection information to the source code for the sample program.
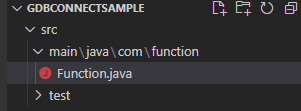
From the sample program displayed in VS Code, select src > main > java > com > function and open Function.java saved under function.
Set the connection information to the variables defined in lines 44 to 48 in Function.java.
| Variable | Description |
|---|---|
| url | URL of the provider file |
| cls | cluster name |
| dbn | database name |
| usr | connection user name |
| pas | connection user password |
For the details about these parameters, see below:
URL of the provider file
Set the URL to save the provider file in which the connection information defined.
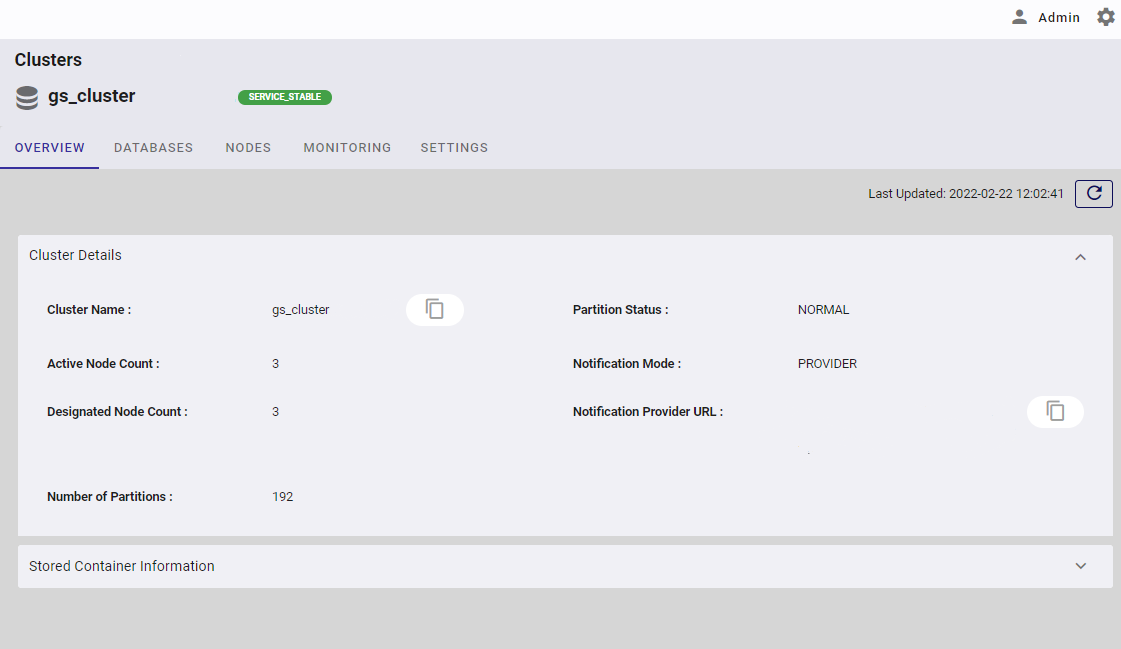
After Set the name of a database to which the sample program is connected.logging in to Management GUI, you can check the URL by referring to [Notification Provider URL] on the [Clusters] screen.
For details, see "4.2. Cluster overview feature" in the "GridDB Cloud Management GUI Reference" (GridDB_Cloud_ManagementGui_Reference.html).Cluster name Set the name of a cluster to which the sample program is connected.
After logging in to Management GUI, you can check the cluster name by referring to [Cluster Name] on the [Clusters] screen.
For details, see "4.2. Cluster overview feature" in the "GridDB Cloud Management GUI Reference" (GridDB_Cloud_ManagementGui_Reference.html).Database name
Set the name of a database to which the sample program is connected.
If a database has not been created, you can create it after logging in to Management GUI and accessing the [DATABASES] tab on [Clusters] screen.
For details, see "4.4.3 Creating a database" in the "GridDB Cloud Management GUI Reference" (GridDB_Cloud_ManagementGui_Reference.html).Connection user name
Set the name of a user used when connecting to the sample program. If a user has not been created, you can create it after logging in to Management GUI and accessing the [GridDB Users] screen.
For details, see "4.13.3 Creating a database user" in the "GridDB Cloud Management GUI Reference" (GridDB_Cloud_ManagementGui_Reference.html).Connection user password
Set a password used when connecting to the sample program.
If a user has not been created, you can create it after logging in to Management GUI and accessing the [GridDB Users] screen.
For details, see "4.13.3 Creating a database user" in the "GridDB Cloud Management GUI Reference" (GridDB_Cloud_ManagementGui_Reference.html).
After completing the settings, press Ctrl+S and save Function.java.
4.3 Signing in to Azure
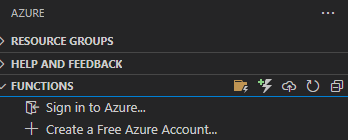
To deploy the sample program to Azure, sign in to Azure in VSCode.
Select [Azure] in the menu on the left of the VSCode window.

Press [Sign in to Azure…] and sign in using the Azure account you have created in advance.
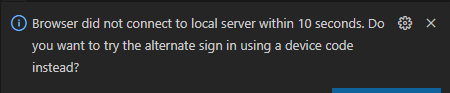
If the following dialog appears, follow the instruction therein and sign in using a device code.
4.4 Building the sample program
Build the sample program.
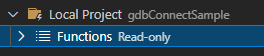
Select [Azure] in the menu on the left of the VSCode window.
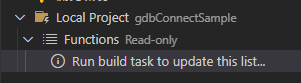
Press [Local Project gdbConnectSample], and press [Functions Read-only] in the expanded menu.
Press [Run build task to update this list] to build the sample program.
Check that the following message appears on the terminal launched.
[INFO] -----------------------
[INFO] BUILD SUCCESS
[INFO] -----------------------
4.5 Deploying the sample program
Deploy the sample program onto Azure.
Select [Azure] in the menu on the left of the VSCode window.
Press the  icon in the [FUNCTONS] menu.
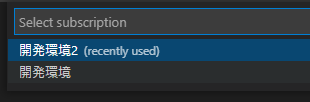
A list of subscriptions to which the sample program is deployed will appear in the upper window. Select a subscription to use.
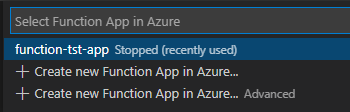
After selecting the subscription, a list of function applications to which the sample program is deployed will appear. Select a function to use. Deployment will start; wait for the processing to complete.
If the following message is displayed, deployment completes.
Note that
Deployment to "<Function application name>" completed.
4.6 Running the sample program
Run the sample program deployed to Azure.
Start a Web browser and enter the following URL in the bar.
Replace
https://<Function application name>.azurewebsites.net/api/gdbConnect?id=point01&temperature=12.345&humidity=54.321
If the following message is displayed on the Web browser, the sample program is successfully executed.
The data has been registered.
5 Verifying registration data
Run the sample program and verify registered data using SQL.
Log in to Management GUI.
To find out how to log in, see "4.1.2 Log-in" in the "GridDB Cloud Management GUI Reference" (GridDB_Cloud_ManagementGui_Reference.html).
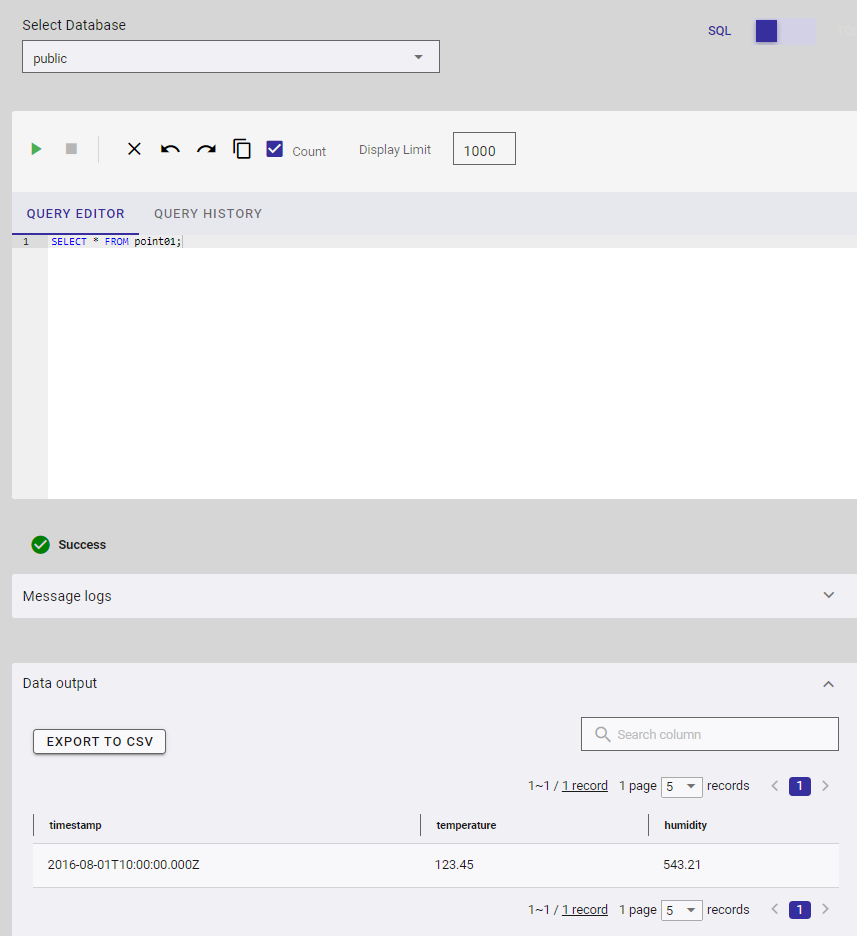
Open the [Query] screen and run the following SQL:
SELECT * FROM point01;
If the data is displayed as an SQL execution result, verification of registration completes.
This completes the execution of the sample program.
As for containers and function applications created while executing the sample program, remove or destroy them as needed.
This manual does not contain a detailed procedure to remove or destroy them.
Removing Virtual Network peering (peering connection) Contact the GridDB Cloud support desk.
Removing VNet integration settings Go to the [Function App] window in the Azure Portal > [Networking} menu for the function application created > {VNet Integration] and remove VNet integration settings.
For details, see the official Azure documentation.Azure resources (including VNet and function applications)
After removing Virtual Network peering (peering connection) and VNet integration settings, remove Azure resources.
For a procedure to remove each resource, see the official Azure documentation.Deleting a database See "4.4.5 Deleting a database" in the "GridDB Cloud Management GUI Reference" (GridDB_Cloud_ManagementGui_Reference.html).
Deleting a container See "4.5.4 Deleting a container" in the "GridDB Cloud Management GUI Reference" (GridDB_Cloud_ManagementGui_Reference.html).
Deleting a connection user
See "4.13.5 Deleting a database user" in the "GridDB Cloud Management GUI Reference" (GridDB_Cloud_ManagementGui_Reference.html).

