GridDB quick start guide
Revision: 4.3.2-9
1 Introduction
1.1 Contents of this manual
This manual explains the outline and simple usage of GridDB to those who use GridDB for the first time, illustrating installation of GridDB in a PC, starting and stopping, and data manipulation.
The contents of each chapter are as follows:
Introduction
This section describes two types of GridDB products, GridDB Standard Edition and GridDB Advanced Edition. Also outlines "nodes and clusters", and "containers and rows" which are the basics of GridDB architecture data model.Installation of GridDB
This section describes the operating procedures to install GridDB in a PC. Follow the procedures below and install GridDB.Starting/stopping
This section explains operations to start/stop GridDB. The operations using operating commands are introduced from among some operational methods of GridDB.Data operation
This section describes simple data manipulations using gs_sh commands for various operations of GridDB, and gs_import commands for importing data. A series of basic operations are explained, including connecting with a cluster, creating a container, data registration, and data search.Executing a sample program
GridDB provides some sample programs to create a container and data registration. Building and executing sample programs are explained.Uninstallation of GridDB
This section describes the uninstallation procedure of GridDB.
1.2 What is GridDB?
GridDB is a database which allows a vast quantity of data to be stored and searched quickly and safely..
There are currently 2 distinct versions of GridDB available.
- GridDB Standard Edition (GridDB SE)
- NoSQL type database products
- GridDB Advanced Edition (GridDB AE)
- NewSQL type database products, that is, GridDB SE plus SQL functions.
GridDB Standard Edition, called GridDB SE henceforth, has the following features:
- High speed data management using in-memory processing.
- Large capacity by scaling out
- High reliability by performing data replication, storing backup data in a physical disk, and using data transaction functions.
- Easy operation by using autonomous management of adding and deleting nodes in a cluster
GridDB Advanced Edition, "called GridDB AE" henceforth, is GridDB SE with the SQL functions. Since GridDB AE includes GridDB SE, it has all the features and functions of GridDB SE. The SQL function is based on SQL92 and JDBC (Java Database Connectivity) and ODBC (Open Database Connectivity) are available, which allows direct access to a database from BI (Business Intelligence) tools or ETL (Extract Transfer Load) tools.
The interfaces available for each product:
| GridDB SE | GridDB AE | |
|---|---|---|
| Java API | ✓ | ✓ |
| C API | ✓ | ✓ |
| JDBC | - | ✓ |
| ODBC | - | ✓ |
1.3 Structure of GridDB
This chapter explains "A node and a cluster", and "a container and a row" which are the basics of GridDB architecture data model.
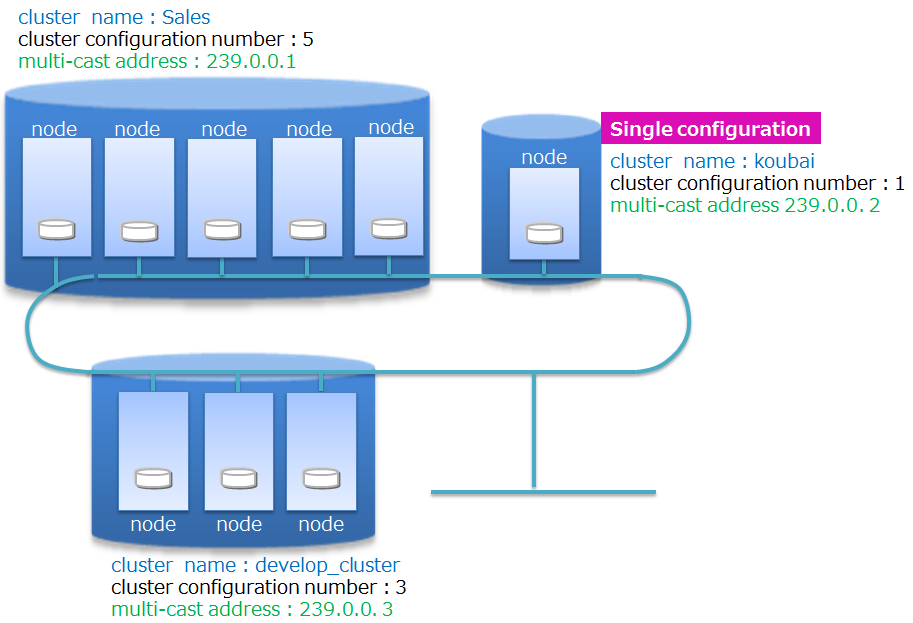
1.3.1 A node and a cluster
A "node" refers to a server process to perform data management in GridDB. Only one node can operate in one machine.
GridDB is operated in "clusters" which are composed of multiple nodes. To access a database from an application, the nodes have to be started up and the cluster service has to be initiated.
Cluster service is started when the number of nodes joining the cluster becomes the same as the number of nodes constituting a cluster. Cluster service will not be started and access to the database from the application will not be possible until all the nodes constituting a cluster have joined the cluster.
A cluster needs to be composed even when operating with only one node. In this case, the number of nodes constituting a cluster is one and is called "Single configuration". A cluster needs a "cluster name"so that it can be identified even if multiple clusters exist on the network. Using this "cluster name", a node or an application identifies the cluster.
1.3.2 Data model - what is a container and a row -
GridDB uses a unique key container type data model, which is extended from a key value type, a typical data model of NoSQL. It has the following features:
- A concept resembling a RDB table, named "container", has been introduced to manage data.
- A schema to define the data type for the container can be set. An index can be set in a column.
- Guarantees the ACID characteristic of data for each container.
Container
A container of data of two types: a collection and a timeseries container.
- Collection
- The container for managing general data
- Timeseries container
- The container for managing time series data
Be sure to create a container before registering data using an application.
- Collection
Row
A row refers to a row of data to be registered in a container. Multiple rows are registered in a container.
1.4 Explanation of terms
Explanation of terms used in this manual.
| Terms | Meaning |
|---|---|
| Node | A server process to perform data management in GridDB. |
| Cluster | Refers to a single or a set of multiple nodes to perform data management together. |
| Container | A container to manage a set of rows. There are two types: collections and time series containers. |
| Collection | A type of container that manages rows containing general key. |
| Timeseries container | A type of container that manages rows containing time-series key. It has a special function to handle time-series data. |
| Row | A chunk of data managed in GridDB, which consists of a key and multiple values. |
2 Installation of GridDB
Install and use GridDB in the following way:
- Checking before installation
- Installation of GridDB
- Environmental settings
2.1 Checking before installation
Checks that the OS of the machine to install GridDB is in the group of OSs guarantee by GridDB, that is, the OS should be RHEL or CentOS and the version should be the ones listed in the release note.
[Example] Checking OS version
$ cat /etc/redhat-release
CentOS Linux release 7.2.1511 (Core)
[Memo]
- At least "Basic Server" needs to have been chosen while specifying OS package group during the OS installation.
2.2 Installation of GridDB
2.2.1 Installation of a package.
Install the RPM packages of GridDB, which include the following types, including a server, an operation tool, a library,.
| Type | Package name | File name | Description |
|---|---|---|---|
| Server | griddb-xx-server | griddb-xx-server-X.X.X-linux.x86_64.rpm | The start commands of a node and other node modules are included. |
| Operation tool | griddb-xx-client | griddb-xx-client-X.X.X-linux.x86_64.rpm | Operating tools except for start node are included. |
| Operation tool/application development library | griddb-xx-java_lib | griddb-xx-java_lib-X.X.X-linux.x86_64.rpm | Java library is included. |
| Application development library | griddb-xx-c_lib | griddb-xx-c_lib-X.X.X-linux.x86_64.rpm | C header file and library are included. (Install these if needed) |
| Operation tool/application development library | griddb-xx-newsql | griddb-xx-newsql-X.X.X-linux.x86_64.rpm | NewSQL interface library (Java, C) is included. (AE version only) |
*: xx is the GridDB edition (se, ae, ve)
*: X.X.X is the GridDB version
[Memo]
- The application development library provides the package of programming languages other than C and Java. Install them if needed.
Place the RPM packages in any directory in the machine to install GridDB. Install the packages using the rpm command as a root user. Install the server package "griddb-xx-server" first.
[Example]
# rpm -Uvh griddb-xx-server-X.X.X-linux.x86_64.rpm
Preparing...                ########################################### [100%]
User gsadm and group gridstore have been registered.
GridDB uses new user and group.
   1:griddb-xx-server          ########################################### [100%]
#
# rpm -Uvh griddb-xx-client-X.X.X-linux.x86_64.rpm
Preparing...                ########################################### [100%]
User and group has already been registered correctly.
GridDB uses existing user and group.
   1:griddb-xx-client          ########################################### [100%]
#
# rpm -Uvh griddb-xx-java_lib-X.X.X-linux.x86_64.rpm
Preparing...                ########################################### [100%]
   1:griddb-xx-java_lib        ########################################### [100%]
#
# rpm -Uvh griddb-xx-c_lib-X.X.X-linux.x86_64.rpm
Preparing...                ########################################### [100%]
   1:griddb-xx-c_lib           ########################################### [100%]
#
# rpm -Uvh griddb-xx-newsql-X.X.X-linux.x86_64.rpm
Preparing...                ########################################### [100%]
   1:griddb-xx-newsql          ########################################### [100%]
2.2.2 Users and the directory hierarchy after installation
The following user and directories are created after the installation.
User
OS Group gridstore and a user gsadm are created. Use the user gsadm as the operator of GridDB.
| User | Group | // GridDB home directory path |
|---|---|---|
| gsadm | gridstore | /var/lib/gridstore |
The following environment variables are defined for this gsadm user.
| Environment variables | Value | Meaning |
|---|---|---|
| GS_HOME | /var/lib/gridstore | User gsadm/GridDB home directory |
| GS_LOG | /var/lib/gridstore/log | The output directory of the event log file of a node |
Directory hierarchy
The following two directories are created: GridDB home directory which contains files such as a node definition file and database files, the installation directory which contains the installed files.
GridDB home directory
/var/lib/gridstore/                      # GridDB home directory
                   admin/                # gs_admin home directory
                   archive/              # Long term archive tools directory
                   backup/               # Backup directory
                   conf/                 # Definition files directory
                        gs_cluster.json  # Cluster definition file
                        gs_node.json     # Node definition file
                        password         # User definition file
                   data/                 # Database file directory
                   expimp/               # Export/Import tools directory
                   log/                  # Log directory
                   webapi/               # Web API directory
Installation directory
/usr/griddb/                            # Installation directory
            Readme.txt
            bin/                        # Operating command, module directory
            conf/                       # Sample definition file directory
                 gs_cluster.json.tmpl   # Cluster definition file sample
                 gs_cluster.json.tmpl   # Node definition file sample
                 password.tmpl          # User definition file sample
            etc/
            lib/                        # Library directory
            license/                    # License directory
            prop/                       # Configuration file directory
            sample/                     # Sample program
            web/                        # Integrated operational management GUI file directory
[Memo]
- When a node is started or a tool is executed, a database file or a log file will be created under the following directories.
/var/lib/gridstore/data                # Database file directory
/var/lib/gridstore/log                 # Log directory
2.3 Environmental settings
2.3.1 Network settings
GridDB uses multicast communication to constitute a cluster. Set the network to enable multicast communication.
First, check the host name and an IP address. Execute "hostname -i" command to check the settings of an IP address of the host. When the IP address of the machine is displayed as in the following example, the network setting is already done, so skip the procedures in this section.
- [Example]
$ hostname -i
192.168.11.10
When the following message or the loopback addresses 127.0.0.1 is displayed, the setting has not been configured. Follow the following procedures from 1 to 3.
- [Example]
or$ hostname -i hostname: no IP address was found for this hostname.$ hostname -i 127.0.0.1
Network settings
- Check the host name and OS IP address.
Check the host name.
[Example]
$ hostname
MY_HOST
Check the IP address.
[Example]
$ ip -f inet -o addr show eth0 | cut -d' ' -f 7 | cut -d/ -f 1
192.168.11.10
- Assign the hostname to the IP address.
Add the host name and IP address, which were checked in the procedure 1, to the /etc/hosts file as a root user.
[Example of description in the file]
192.168.11.10 MY_HOST
- Check the setting.
Execute "hostname -i" command to check the settings of an IP address of the host. Check that the IP address specified in the procedure 2 is displayed.
[Example]
$ hostname -i
192.168.11.10
2.3.2 Setting parameters of a node
To operate GridDB after installation, initial setting of parameters, such as addresses and the cluster name, is required. In this manual, only "Cluster name", an essential item, is set and for other items default values are used.
Describe "Cluster name" of a cluster in the cluster definition file. A cluster definition file is "/var/lib/gridstore/conf/gs_cluster.json."
Write the cluster name after ":" of ""clusterName":""" as "myCluster", the example used in this manual.
[Example of description in the file]
{
        "dataStore":{
                "partitionNum":128,
                "storeBlockSize":"64KB"
        },
        "cluster":{
                "clusterName":"myCluster",
                "replicationNum":2,
....
[Memo]
- Using a cluster name, which is unique on the sub network is recommended.
- A cluster name must be composed of one or more ASCII alphanumeric characters or the underscore "_". A number is not accepted as the first character of the name. The name is also not case-sensitive. The maximum length of the name must be 64 characters.
2.3.3 Explanation of terms
Except for network settings and the cluster name, GridDB can operate with the default setting values. The main setting items are shown below. Use the values below when executing the tools in the following sections.
| Setting items | Value |
|---|---|
| IP address | The IP address displayed when executing "hostname -i" command |
| Cluster name | myCluster |
| Multicast address | 239.0.0.1 (Default value) |
| Multicast port number | 31999 (Default value) |
| User name | admin (Default value) |
| User password | admin (Default value) |
| SQL multicast address (AE only) | 239.0.0.1 (Default value) |
| SQL multicast port number (AE only) | 41999 (Default value) |
2.3.4 Initial setting of operation tools
Some operation tools require initial settings. Initial settings of gs_sh and gs_import, used for data manipulation, are explained in this section. (When not using these tools, skip this section.)
2.3.4.1 Setting gs_sh command
gs_sh is a command line interface of GridDB for cluster operation or data manipulation. It provides functions for batch operations on cluster nodes, data manipulation functions, including creating a container, TQL search and SQL search.
Set the connection information to a cluster in the configuration file of gs_sh "/var/lib/gridstore/.gsshrc" before using a gs_sh command.
Use a setcluster subcommand and a setuser subcommand to define the connection destination address of a cluster, or the user name that are used for the connection. Specify the default values except for the cluster variables and the cluster name. Describe "/var/lib/gridstore/.gsshrc" file as follows.
[Example of description in the file]
setcluster cluster myCluster 239.0.0.1 31999
setuser admin admin
Cluster information definition subcommand
- setcluster <Cluster variable> <Cluster name> <Multicast address> <Port no.>
- Cluster variable: cluster
- Cluster name: myCluster
- Multicast address: 239.0.0.1 (Default value)
- Multicast port number: 31999 (Default value)
- setcluster <Cluster variable> <Cluster name> <Multicast address> <Port no.>
User information definition subcommand
- setuser <User name> <Password>
- User name: admin (Default value)
- Password: admin (Default value)
- setuser <User name> <Password>
For GridDB AE, also define the information about the connection destination of SQL. Specify the default values except for the cluster variables and the cluster name. Describe the file as follows.
[Example of description in the file]
setcluster cluster myCluster 239.0.0.1 31999
setclustersql cluster myCluster 239.0.0.1 41999
setuser admin admin
- Cluster information (SQL) definition subcommand
- setclustersql <Cluster variable> <Cluster name> <SQL address> <SQL port no.>
- Cluster variable: cluster
- Cluster name: myCluster
- SQL address: 239.0.0.1 (Default value)
- SQL port number: 41999 (Default value)
- setclustersql <Cluster variable> <Cluster name> <SQL address> <SQL port no.>
2.3.4.2 Setting gs_import command
gs_import is a command for importing data to a container.
Describe information, such as cluster address, in a property file in advance. The property file is "/var/lib/gridstore/expimp/conf/gs_expimp.properties."
Describe the cluster name ("myCluster" in this manual) right next to "clusterName=" in the property file.
[Example of description in the file]
clusterName=myCluster
mode=MULTICAST
hostAddress=239.0.0.1
hostPort=31999
...
3 Starting/stopping
Start/stop a GridDB node and a cluster. Starting/stopping operations using operating commands are introduced from among some operational methods of GridDB.
A list of operating commands
| Command | Function |
|---|---|
| gs_startnode | Starting a node |
| gs_joincluster | Add a node to a cluster. |
| gs_leavecluster | Detach a node from a cluster |
| gs_stopcluster | Stopping a cluster |
| gs_stopnode | Stop a node (shutdown) |
| gs_stat | Get node internal data |
[Points to note]
- Execute the operating command as a gsadm user.
- Example
# su - gsadm
$ pwd
/var/lib/gridstore
- Example
- If a proxy variable (http_proxy) has been set up, set the node address(es) in no_proxy and exclude it/them from the proxy target. Otherwise, since the operating command uses REST/http communications, it will connect to the proxy server and will fail to operate.
- Example of setting
$ export no_proxy=localhost,127.0.0.1,192.168.10.11,192.168.10.12,192.168.10.13
- Example of setting
3.1 Starting operations
The normal starting procedures of GridDB, after the installation and setting up, is as follows.
- Starting a node
- Starting a cluster
As explained in "a node and a cluster" section, GridDB cluster is formed when the number of nodes specified by the user joins the cluster and then the cluster service is started. Cluster service will not be started and access to the cluster from the application will not be possible until all the nodes constituting a cluster have joined the cluster.
The example in this manual is "single configuration" using one node. Start up a node, add the node to a cluster and then start the cluster.
3.1.1 Starting a node
Use the following command to start a node.
A gs_startnode -u <user name>/<password> -w
- Specify the user name and the password of admin, the management user, along with the user authentication option -u, and specify -w option to wait wait for the node to start.
[Example]
$ gs_startnode -u admin/admin -w
3.1.2 Starting a cluster
Execute a command to join the cluster at each node and start the cluster. Use the following command to start the cluster.
gs_joincluster -u <user name>/<password> -w -c <cluster name>
- Specify the user name and password of admin, the management user, along with the user authentication option -u, and specify -w option to wait until the starting up of the cluster. Specify a cluster name with -c option.
[Example]
$ gs_joincluster -u admin/admin –w -c myCluster
After starting the cluster, check the cluster status. Use the following command to check the state.
gs_stat -u <user name>/<password>
- Specify the user name and the password of admin, the management user, with the user authentication option -u. To check the status of a cluster, extract the lines including "Status" using grep command.
[Example]
$ gs_stat -u admin/admin | grep Status
        "clusterStatus": "MASTER",
        "nodeStatus": "ACTIVE",
        "partitionStatus": "NORMAL"
If the three status displayed by "gs_stat" command are the ones in the above example, the cluster has started normally. The cluster has becme accessible from an application.
3.2 Stopping operations
3.2.1 Basic flow
The stopping procedures of GridDB is as follows.
- Stopping a cluster
- Stopping a node
Contrary to the startup procedures, stop the cluster first and then stop the each node. When the cluster is stopped, it becomes inaccessible from the applications.
3.2.2 Stopping a cluster
Execute the following cluster stop command. When the cluster stop command is executed, the cluster becomes inaccessible from the applications.
gs_stopcluster -u <user name>/<password> -w
- Specify the user name and the password of admin, the management user, along with the user authentication option -u, and specify -w option to wait until the cluster has stopped.
[Example]
$ gs_stopcluster -u admin/admin -w
3.2.3 Stopping a node
Execute the node stop command to stop, or shutdown, a node. Be sure to stop the cluster before stopping a node.
gs_stopnode -u <user name>/<password> -w
- Specify the user name and the password of admin, the management user, along with the user authentication option -u, and specify -w option to wait until the node is stopped.
[Example]
$ gs_stopnode -u admin/admin -w
4 Data operation
This chapter explains how to manipulate GridDB data. The following basic operations using gs_sh commands and a gs_import command will be explained.
- Connecting to a cluster (using a gs_sh command)
- Creating a container (using a gs_sh command)
- Registering a row (using a gs_import command)
- Executing a TQL search (using a gs_import command)
- Executing a SQL search (using a gs_import command) (AE version only)
4.1 Connecting to a cluster
Connect to a cluster using a gs_sh command. When gs_sh is started, "gs>" prompt will be displayed in a state waiting for the input of a subcommand. To connect to a cluster, use a subcommand "connect."
- Subcommand to connect
- connect <cluster variable>
- The first argument: $cluster, the cluster variable defined using setcluster command
- connect <cluster variable>
[Example]
$ gs_sh
gs>
gs> connect $cluster
The connection attempt was successful (NoSQL)
gs[public]>
4.2 Creating a container
4.2.1 What is a container
As explained in "Data model - what is a container and a row -", GridDB manages data using a "container", which contains data. A container has a definition of schemas, such as columns and data types. Be sure to create a container before registering data using an application.
Container type
- There are two types of containers. Use the one which serves the purpose.
- Collection: The container for managing general data
- Timeseries container: The container for managing time series data
- There are two types of containers. Use the one which serves the purpose.
Column data type
- The types of column data types are as follows.
Basic data types
- Boolean type (BOOL)
- Character string (STRING)
- Integer type
- BYTE
- SHORT
- INTEGER
- LONG
- Floating point type
- FLOAT
- DOUBLE
- Time type (TIMESTAMP)
- Spatial type (GEOMETRY)
- BLOB
HYBRID
- Array type
- An array of boolean type, character string type, integer type, floating point type, time type
- Array type
- The types of column data types are as follows.
4.2.2 Creating a container
Create a container of the type "collection" with the columns "id" (integer type) and "value" (string type).
Collection creation subcommand
- createcollection <container name> <column name> <column type> [<column name> <column type> ...]
[Example] Execute a subcommand "createcollection" to create a container with the container name "mycollection", columns "id" (integer type) and "value" (string type).
gs[public]> createcollection mycollection id integer value stringContainer list display subcommand
- showcontainer
[Example] Execute the subcommand "showcontainer" and check the created container.
gs[public]> showcontainer
Database : public
Name               Type            PartitionId
----------------------------------------------------------------
mycollection         COLLECTION           59

Total Count: 1
4.3 Registering a row
"Row" refers to a row of data registered in a container or table. Import sample data and register a row. Unzip and import the sample data.
[Example]
$ cd /usr/griddb/sample/ja/data/
$ unzip impSample.zip
Import the data in impSample/collection.
[Example]
$ cd impSample/collection
$ gs_import -u admin/admin --all
Start importing
Number of target containers: 1

public.c001: 5

The number of target containers: 1 (Success :1 Failure : 0)
Importing terminated
4.4 Executing a TQL search
Execute a TQL search on a container and display the result. Execute a TQL search using the subcommands "tql" and "get" of gs_sh command.
- tql: Search the row of a container with a TQL query.
- get: Display the result of TQL.
Search the container named "c001."
Execute the search after connecting to the cluster. First, execute the subcommand "tql" and execute a TQL search on a container "c001".
TQL execution subcommand
- tql <container name> <query>;
[Example]
gs[public]> tql c001 select * where count > 20;
3 results.  (26 ms)
Next, execute the subcommand "get" and display the result.
The subcommand to get the TQL execution result
- get
[Example]
gs[public]> get
name,status,count
tokyo,false,100
iwate,false,30
akita,false,45
The 3 results had been acquired.
4.5 Executing an SQL search (AE version only)
Execute an SQL search no a table and display the result. Execute an SQL search using the subcommands "sql" and "get" of a gs_sh command.
- sql: Search NewSQL data (a table and a time series table) using an SQL query.
- get: Display the result of SQL (unnecessary, when displaying all the search results).
Search the container named "c001." Execute the search after connecting to the cluster. Execute the subcommand "sql" and execute an SQL search on a container "c001".
SQL execution subcommand
- sql <SQL query>;
[Example]
gs[public]> sql select * from c001 where count > 20 and count < 80;
2 results.  (179 ms)
Next, execute the subcommand "get" and display the result.
The subcommand to get the SQL execution result
- get
[Example]
gs[public]> get
name,status,count
iwate,false,30
akita,false,45
The 2 results had been acquired.
5 Executing a sample program
Sample programs using Java API and JDBC are available. Building and executing sample programs are explained.
The sample programs are in /usr/griddb/sample.
5.1 Execution of a sample program using Java API
The following package needs to be installed to run the sample program using Java API.
- Application development library (Java) package: griddb-xx-java_lib
A sample program is in the following directory.
/usr/griddb/sample/ja/java
Specify the following libraries in the environment variable CLASSPATH to compile and execute the sample program.
(/usr/share/java/gridstore.jar)
[Example]
Compile and run the program.
$ export CLASSPATH=${CLASSPATH}:/usr/share/java/gridstore.jar:.
$ javac TQLSelect.java
$ java TQLSelect
Sample program "TQLSelect.java" is a program to execute the following processes.
- Connecting to a cluster
- Creating a container
- Registering a row
- Executing a TQL search
import java.util.ArrayList;
import java.util.List;
import java.util.Properties;

import com.toshiba.mwcloud.gs.Collection;
import com.toshiba.mwcloud.gs.ColumnInfo;
import com.toshiba.mwcloud.gs.Container;
import com.toshiba.mwcloud.gs.ContainerInfo;
import com.toshiba.mwcloud.gs.GSType;
import com.toshiba.mwcloud.gs.GridStore;
import com.toshiba.mwcloud.gs.GridStoreFactory;
import com.toshiba.mwcloud.gs.Query;
import com.toshiba.mwcloud.gs.Row;
import com.toshiba.mwcloud.gs.RowSet;

public class TQLSelect {

    public static void main(String[] args){
        try {
            //===============================================
            // Connecting to a cluster
            //===============================================
            // Specifying connection information (Multicast method)
            Properties prop = new Properties();
            prop.setProperty("notificationAddress", "239.0.0.1");
            prop.setProperty("notificationPort", "31999");
            prop.setProperty("clusterName", "myCluster");
            prop.setProperty("database", "public");
            prop.setProperty("user", "admin");
            prop.setProperty("password", "admin");
            prop.setProperty("applicationName", "SampleJava");

            // Generating a GridStore object
            GridStore store = GridStoreFactory.getInstance().getGridStore(prop);
            // Connecting to a cluster when a container is creted or acquired.
            store.getContainer("dummyContainer");

            //===============================================
            // Creating a container
            //===============================================
            String containerName = "SampleJava_TQLSelect";
            createContainerPutRow(store, containerName);

            //===============================================
            // Executing a TQL search
            //===============================================
            // (1) Getting a Container object
            Container<?, Row> container = store.getContainer(containerName);
            if ( container == null ){
                throw new Exception("Container not found.");
            }

            // (2) Executing a TQL query
            Query<Row> query = container.query("SELECT * WHERE count >= 50 ORDER BY id");
            RowSet<Row> rs = query.fetch();

            // (3) Acquiring a result in a row
            while ( rs.hasNext() ) {
                Row row = rs.next();
                int id = row.getInteger(0);
                String name = row.getString(1);
                int count = row.getInteger(2);
                System.out.println("row id=" + id + ", name=" + name + ", count=" + count);
            }

            //===============================================
            // Terminating process
            //===============================================
            rs.close();
            query.close();
            container.close();
            store.close();
            System.out.println("success!");

        } catch ( Exception e ){
            e.printStackTrace();
        }
    }

    private static void createContainerPutRow(GridStore store, String containerName) throws Exception {
        // Creating a container
        ContainerInfo containerInfo = new ContainerInfo();
        List<ColumnInfo> columnList = new ArrayList<ColumnInfo>();
        columnList.add(new ColumnInfo("id", GSType.INTEGER));
        columnList.add(new ColumnInfo("productName", GSType.STRING));
        columnList.add(new ColumnInfo("count", GSType.INTEGER));
        containerInfo.setColumnInfoList(columnList);
        containerInfo.setRowKeyAssigned(true);

        Collection<Void, Row> collection = store.putCollection(containerName, containerInfo, false);
        System.out.println("Create Collection name=" + containerName);


        // Registering a row
        String[] nameList = {"notebook PC", "desktop PC", "keyboard", "mouse", "printer"};
        int[] numberList = {108, 72, 25, 45, 62};

        List<Row> rowList = new ArrayList<Row>();
        for ( int i = 0; i < nameList.length; i++ ){
            Row row = collection.createRow();
            row.setInteger(0, i);
            row.setString(1, nameList[i]);
            row.setInteger(2, numberList[i]);
            rowList.add(row);
        }
        collection.put(rowList);
    }
}
5.2 Execution of a sample program using C API
The following package needs to be installed to run the sample program using C API.
- Application development library (C) package: griddb-xx-c_lib
A sample program is in the following directory.
/usr/griddb/sample/ja/c
Specify the following libraries in the environment variable LD_LIBRARY_PATH to compile and execute the sample program.
/usr/lib64
[Example]
Compile and run the program.
$ export LD_LIBRARY_PATH=${LD_LIBRARY_PATH}:/usr/lib64
$ gcc -lgridstore -o TQLSelect TQLSelect.c
$ ./TQLSelect
Sample program "TQLSelect.c" is a program to execute the following processes.
- Connecting to a cluster
- Creating a container
- Registering a row
- Executing a TQL search
#include "gridstore.h"
#include <stdlib.h>
#include <stdio.h>


void main(int argc, char *argv[]){

    /* constant */
    // container name
    const GSChar * containerName = "SampleC_TQLSelect";

    // Row data to register (number of rows in a container: 5)
    const int rowCount = 5;
    const GSChar * nameList[5] = {"notebook PC", "desktop PC", "keyboard", "mouse", "printer"};
    const int numberList[5] = {108, 72, 25, 45, 62};

    // TQL query
    const GSChar * queryStr = "SELECT * WHERE count >= 50 ORDER BY id";


    /* variable */
    GSGridStore *store = NULL;
    GSContainer *container;
    GSResult ret;
    int i;
    int j;

    // For creating a container
    GSContainerInfo info0 = GS_CONTAINER_INFO_INITIALIZER;
    GSColumnInfo columnInfo = GS_COLUMN_INFO_INITIALIZER;
    GSColumnInfo columnInfoList[3]; // The number of columns: 3

    // For Row registration
    GSRow *row;
    GSRow * rowList[5];
    const void * const * rowObj;

    // For error processing
    size_t stackSize;
    GSResult errorCode;
    GSChar errMsgBuf1[1024], errMsgBuf2[1024];  // The buffer to store error messages

    // For executing a query
    GSQuery *query;
    GSRowSet *rs;
    GSBool exist;


    //===============================================
    // Connecting to a cluster
    //===============================================
    // Specifying connection information (Multicast method)
    const GSPropertyEntry props[] = {
        { "notificationAddress", "239.0.0.1" },
        { "notificationPort", "31999" },
        { "clusterName", "myCluster" },
        { "database", "public" },
        { "user", "admin" },
        { "password", "admin" },
        { "applicationName", "SampleC" }
    };
    const size_t propCount = sizeof(props) / sizeof(*props);

    // Getting a GridStore instance
    ret = gsGetGridStore(gsGetDefaultFactory(), props, propCount, &store);
    if ( !GS_SUCCEEDED(ret) ){
        fprintf(stderr, "ERROR gsGetGridStore\n");
        goto LABEL_ERROR;
    }
    // Connecting to a cluster after a container is creted or acquired
    ret = gsGetContainerGeneral(store, "containerName", &container);
    if ( !GS_SUCCEEDED(ret) ){
        fprintf(stderr, "ERROR gsGetContainerGeneral\n");
        goto LABEL_ERROR;
    }
    gsCloseContainer(&container, GS_TRUE);
    printf("Connect to Cluster\n");


    //===============================================
    // Data preparation (creating a container creation & registering rows)
    //===============================================
    {
        // Setting up container information
        info0.type = GS_CONTAINER_COLLECTION;
        info0.rowKeyAssigned = GS_TRUE;

        columnInfo.name = "id";
        columnInfo.type = GS_TYPE_INTEGER;
        columnInfoList[0] = columnInfo;

        columnInfo.name = "productName";
        columnInfo.type = GS_TYPE_STRING;
        columnInfoList[1] = columnInfo;

        columnInfo.name = "count";
        columnInfo.type = GS_TYPE_INTEGER;
        columnInfoList[2] = columnInfo;

        info0.columnCount = sizeof(columnInfoList) / sizeof(*columnInfoList);
        info0.columnInfoList = columnInfoList;

        // Creating a collection
        ret = gsPutContainerGeneral(store, containerName, &info0, GS_FALSE, &container);
        if ( !GS_SUCCEEDED(ret) ){
            fprintf(stderr, "ERROR gsPutCollectionGeneral\n");
            goto LABEL_ERROR;
        }
        printf("Sample data generation: Create Collection name=%s\n", containerName);

        for ( i = 0; i < rowCount; i++ ){
            // Generating an empty row object
            gsCreateRowByContainer(container, &row);

            // Setting values to the row object
            gsSetRowFieldByInteger(row, 0, i);
            gsSetRowFieldByString(row, 1, nameList[i]);
            gsSetRowFieldByInteger(row, 2, numberList[i]);

            rowList[i] = row;
        }
        rowObj = (void *)rowList;

        // Registering multiple rows
        ret = gsPutMultipleRows(container, rowObj, rowCount, NULL);
        if ( !GS_SUCCEEDED(ret) ){
            fprintf(stderr, "ERROR gsPutMultipleRows\n");
            goto LABEL_ERROR;
        }
        printf("Sample data generation: Put Rows count=%d\n", rowCount);

        gsCloseContainer(&container, GS_TRUE);
    }


    //===============================================
    // Executing a TQL search
    //===============================================
    // (1) Getting a container
    ret = gsGetContainerGeneral(store, containerName, &container);
    if ( !GS_SUCCEEDED(ret) ){
        fprintf(stderr, "ERROR gsGetContainerGeneral\n");
        goto LABEL_ERROR;
    }
    if ( container == NULL ){
        fprintf(stderr, "ERROR Container not found. name=%s\n", containerName);
        goto LABEL_ERROR;
    }

    // (2) Executing a TQL search
    printf("TQL query : %s\n", queryStr);
    ret = gsQuery(container, queryStr, &query);
    if ( !GS_SUCCEEDED(ret) ){
        fprintf(stderr, "ERROR gsQuery\n");
        goto LABEL_ERROR;
    }
    ret = gsFetch(query, GS_FALSE, &rs);
    if ( !GS_SUCCEEDED(ret) ){
        fprintf(stderr, "ERROR gsFetch\n");
        goto LABEL_ERROR;
    }

    // (3) Creatning an empty row
    gsCreateRowByContainer(container, &row);

    // (4) Getting a result
    while (gsHasNextRow(rs)) {
        int id;
        const GSChar *productName;
        int count;


        // (5) Getting a row
        ret = gsGetNextRow(rs, row);
        if ( !GS_SUCCEEDED(ret) ){
            fprintf(stderr, "ERROR gsGetNextRow\n");
            goto LABEL_ERROR;
        }

        gsGetRowFieldAsInteger(row, 0, &id);
        gsGetRowFieldAsString(row, 1, &productName);
        gsGetRowFieldAsInteger(row, 2, &count);

        printf("TQL result: id=%d, productName=%s, count=%d\n", id, productName, count);
    }


    //===============================================
    // Terminating process
    //===============================================
    // Releasing resources
    gsCloseGridStore(&store, GS_TRUE);
    printf("success!\n");
    return;


LABEL_ERROR:
    //===============================================
    // Error processing
    //===============================================
    // Outputting error codes and error messages
    stackSize = gsGetErrorStackSize(store);
    for ( i = 0; i < stackSize; i++ ){
        errorCode = gsGetErrorCode(store, i);
        gsFormatErrorMessage(store, i, errMsgBuf1, sizeof(errMsgBuf1));
        gsFormatErrorLocation(store, i, errMsgBuf2, sizeof(errMsgBuf2));
        fprintf(stderr, "[%d] %s (%s)\n", errorCode, errMsgBuf1, errMsgBuf2);
    }

    // Releasing resources
    gsCloseGridStore(&store, GS_TRUE);
    return;

}
5.3 Execution of a sample program using JDBC
The following package needs to be installed to run the sample program using JDBC API.
- Application development library (NewSQL) package: griddb-xx-newsql
A sample program is in the following directory.
/usr/griddb-ae-newsql-X.X.X/sample/ja/jdbc/
*: X.X.X indicates the GridDB version.
Specify the following libraries in the environment variable CLASSPATH to compile and execute the sample program.
/usr/share/java/gridstore-jdbc.jar
[Example]
Compile and run the program.
$ export CLASSPATH=${CLASSPATH}:/usr/share/java/gridstore-jdbc.jar:.
$ javac JDBCSelect.java
$ java JDBCSelect
Sample program "JDBCSelect.java" is a program to execute the following processing.
- Connecting to a cluster
- Creating a container
- Registering a row
- Executing an SQL search
import java.net.URLEncoder;
import java.sql.Connection;
import java.sql.DriverManager;
import java.sql.ResultSet;
import java.sql.Statement;
import java.util.Properties;

public class JDBCSelect {

    public static void main(String[] args){
        try {
            //===============================================
            // Connecting to a cluster
            //===============================================
            // Connection information of JDBC
            String jdbcAddress = "239.0.0.1";
            String jdbcPort = "41999";
            String clusterName = "myCluster";
            String databaseName = "public";
            String username = "admin";
            String password = "admin";
            String applicationName = "SampleJDBC";

            // Encoding a cluster name and a database name
            String encodeClusterName = URLEncoder.encode(clusterName, "UTF-8");
            String encodeDatabaseName = URLEncoder.encode(databaseName, "UTF-8");

            // Creating a URL (Multicast method)
            String jdbcUrl = "jdbc:gs://"+jdbcAddress+":"+jdbcPort+"/"+encodeClusterName+"/"+encodeDatabaseName;

            Properties prop = new Properties();
            prop.setProperty("user", username);
            prop.setProperty("password", password);
            prop.setProperty("applicationName", applicationName);

            // Connecting
            Connection con = DriverManager.getConnection(jdbcUrl, prop);

            //===============================================
            // Creating a container and registering data
            //===============================================
            {
                Statement stmt = con.createStatement();

                // (Delete the container if it already exists)
                stmt.executeUpdate("DROP TABLE IF EXISTS SampleJDBC_Select");

                // Creating a container
                stmt.executeUpdate("CREATE TABLE IF NOT EXISTS SampleJDBC_Select ( id integer PRIMARY KEY, value string )");
                System.out.println("SQL Create Table name=SampleJDBC_Select");

                // Registering a row
                int ret1 = stmt.executeUpdate("INSERT INTO SampleJDBC_Select values "+
                                            "(0, 'test0'),(1, 'test1'),(2, 'test2'),(3, 'test3'),(4, 'test4')");
                System.out.println("SQL Insert count=" + ret1);

                stmt.close();
            }

            //===============================================
            // Executing a search
            //===============================================
            // (1) Creating a statement
            Statement stmt = con.createStatement();

            // (2) Executing a SQL command
            ResultSet rs = stmt.executeQuery("SELECT * from SampleJDBC_Select where ID > 2");

            // (3) Getting a result
            while( rs.next() ){
                int id = rs.getInt(1);
                String value = rs.getString(2);
                System.out.println("SQL row(id=" + id + ", value=" + value + ")");
            }

            //===============================================
            // Terminating process
            //===============================================
            stmt.close();
            con.close();
            System.out.println("success!");

        } catch ( Exception e ){
            e.printStackTrace();
        }
    }
}
6 Uninstallation of GridDB
Uninstall all packages if GridDB is no longer required. Get root authority and follow the procedure below to uninstall the packages.
[Example]
# rpm -e griddb-xx-server
# rpm -e griddb-xx-client
# rpm -e griddb-xx-java_lib
# rpm -e griddb-xx-c_lib
# rpm -e griddb-xx-newsql (AE only)
*: xx is the GridDB edition (se, ae)
[Notes]
- Files such as definition files and data files etc. that are stored under the GridDB home directory will not be uninstalled. Manually delete them if they are no longer required.