User Guide for GridDB Dockerfile sample
Revision: 3960
1 Overview
1.1 Purpose of this document
This document explains how to use the GridDB Dockerfile sample.
1.2 Precautions
Make sure you can connect to the Internet. If you are behind a proxy, uncomment the proxy settings in the Dockerfiles.
2 GridDB Dockerfile sample
2.1 Overview
You can use GridDB Dockerfile sample to create GridDB server image and GridDB client image.
You can run GridDB server and GridDB client on docker hosts.
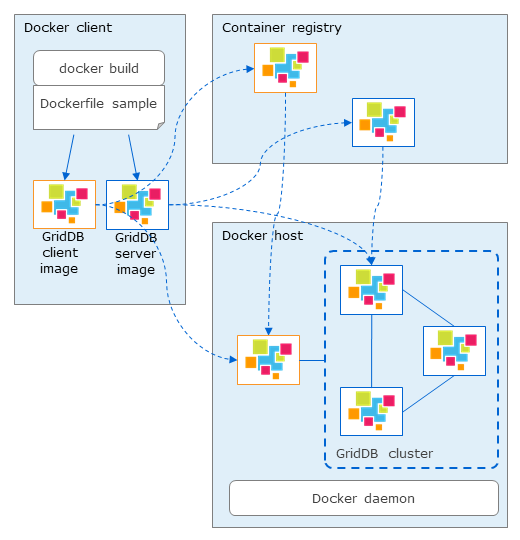
2.2 Architecture
GridDB Dockerfile sample includes two types of Dockerfile:
Dockerfile for GridDB server
Used to build GridDB server image
Dockerfile for GridDB client
Used to build GridDB client image which can run operation tools, NewSQL interface, Java library, and WebAPI
After building GridDB server and client image successfully, you can run these images to compose a GridDB cluster or you can push them in a container registry then you are able to pull them from other machines.
2.3 Component of GridDB Dockerfile sample
- Docker_server/: GridDB server directory
- rpm/: GridDB installer directory
- Dockerfile_server
- docker-entrypoint_server.sh
- Docker_client/: GridDB client directory
- 3rd/: external software directory
- rpm/: GridDB installer directory
- Dockerfile_client
- docker-entrypoint_client.sh
- Provider/:
- Provider
- provider.json
- sample/:
- JDBCClient.java
- SingleNodeClient.java
- MultiNodesClient.java
- docker-compose.yml: config file for docker-compose
- .env: environment variables for docker-compose
2.4 Supported environment condition
GridDB Dockerfile sample has been confirmed to work in the following environments:
On-premises:
- Host OS: RHEL/CentOS 7.6
- Docker: Docker CE 19.03 (with docker-compose)
Microsoft Azure:
- Azure VM (Centos 7.5)
- Azure Container Instance (ACI)
- Azure Container Registry (ACR)
3 How to use GridDB Dockerfile sample on-premises
3.1 Build image
3.1.1 Build GridDB server image
Copy the following files to Docker_server\rpm directory:
$ ls rpm
griddb-client-4.2.0-linux.x86_64.rpm
griddb-server-4.2.0-linux.x86_64.rpm
Execute the following command in the Docker_server directory to build GridDB server image:
$ docker build -t griddb/griddb-server:4.2 -f Dockerfile_server .
3.1.2 Build GridDB client image
Copy the following files to Docker_client\rpm directory:
$ ls rpm
griddb-client-4.2.0-linux.x86_64.rpm
griddb-java_lib-4.2.0-linux.x86_64.rpm
griddb-webapi-4.2.0-linux.x86_64.rpm
griddb-newsql-4.2.0-linux.x86_64.rpm (GridDB AE only)
Copy the following files to Docker_client\3rd directory:
- Apache Tomcat 8 (apache-tomcat-8.X.XX.tar.gz)
- Java SE 8 (jdk-8uXXX-linux-x64.rpm)
Execute the following command in the Docker_client directory to build GridDB client image:
$ docker build -t griddb/griddb-client:4.2 -f Dockerfile_client .
3.2 Run GridDB image
3.2.1 Run GridDB server image
Use the following command to start GridDB server container built in the previous section:
$ docker run -d --name <docker_container_name> \
    -e GRIDDB_CLUSTERNAME=<cluster_name> \
    -e GRIDDB_NODE_NUM=<node_number> \
    -e NOTIFICATION_ADDRESS=<notification_address> \
    griddb/griddb-server:4.2
The following environment variables need to be specified when starting GridDB server container:
| Enviroment variable name | Description | Default value |
|---|---|---|
| GRIDDB_CLUSTERNAME | cluster name | myCluster |
| GRIDDB_NODE_NUM | number of nodes of the cluster | 1 |
| NOTIFICATION_ADDRESS | multicast address (MULTICAST mode) | (*1) |
| NOTIFICATION_MEMBER | list of IP addresses of nodes, separated by comma (FIXED_LIST mode) | (*1) |
| NOTIFICATION_PROVIDER | provider url (PROVIDER mode) | (*1) |
| SERVICE_ADDRESS | ip address of a node | - |
(*1) only specify one of them
3.2.2 Run GridDB client image
Use the following command to start GridDB client container built in the previous section:
$ docker run -d --name <docker_container_name> \
    -e GRIDDB_NODE=<node_ip> \
    -e GRIDDB_PORT=<node_operation_port> \
    griddb/griddb-client:4.2
The following environment variables need to be specified when starting GridDB client container:
| Enviroment variable name | Description | Default value |
|---|---|---|
| GRIDDB_NODE | IP address of a node (any node) | -(required) |
| GRIDDB_PORT | port of a node | -(required) |
3.3 Compose a GridDB cluster (on the same Docker host)
3.3.1 Single node
Start GridDB cluster
Start a GridDB server container and build a cluster with a single node configuration.
Run the following command. The container name is griddb:
$ docker run -d --name griddb \
    -e GRIDDB_CLUSTERNAME=<cluster_name> \
    -e GRIDDB_NODE_NUM=1 \
    -e NOTIFICATION_ADDRESS=<notification_address> \
    griddb/griddb-server:4.2
Use --mount option persisting data GridDB home directory as a docker volume:
$ docker run -d --name griddb \
    -e GRIDDB_CLUSTERNAME=<cluster_name> \
    -e GRIDDB_NODE_NUM=1 \
    -e NOTIFICATION_ADDRESS=<notification_address> \
    --mount source=<volume_name>,target=/var/lib/gridstore/ \
    griddb/griddb-server:4.2
Connect from GridDB client
Connect with NoSQL API:
$ cd sample
$ javac -cp /usr/share/java/gridstore.jar SingleNodeClient.java
$ java -cp .:/usr/share/java/gridstore.jar SingleNodeClient <IP Address> 10001 myCluster
Connect with JDBC:
$ cd sample
$ javac JDBCClient.java
$ java -cp .:/usr/share/java/gridstore-jdbc.jar JDBCClient <IP Address> 20001 myCluster
Connect from GridDB client container
Specify a running GridDB server by --link option and start the GridDB client container.
$ docker run -d --name griddb-client \
    --link <container_name>:griddb \
    griddb/griddb-client:4.2
3.3.2 Multiple nodes
The following steps will start and compose a three-node GridDB cluster and GridDB home directory of each node is persisted. The client container will also run on the same docker host.
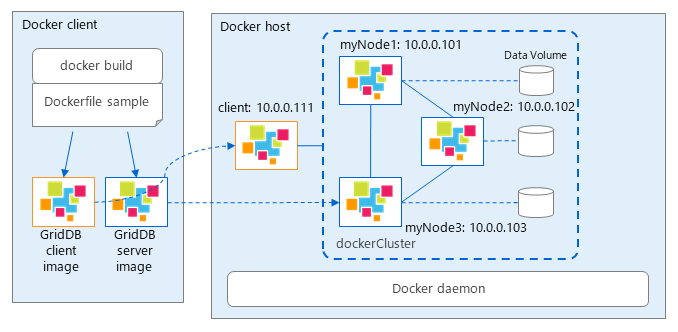
By using docker-compose.yml file, you can start multiple containers including client at once:
version: '3'
services:
    griddb1:
        container_name: myNode1
        image: griddb-server:4.2
        build:
            context: ./Docker_server
            dockerfile: Dockerfile_server
        env_file: .env
        networks:
            griddb_net:
                ipv4_address: ${IPADDR_NODE1}
        volumes:
            - "node1:/var/lib/gridstore/"
    griddb2:
        container_name: myNode2
        image: griddb-server:4.2
        env_file: .env
        networks:
            griddb_net:
                ipv4_address: ${IPADDR_NODE2}
        volumes:
            - "node2:/var/lib/gridstore/"
    griddb3:
        container_name: myNode3
        image: griddb-server:4.2
        env_file: .env
        networks:
            griddb_net:
                ipv4_address: ${IPADDR_NODE3}
        volumes:
            - "node3:/var/lib/gridstore/"
    client:
        container_name: client
        image: griddb-client:4.2
        build:
            context: ./Docker_client
            dockerfile: Dockerfile_client
        env_file: .env
        networks:
            griddb_net:
                ipv4_address: ${IPADDR_CLIENT}
        volumes:
            - "client:/var/lib/gridstore/log"
        depends_on:
            - "griddb1"
            - "griddb2"
            - "griddb3"
        ports:
            - 8080:8080
            - 8081:8081

volumes:
    node1:
    node2:
    node3:
    client:

networks:
    griddb_net:
        driver: bridge
        ipam:
            config:
                - subnet: ${SUBNET}
Define environment variable corresponding to the GridDB cluster connection method (FIXED_LIST, MULTICAST, PROVIDER).
The environment variables for starting container in section 3.2 and for above docker-compose are described in .env file:
| Environment variable | Description | Example |
|---|---|---|
| GRIDDB_NODE_NUM | number of nodes of the cluster | 3 |
| GRIDDB_CLUSTERNAME | cluster name | dockerCluster |
| NOTIFICATION_ADDRESS | multicast address (MULTICAST mode) | 239.0.0.1 |
| NOTIFICATION_MEMBER | list of IP addresses of nodes, separated by comma (FIXED_LIST mode) | 172.18.0.2,172.18.0.3,172.18.0.4 |
| NOTIFICATION_PROVIDER | provider url (PROVIDER mode) | http://providerhost/provider.json |
| GRIDDB_NODE | IP address of a node (any node) | 172.18.0.2 |
| GRIDDB_PORT | port of a node | 10040 |
| IPADDR_NODE1 | IP address of myNode1 | 172.18.0.2 |
| IPADDR_NODE2 | IP address of myNode2 | 172.18.0.3 |
| IPADDR_NODE3 | IP address of myNode3 | 172.18.0.4 |
| IPADDR_CLIENT | IP address of client | 172.18.0.5 |
| SUBNET | subnetwork of the cluster | 172.18.0.0/24 |
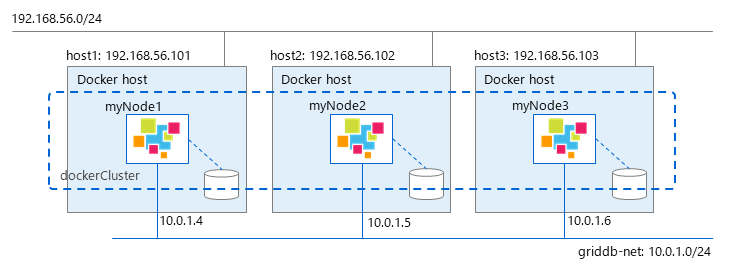
3.4 Compose a GridDB cluster (multiple Docker hosts)
Starting multiple containers on the same docker host in previous section does not provide the full benefit of clustering in the following respects:
- Ensure availability through node redundancy
- High-speed processing by parallel use of independent resources
Building a GridDB cluster on multiple docker hosts offers these benefits.
3.4.1 MULTICAST method
When building cluster in MULTICAST mode, the network of container must be host mode
The following commands will build a three-node GridDB cluster on 3 docker hosts in MULTICAST method

On host1:
$ docker run --net=host \
    -e GRIDDB_NODE_NUM=3 \
    -e GRIDDB_CLUSTERNAME=dockerCluster \
    -e NOTIFICATION_ADDRESS=239.0.0.2 \
    -e SERVICE_ADDRESS=192.168.56.101 \
    --name myNode1 griddb/griddb-server:4.2
On host2:
$ docker run --net=host \
    -e GRIDDB_NODE_NUM=3 \
    -e GRIDDB_CLUSTERNAME=dockerCluster \
    -e NOTIFICATION_ADDRESS=239.0.0.2 \
    -e SERVICE_ADDRESS=192.168.56.102 \
    --name myNode2 griddb/griddb-server:4.2
On host3:
$ docker run --net=host \
    -e GRIDDB_NODE_NUM=3 \
    -e GRIDDB_CLUSTERNAME=dockerCluster \
    -e NOTIFICATION_ADDRESS=239.0.0.2 \
    -e SERVICE_ADDRESS=192.168.56.103 \
    --name myNode3 griddb/griddb-server:4.2
3.4.2 FIXED_LIST method
In FIXED_LIST method, you can use either macvlan or overlay network for containers.
With macvlan network, each container uses the same subnet with docker host, so it is no need to expose ports.
With overlay network, it is necessary to expose 3 ports: 10001, 20001 (when using NewSQL) and 10040.
The following commands will build a three-node GridDB cluster on 3 docker hosts in FIXED_LIST method using overlay network
Using docker in swarm mode to create an overlay network
On host1:
$ docker swarm init --advertise-addr=192.168.56.101This command will return the token for other nodes to join the swarm
On host2:
$ docker swarm join --token <TOKEN> \
    --advertise-addr 192.168.56.102 192.168.56.101:2377
On host3:
$ docker swarm join --token <TOKEN> \
    --advertise-addr 192.168.56.103 192.168.56.101:2377
Create an overlay network (griddb-net)
$ docker network create -d overlay \
    --subnet 10.0.1.0/24 --attachable griddb-net
Start GridDB server containers:
On host1:
$ docker run \
    -e GRIDDB_NODE_NUM=3 \
    -e GRIDDB_CLUSTERNAME=dockerCluster \
    -e NOTIFICATION_MEMBER=10.0.1.4,10.0.1.5,10.0.1.6 \
    -p 10001:10001 -p 10040:10040 -p 20001:20001 \
    --network griddb-net --ip 10.0.1.4 \
    --name myNode1 griddb/griddb-server:4.2
On host2:
$ docker run -e GRIDDB_NODE_NUM=3 \
    -e GRIDDB_NODE_NUM=3 \
    -e GRIDDB_CLUSTERNAME=dockerCluster \
    -e NOTIFICATION_MEMBER=10.0.1.4,10.0.1.5,10.0.1.6 \
    -p 10001:10001 -p 10040:10040 -p 20001:20001 \
    --network griddb-net --ip 10.0.1.5 \
    --name myNode2 griddb/griddb-server:4.2
On host3:
$ docker run -e GRIDDB_NODE_NUM=3 \
    -e GRIDDB_NODE_NUM=3 \
    -e GRIDDB_CLUSTERNAME=dockerCluster \
    -e NOTIFICATION_MEMBER=10.0.1.4,10.0.1.5,10.0.1.6 \
    -p 10001:10001 -p 10040:10040 -p 20001:20001 \
    --network griddb-net --ip 10.0.1.6 \
    --name myNode3 griddb/griddb-server:4.2
Modify 2 files:
gs_node.jsonandgs_cluster.jsonin each container:gs_node.jsonof myNode1:Modify
/transaction/serviceAddressand/sql/serviceAddressto "192.168.56.101"gs_node.jsonof myNode2:Modify
/transaction/serviceAddressand/sql/serviceAddressto "192.168.56.102"gs_node.jsonof myNode3:Modify
/transaction/serviceAddressand/sql/serviceAddressto "192.168.56.103"gs_cluster.jsonof 3 nodes:
{
  ...
  "cluster": {
    ...
    "notificationMember": [
      {
        "cluster": {"address": "10.0.1.4","port": 10010},
        "sync": {"address": "10.0.1.4","port": 10020},
        "system": {"address": "10.0.1.4","port": 10040},
        "transaction": {"address": "192.168.56.101","port": 10001},
        "sql": {"address": "192.168.56.101","port": 20001}
      },
      {
        "cluster": {"address": "10.0.1.5","port": 10010},
        "sync": {"address": "10.0.1.5","port": 10020},
        "system": {"address": "10.0.1.5","port": 10040},
        "transaction": {"address": "192.168.56.102","port": 10001},
        "sql": {"address": "192.168.56.102","port": 20001}
      },
      {
        "cluster": {"address": "10.0.1.6","port": 10010},
        "sync": {"address": "10.0.1.6","port": 10020},
        "system": {"address": "10.0.1.6","port": 10040},
        "transaction": {"address": "192.168.56.103","port": 10001},
        "sql": {"address": "192.168.56.103","port": 20001}
      }
    ]
    ...
  }
  ...
}
3.4.3 PROVIDER method
PROVIDER method is the same as FIXED_LIST method
On docker host with overlay network, 3 ports: 10001, 20001 (when using NewSQL) and 10040 must be exposed.
The following commands will build a three-node GridDB cluster on 3 docker hosts in PROVIDER method using overlay network
Assume that the provider host is http : //192.168.56.104/provider.json and provides the following host information:
$ curl http://192.168.56.104/provider.json
[
  {
    "cluster": {"address": "10.0.1.4","port": 10010},
    "sync": {"address": "10.0.1.4","port": 10020},
    "system": {"address": "10.0.1.4","port": 10040},
    "transaction": {"address": "192.168.56.101","port": 10001},
    "sql": {"address": "192.168.56.101","port": 20001}
  },
  {
    "cluster": {"address": "10.0.1.5","port": 10010},
    "sync": {"address": "10.0.1.5","port": 10020},
    "system": {"address": "10.0.1.5","port": 10040},
    "transaction": {"address": "192.168.56.102","port": 10001},
    "sql": {"address": "192.168.56.102","port": 20001}
  },
  {
    "cluster": {"address": "10.0.1.6","port": 10010},
    "sync": {"address": "10.0.1.6","port": 10020},
    "system": {"address": "10.0.1.6","port": 10040},
    "transaction": {"address": "192.168.56.103","port": 10001},
    "sql": {"address": "192.168.56.103","port": 20001}
  }
]
Using docker in swarm mode to create an overlay network
On host1:
$ docker swarm init --advertise-addr=192.168.56.101This command will return the token for other nodes to join the swarm.
On host2:
$ docker swarm join --token <TOKEN> \
    --advertise-addr 192.168.56.102 192.168.56.101:2377
On host3:
$ docker swarm join --token <TOKEN> \
    --advertise-addr 192.168.56.103 192.168.56.101:2377
Create an overlay network (griddb-net)
$ docker network create -d overlay \
    --subnet 10.0.1.0/24 --attachable griddb-net
Start GridDB server containers:
On host1:
$ docker run -e GRIDDB_NODE_NUM=3 \
    -e GRIDDB_CLUSTERNAME=dockerCluster \
    -e NOTIFICATION_PROVIDER=http://192.168.56.104/provider.json \
    -p 10001:10001 -p 10040:10040 -p 20001:20001 \
    --network griddb-net --ip 10.0.1.4 \
    --name myNode1 griddb/griddb-server:4.2
On host2:
$ docker run -e GRIDDB_NODE_NUM=3 \
    -e GRIDDB_CLUSTERNAME=dockerCluster \
    -e NOTIFICATION_PROVIDER=http://192.168.56.104/provider.json \
    -p 10001:10001 -p 10040:10040 -p 20001:20001 \
    --network griddb-net --ip 10.0.1.5 \
    --name myNode2 griddb/griddb-server:4.2
On host3:
$ docker run -e GRIDDB_NODE_NUM=3 \
    -e GRIDDB_CLUSTERNAME=dockerCluster \
    -e NOTIFICATION_PROVIDER=http://192.168.56.104/provider.json \
    -p 10001:10001 -p 10040:10040 -p 20001:20001 \
    --network griddb-net --ip 10.0.1.6 \
    --name myNode3 griddb/griddb-server:4.2
Modify file
gs_node.jsonin each container, (gs_cluster.jsonis not necessaty)gs_node.jsonof myNode1:Modify
/transaction/serviceAddressand/sql/serviceAddressto "192.168.56.101"gs_node.jsonof myNode2:Modify
/transaction/serviceAddressand/sql/serviceAddressto "192.168.56.102"gs_node.jsonof myNode3:Modify
/transaction/serviceAddressand/sql/serviceAddressand "192.168.56.103"
4 How to use GridDB Dockerfile sample on Microsoft Azure service
4.1 Using Azure Container Registry (ACR)
Azure Container Registry (ACR) is a service of Microsoft Azure that provides a private docker registry for managing container images.
The following steps describe how to push and pull a GridDB docker image to the ACR.
4.1.1 Preparation
Install the Azure CLI:
https://docs.microsoft.com/en-us/cli/azure/install-azure-cli?view=azure-cli-latestBuild GridDB docker image. (Refer to section 3.1)
4.1.2 (Reference) Create an ACR
Create a new resource group if necessary
$ az group create --name <resource-group-name> --location <resource-group-location>Create a new registry
$ az acr create --resource-group <resource-group-name> --name <container-registry-name> --sku Premium --admin-enabled trueGet credential of the container registry:
$ az acr credential show --name <container-registry-name>Restrict access to an ACR
This section describes how to set the ACR registry to allow access only from specific IP addresses and prohibit access from other IP addresses.
A similar procedure can be used to allow access only from a specific Azure virtual network.
Update the registry configuration to deny access by default:
$ az acr update --name <container-registry-name> --default-action DenyRemove service endpoint:
$ az network vnet subnet update \
    --name <subnet-name> \
    --vnet-name <virtual-network-name> \
    --resource-group <resource-group-name> \
    --service-endpoints ""
Remove network rule:
$ az acr network-rule remove --name <container-registry-name> --subnet <subnet-resource-id>Create a new network rule that allows access only from specific IPs
$ az acr network-rule add --name <container-registry-name> --ip-address <your-public-IP-address>
4.1.3 Push image to ACR
Create a tag for the local image in the registry
$ az acr login --name <registry-path>

$ docker tag <image-name> <registry-path>/<image-name-in-registry>
Push image to the registry
$ docker push <registry-path>/<image-name-in-registry>
4.1.4 Pull image from the registry
Pull an image from the registry
$ az acr login --name <registry-path>

$ docker pull <registry-path>/<image-name-in-registry>
4.2 Start a GridDB cluster on ACI
Azure Container Instance (ACI) is a service of Microsoft Azure that provides Docker container execution environment.
The following steps describe how to operate a GridDB container with Azure Container Instance (ACI).
On ACI, only PROVIDER method of the GridDB cluster is confirmed.
The following figure shows the system configuration of GridDB docker on Azure.
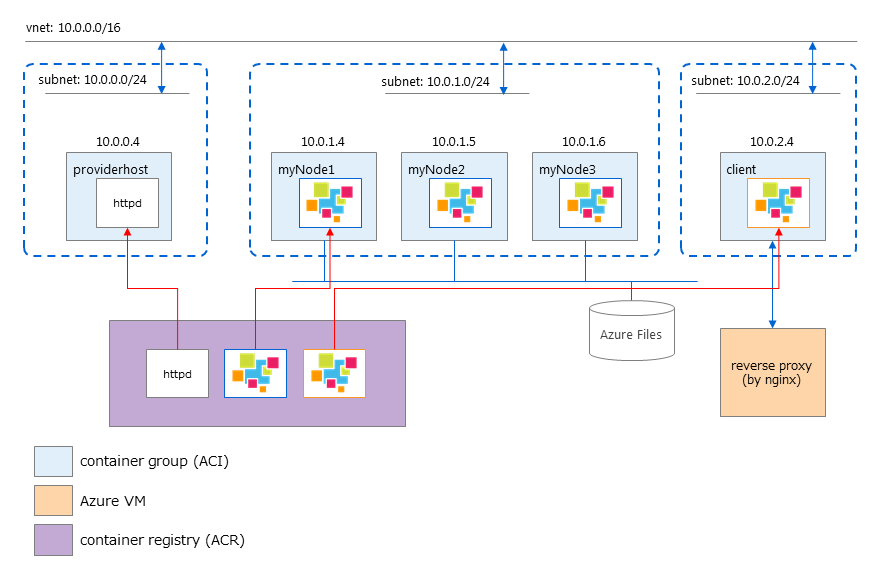
A GridDB cluster consists of 3 nodes, each node belongs to a separated container group.
In order to configure a GridDB cluster in PROVIDER mode, a container for the provider host is required. In this document, httpd is used.
In addition, using a VM for reverse proxy (by nginx) to publish GridDB WebAPI and integrated operation management GUI (gs_admin) to outside the private network.
4.2.1 Preparation
Install the Azure CLI
https://docs.microsoft.com/en-us/cli/azure/install-azure-cli?view=azure-cli-latestBuild GridDB docker image. (Refer to section 3.1)
Build docker image for provider host
$ docker build -t providerhost:1.0 -f Provider .Push image to ACR. (Refer to section 4.1)
4.2.2 Create the necessary resources
Login to Azure CLI
$ az loginIf you are connected to the Internet behind a proxy, export the following environment variables:
$ export http_proxy=http://<user name>:<password>@<proxy address>:<proxy port>

$ export https_proxy=http://<user name>:<password>@<proxy address>:<proxy port>
Create a new resource group if necessary
$ az group create --name <resource-group-name> --location <location>Create a new storage account (if necessary) to use Azure Files
$ az storage account create --name <storage_account_name> --resource-group <resource-group-name>

$ az storage share create --name node1 --account-name <storage_account_name>

$ az storage share create --name node2 --account-name <storage_account_name>

$ az storage share create --name node3 --account-name <storage_account_name>
Get the storage account key
$ az storage account keys list --resource-group <resource-group-name> \
    --account-name <storage_account_name> --query "[0].value" --output tsv
Create an Azure virtual network:
$ az network vnet create --resource-group <resource-group-name> \
    --name <vnet-name> --address-prefix 10.0.0.0/16
Login to the ACR (where the GridDB images are pushed to)
$ docker login <registry-path>Start the provider host
Create a subnet (10.0.0.0/24) for the provider host.
$ az network vnet subnet create --resource-group <resource-group-name> \
    --vnet-name <vnet-name> --name providerhost --address-prefix 10.0.0.0/24
Start the provider host container
$ az container create --name providerhost --resource-group <resource-group-name> \
    --image <registry-path>/providerhost:1.0 \
    --registry-username <registry-name> --registry-password <registry-password> \
    --vnet <vnet-name> --subnet providerhost --port 80
4.2.3 Start GridDB cluster
Create a subnet (10.0.1.0/24) for the GridDB server containers
$ az network vnet subnet create --resource-group <resource-group-name> \
    --vnet-name <vnet-name> --name servernodes --address-prefix 10.0.1.0/24
Start 3 GridDB server containers
$ az container create --name myNode1 \
    --image <registry-name-on-azurecr.io>/griddb-server:4.2 \
    --registry-username <registry-name> --registry-password <registry-password> \
    --resource-group <resource-group-name> \
    --vnet <vnet-name> --subnet servernodes \
    --ports 10001 10010 10020 10040 20001 \
    --environment-variables 'GRIDDB_CLUSTERNAME'='<cluster-name>' 'GRIDDB_NODE_NUM'='3' 'NOTIFICATION_PROVIDER'='http://10.0.0.4/provider.json' \
    --azure-file-volume-account-name <gridDB_storage_account> \
    --azure-file-volume-account-key  <volume-account-key> \
    --azure-file-volume-share-name myNode1 \
    --azure-file-volume-mount-path /var/lib/gridstore/data

$ az container create --name myNode2 \
    --image <registry-name-on-azurecr.io>/griddb-server:4.2 \
    --registry-username <registry-name> --registry-password <registry-password> \
    --resource-group <resource-group-name> \
    --vnet <vnet-name> --subnet servernodes \
    --ports 10001 10010 10020 10040 20001 \
    --environment-variables 'GRIDDB_CLUSTERNAME'='<cluster-name>' 'GRIDDB_NODE_NUM'='3' 'NOTIFICATION_PROVIDER'='http://10.0.0.4/provider.json' \
    --azure-file-volume-account-name <gridDB_storage_account> \
    --azure-file-volume-account-key  <volume-account-key> \
    --azure-file-volume-share-name myNode2 \
    --azure-file-volume-mount-path /var/lib/gridstore/data

$ az container create --name myNode3 \
    --image <registry-name-on-azurecr.io>/griddb-server:4.2 \
    --registry-username <registry-name> --registry-password <registry-password> \
    --resource-group <resource-group-name> \
    --vnet <vnet-name> --subnet servernodes \
    --ports 10001 10010 10020 10040 20001 \
    --environment-variables 'GRIDDB_CLUSTERNAME'='<cluster-name>' 'GRIDDB_NODE_NUM'='3' 'NOTIFICATION_PROVIDER'='http://10.0.0.4/provider.json' \
    --azure-file-volume-account-name <gridDB_storage_account> \
    --azure-file-volume-account-key  <volume-account-key> \
    --azure-file-volume-share-name myNode3 \
    --azure-file-volume-mount-path /var/lib/gridstore/data
4.2.4 Start GridDB client
Create a subnet (10.0.2.0/24) for the client container.
$ az network vnet subnet create --resource-group <resource-group-name> \
    --vnet-name <vnet-name> --name client --address-prefix 10.0.2.0/24
Start the client container
$ az container create --name client \
    --image <registry-name-on-azurecr.io>/griddb-client:4.2 \
    --registry-username <registry-name> --registry-password <registry-password> \
    --resource-group <resource-group-name> \
    --vnet <vnet-name> --subnet client \
    --ports 8080 8081 \
    --environment-variables 'GRIDDB_NODE'='10.0.1.4' 'GRIDDB_PORT'='10040'
To login to the container, execute the following command
$ az container exec --resource-group <resource-group-name> --name <container-name> --exec-command "/bin/bash"To access GridDB operation tools (gs_admin, WebAPI), follow below procedure:
Create an Azure VM (Centos)
Assign the VM to any subnet of the vnet 10.0.0.0/16
Assign the VM a public IP
Install nginx on the VM and create a reverse proxy server
Install nginx
https://docs.nginx.com/nginx/admin-guide/installing-nginx/installing-nginx-open-source/Add file configuration griddb.conf under /etc/nginx/conf.d/:
server {
    listen 80;
    server_name <dns-server-name-of-virtual-machine>;
    location /gs_admin {
        proxy_pass http://10.1.2.4:8080/gs_admin;
    }
    location /webapi {
        proxy_pass http://10.1.2.4:8081/;
    }
}
Reload nginx
sudo systemctl reload nginx
Access gs_admin
<dns-server-name-of-virtual-machine>/gs_adminBase URL of WebAPI
<dns-server-name-of-virtual-machine>/webapi
4.3 Start GridDB cluster on Azure VM
You can also build a GridDB cluster with Docker CE installed on Azure VM without using ACI
The following procedure describes how to operate the GridDB container with Docker CE on Azure VM.
4.3.1 Preparation
Install the Azure CLI
https://docs.microsoft.com/en-us/cli/azure/install-azure-cli?view=azure-cli-latestBuild GridDB docker image. (Refer to section 3.1)
Push image to ACR. (Refer to section 4.1)
4.3.2 Create the necessary resources
Create a new resource group if necessary
$ az group create --name <resource-group-name> --location <resource-group-location>Create an Azure virtual network
$ az network vnet create --resource-group <resource-group-name> \
    --name <virtual_network_name> --address-prefix 10.0.0.0/16
$ az network vnet subnet create --resource-group <resource-group-name> \
    --vnet-name <virtual_network_name> --name <subnet_name> --address-prefix 10.0.0.0/24
Create Azure VM (3 servers, 1 client)
$ az vm create --resource-group <resource-group-name> \
    --name machine1 --public-ip-address-dns-name <machine1-public-dns-name> \
    --image CentOS --admin-username <user-name> --admin-password <password> \
    --vnet-name <virtual_network_name> --subnet <subnet_name> --private-ip-address 10.0.0.4
$ az vm create --resource-group <resource-group-name> \
    --name machine2 --public-ip-address-dns-name <machine2-public-dns-name> \
    --image CentOS --admin-username <user-name> --admin-password <password> \
    --vnet-name <virtual_network_name> --subnet <subnet_name> --private-ip-address 10.0.0.5
$ az vm create --resource-group <resource-group-name> \
    --name machine3 --public-ip-address-dns-name <machine3-public-dns-name> \
    --image CentOS --admin-username <user-name> --admin-password <password> \
    --vnet-name <virtual_network_name> --subnet <subnet_name> --private-ip-address 10.0.0.6
$ az vm create --resource-group <resource-group-name> --name machineclient \
    --public-ip-address-dns-name <client-public-dns-name> \
    --image CentOS --admin-username <user-name> --admin-password <password> \
    --vnet-name <virtual_network_name> --subnet <subnet_name> --private-ip-address 10.0.0.7
Install Docker CE on the VM
4.3.3 Start GridDB cluster
Pull GridDB docker image from ACR to each VM
On machine1, machine2 and machine3:
$ docker login <registry-name-on-azurecr.io>
$ docker pull <registry-name-on-azurecr.io>/griddb-server:4.2
Start server container on each VM
On machine1:
$ docker run -d --name myNode1 \
    -e GRIDDB_CLUSTERNAME=dockerCluster \
    -e GRIDDB_NODE_NUM=3 \
    -e NOTIFICATION_MEMBER=10.0.0.4,10.0.0.5,10.0.0.6 \
    -e SERVICE_ADDRESS=10.0.0.4 \
    -p 10001:10001 -p 10010:10010 -p 10020:10020 -p 10040:10040 -p 20001:20001 \
    <registry-path>/griddb-server:4.2
On machine2:
$ docker run -d --name myNode2 \
    -e GRIDDB_CLUSTERNAME=dockerCluster \
    -e GRIDDB_NODE_NUM=3 \
    -e NOTIFICATION_MEMBER=10.0.0.4,10.0.0.5,10.0.0.6 \
    -e SERVICE_ADDRESS=10.0.0.5 \
    -p 10001:10001 -p 10010:10010 -p 10020:10020 -p 10040:10040 -p 20001:20001 \
    <registry-path>/griddb-server:4.2
On machine3:
$ docker run -d --name myNode3 \
    -e GRIDDB_CLUSTERNAME=dockerCluster \
    -e GRIDDB_NODE_NUM=3 \
    -e NOTIFICATION_MEMBER=10.0.0.4,10.0.0.5,10.0.0.6 \
    -e SERVICE_ADDRESS=10.0.0.6 \
    -p 10001:10001 -p 10010:10010 -p 10020:10020 -p 10040:10040 -p 20001:20001 \
    <registry-path>/griddb-server:4.2
4.3.4 Start GridDB client
Pull GridDB docker image from ACR
On machineclient:
$ docker login <registry-name-on-azurecr.io>
$ docker pull <registry-name-on-azurecr.io>/griddb-client:4.2
Start the client container
On machineclient:
$ docker run -d --name client \
  -e GRIDDB_NODE=10.0.0.4 \
  -e GRIDDB_PORT=10040 \
  -p 8080:8080 -p 8081:8081 \
  <registry-name-on-azurecr.io>/griddb-client:4.2
5 Operations
5.1 Start a shell in a container
$ docker exec -it <node_name> bash
5.2 Check GridDB cluster status
$ docker exec -it <node_name> bash
$ su - gsadm
$ gs_stat -u admin/admin
5.3 Access to GridDB cluster
5.3.1 Access GridDB cluster in MULTICAST mode from docker host
Set a multicast route from the host network to the container's docker0 interface.
$ ip route add 239.0.0.1/32 dev docker0The client accesses the multicast route
$ cd sample
$ javac -cp /usr/share/java/gridstore.jar MultiNodesClient.java
$ java -cp .:/usr/share/java/gridstore.jar MultiNodesClient 239.0.0.1 31999 myCluster
5.3.2 Access from GridDB client outside Docker host
Keep the necessary ports exposed when starting the container
$ docker run -P -d --name griddb griddb/griddb-server:4.2or forward port:
$ docker run -p 40001:10001 -d --name griddb griddb/griddb-server:4.2You can check the exposed port with the following command
$ docker port griddbThe client accesses the exposed port
$ cd sample
$ javac -cp /usr/share/java/gridstore.jar SingleNodeClient.java
$ java -cp .:/usr/share/java/gridstore.jar SingleNodeClient <Docker Host IP Address> 40001 myCluster
6 Trademark
GridDB is a registered trademark of Toshiba Digital Solutions Corporation in Japan.
Docker is a registered trademark of Docker Inc. in the United States and other countries.
Microsoft and Azure are registered trademarks of Microsoft Corporation in the United States and other countries.